As I promised in a recent blog, we decided to get some Cressey Performance hats made up. These are of the Flex Fit variety, which means that they're ultra-comfortable and one size fits all (unless you have an absolutely GIANT head or are a petite female who will wear a fitted cap, in which case, you'll want to let us know).
Yesterday was a good day at the office for the "Cressey Performers" out there, so I thought I'd devote this "Stuff You Should Read" to the CP cause.
The day technically started off on Tuesday night, when Tim Collins made his Yankee Stadium debut, pitching brilliantly and ending up with a line of 2IP, 0H, 0BB, 0R, and 3K. You can actually watch the highlights HERE. What was even cooler for me, though, was watching Tim and Mitch Williams break down his delivery on MLB Tonight, a video you can watch HERE. There are some great messages for the young pitchers out there.
Wednesday continued with a call-up to the big leagues for CP athlete and Oakland A's prospect Trystan Magnuson. Trystan's an awesome guy and deserves all the success that comes his way; I'm really happy for him.
The day continued with three sparkling performance by CP high school athletes. Tyler Beede threw a perfect game, striking out 15 and going 2-3 at the plate along the way.
Adam Ravenelle, meanwhile, lost his own perfect game in the 6th inning - but still managed to throw a complete game shutout with 18K and 0BB. He also had two HR at the plate.
Third, Jordan Cote had two HR and 6RBI - and struck out 13 in a complete game shutout where he only allowed 2H and 0BB.
The strikeout numbers and home runs are great, but to be honest, it just absolutely fires me up to see these three guys throw 21 innings and allow ZERO walks. Commanding the strike zone - particularly with one's fastball - is everything for young pitchers and these guys did exactly that yesterday.
Lastly, I gave an interview to Nick Bromberg on the topic of using exclusively jumping rope for fitness, and it was featured on The Post Game on Yahoo Sports. Check it out.
Sign-up Today for our FREE Newsletter and receive a deadlift technique tutorial!
Single-leg work has been a pretty controversial topic lately.
Some folks say that it's the only safe way to train the lower body for the long haul and that bilateral exercise is the devil. Others insist that you can't possibly build size relying on unilateral lower body strength exercises and that they're a cop-out for those who don't want to squat and deadlift heavy in a strength and conditioning program.
What's my take?
Continue Reading...
Late last week, my buddy Nick Tumminello made the follow comment that some folks, unfortunately, took out of context:
“Everyone is talking about assessments (and that's cool). But, no one seems to talking about simply not allowing poor form in training. If you can't keep good form in a certain exercise (movement pattern), simply don't do that exercise until you've improved the movement or decided that you're simply not built for it to begin with. Not sure why things need be any more complicated than that!”
For the record, I agree 100% with Nick and understood what he meant, but it would have been easy to assume that he was referring to “trainers train, and therapists assess.” In other words, many folks assume that as long as you aren’t symptomatic in some way, then you’re safe to start exercising because you can simply “feel” things out as you go and, if something hurts, you don’t do it.
While you obviously shouldn’t do something if it hurts, just because something doesn’t hurt doesn’t mean that it’s not harmful long-term – and to me, that’s the difference between “working someone out” and provided them with an optimal training experience. As physical therapist Mike Reinold has said, “Assess; don’t assume.”
To illustrate my point, here are a few examples.
Let’s say you have someone with a chronically cranky acromioclavicular joint or osteolysis of the distal clavicle that might only be apparent upon reviewing a health history, palpating the area, or taking someone into full horizontal adduction at the shoulder. While direct over-pressure on the area (as in a front squat) would surely elicit symptoms, my experience is that most folks won’t notice a significant amount of pain until the next day if the strength exercise selection is inappropriate (e.g., dips, full range-of-motion bench pressing). You might have avoided what “hurt” during the session (presumably because the individual was warmed up), but you find out after the fact that you just set an individual back weeks in their recovery and fitness program.
How about right scapular winging? It’s not easily observed if a client has a shirt on, and if you simply throw that individual into a bootcamp with hundreds of push-ups each week, you’re bound to run into trouble. Here’s the thing, though: even if you observed that winging and wanted to address it in your training, you really have to consider that it can come from one or more of several factors: weak scapular stabilizers, a stiff posterior cuff, insufficient right thoracic rotation, faulty breathing patterns, or poor tissue quality of pec minor, rhomboids, levator scapulae (or any of a number of other muscles/tendons). Just doing some rows and YTWL circuits will not work.
Also at the shoulder, a baseball pitcher with crazy congenital and acquired shoulder external rotation may have a ton of anterior instability in the “cocking” position of throwing (90 degrees of abduction and external rotation), but be completely asymptomatic. Back squatting this athlete would exacerbate the problem over the long haul even if he didn’t notice any symptoms acutely.
Finally, in my recent article, Corrective Exercise: Why Stiffness Can Be a Good Thing, I spoke about how someone can have crazy short hip flexors and still manage a perfect squat pattern because his stiffness at adjacent joints is outstanding. If I don’t assess him in the first place and just assume that he squats well, I’m just waiting for him to strain a rectus femoris during sprinting or any of a number of other activities. Gross movement in a strength and conditioning program wouldn’t tell me anything about this individual, but targeted assessments would.
The point is that while Nick’s statement is absolutely true – demanding perfect form is corrective in itself – you’ve still got to assess to have a clear picture of where you’re starting. Otherwise, many cases like this will slip through the cracks.
To that end, I’m happy to announce that my long-time friend and colleague, Mike Robertson, recently released his Bulletproof Knees and Back Seminar DVD Set. This comprehensive product covers anatomy, assessments, program design, and coaching. In fact, almost the entire second day is focused on coaching, and that’s an area in which most trainers really do need to improve. All in all, this isn’t a collection of bits and pieces; it’s Mike’s entire philosophy on training someone who is suffering from knee or low back pain (and how to prevent it in the first place). Effectively, Mike covers what both Nick and I are getting at in the paragraphs you just read.
This is tremendously valuable information that fitness professionals need to hear, so be sure to check it out.
Sign-up Today for our FREE Newsletter and receive a deadlift technique tutorial!
I just received this feedback from a very happy customer and thought I'd share it with you:
Hi Eric,
I just completed Show and Go last week and tested my lifts yesterday. I thought you'd like to see the results.
Broad jump: 80" to 84"
Front box squat: 240 to 265
Bench press: 190 to 210
Trap bar deadlift: 310 to 340
Chin-up 3RM: 220.2 to 234.7
My body composition stayed pretty constant.
Show and Go followed Maximum Strength. Putting the two together, here are the results from the last 8 months (i.e., pre-Maximum Strength vs. post-Show & Go):
Broad jump: 77" to 84"
Front box squat: 155 to 265
Bench press: 150 to 210
Trap bar deadlift: 240 to 340
Chin-up 3RM: 197.8 to 234.7.
Not a bad way to spend eight months, especially at almost 43 years old and only 170 lbs. Thanks to you, I can, for the first time in my life, bench press more than my weight, front squat more than 1.5 times my weight, and deadlift almost twice my weight.
Thanks for producing these workout plans. I look forward to following the next program you release.
Best,
Scott Garland
As you can see, Show and Go makes for a great follow-up strength and conditioning program to Maximum Strength. If you haven't checked out both, I (like Scott) would encourage you to do so!
Maximum Strength: Get Your Strongest Body in 16 Weeks with the Ultimate Weight-Training ProgramShow and Go: High Performance Training to Look, Feel, and Move BetterSign-up Today for our FREE Newsletter and receive a deadlift technique tutorial!
Today marks the third and final installment of this series on which deadlift variation is right for you. Part 1 focused on the Conventional Deadlift, while Part 2 covered the Sumo Deadlift. Today, we'll talk about another fantastic option: the Trap (or Hex) Bar Deadlift.
At Cressey Performance, we use the trap bar for all our initial deadlift technique instruction with new clients, as it tends to be a very safe option for just about everyone.
Because the handles are to the sides (instead of in front) of the lifter, it doesn't take as much hip and ankle mobility to get down to the bar. Most trap bars also come with two handle settings - one of which is a little bit higher so that those with limited mobility can still get down to deadlift with a neutral spine. So, it saves you the time and annoyance of having to put the plates on top of some sort of riser to elevate the bar.
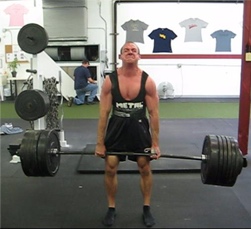
Additionally, because the lifter is positioned "inside" the bar, the load is horizontally closer to with his center of gravity (COG), whereas the resistance is usually more anterior to that COG on a conventional or sumo deadlift. Note the white line in this photo that depicts the position of the load relative to the hip - and imagine how it would be a few inches further to the left in a conventional or sumo deadlift.
As a result, there is less shear stress on the spine and presumably more compressive stress. Our spines generally handle compression much better than shear, so this simple repositioning of the resistance closer to the axis of rotation (hips) can dramatically improve "comfort" during deadlifts in those with a history of back pain (or those who are looking to avoid it). You'll often see lifters who try to go right back to conventional deadlifting after lower back pain and wind up with recurring symptoms. They'd be much better of transitioning with some trap bar deadlifts to "test the waters."
The only problems I see with trap bar deadlifts are pretty subtle ones - and both have to do with the fact that the bar really never comes in contact with the legs on the way up or down. As a result, there is a tendency is novice lifters to try to squat the weight up and down - and this is not what should be taking place; it's a deadlift - which means "hips forward, hips back." This first common problem can be quickly corrected by simply teaching the movement correctly with a good hip hinge.
The second concern would be those in significant posterior pelvic tilt who have lost the lordotic curve of the lumbar spine. When one gets to lockout on a conventional or sumo deadlift, we cue them to activate the glutes and "hump the bar" to complete the movement. In those with posterior pelvic tilt, that same movement to finish hip extension without the presence of a bar to stop them will often lead to them going into full posterior pelvic tilt and lumbar flexion under load in the upright position. In other words, the hips come through too far. This is another problem that can be easily fixed with cueing on when the hip extension should end, and what the upright position should look and feel like.
A lot of those reading this piece may not have access to a trap bar for performing this strength exercise, but to be honest, I can say without wavering that for most people, it's well worth purchasing. You can pick one up HERE through Perform Better for just $144.95 plus shipping. And, this bar is actually surprising versatile addition to a strength and conditioning program relative to what people think; you can do deadlifts with it, but also farmer's walks, overhead presses, and (if it's your thing) shrugs.
To see how all the deadlift variations fit into a comprehensive strength and conditioning program, check out The High Performance Handbook.
Sign-up Today for our FREE Newsletter and receive a deadlift technique tutorial!
In the first installment of this series, I talked about the conventional deadlift and how it's the most advanced progression in the "deadlift spectrum" for most folks. Today, our focus will be another great strength exercise: the sumo deadlift.
I like the sumo deadlift quite a bit for those who aren't quite mobile enough to get all the way down to the bar for conventional deadlifts from the floor. It's also grown in popularity among powerlifters over the years because it shortens the distance the bar has to travel and also (as a general rule of thumb) allows lifters to get more out of their deadlift (or squat) suits when pulling. I find that it's particularly common among the guys who are built to squat and bench press because of shorter arms and legs but longer torsos because they don't have to get down so low (via hip flexion and dorsiflexion) to grasp the bar.
By bringing the feet a bit wider (abducting the hips) and turning the toes out a bit (externally rotating the hips), a lot of folks can get to "depth" much easier and ensure that they can pull with a neutral spine. This is probably one reason why those with more retroverted hips inevitably resort to sumo deadlifts after failing miserably with trying to pull conventional-style; they're just more comfortable with the hips externally rotated a bit. So, if you're someone who always walks with the toes pointed out, there's a good chance that sumo deadlifts are going to be safer for you than conventional pulling.
That said, when discussing sumo deadlifts, I have just two concerns.
First, I think that they need to be cycled in and out of one's strength and conditioning program relatively frequently, especially if you use an ultra-wide stance. Deadlifting sumo-style for more than eight weeks straight is a recipe for hip irritation - especially if you're someone who is doing a fair amount of squatting in the same strength training programs. It's one reason why I prefer a more "moderate" stance width for sumo deadlifts.
Second, the biggest sumo deadlift technique mistake I see is lifters trying to squat the weight up and down. When the hips start too low - and then the hips and knees extend at the same rate - the knees aren't extended enough when the bar gets to them. The only way that the bar can continue its upward path is to either go around the shins (which is accomplished by rounding the back to move the bar away from the body) or get dragged along the shins. If your back hurts or you have blood all over the bar and scabs on your shins, you're probably doing something wrong.
If conventional-style is the most advanced variation of the deadlift out there, sumo deadlifts are likely the first "regression" down, as they allow you to perform the exercise with less hip and ankle mobility, and they also ensure that the bar is starting a bit closer to the primary axis of rotation (the hips), as the femur is flexed and abducted and not just flexed.
Our next installment - the trap bar deadlift - will wrap this series up. In the meantime, in case you missed it, enter your name and email below to receive a free 9-minute deadlift technique video.
It’s no secret that I’m a big fan of the deadlift.
It’s a great strength exercise for the posterior chain with excellent carryover to real life – whether we’re talking about athletics or picking up bags of groceries.
It’s among the best muscle mass builders of all time because it involves a ton of muscle in the posterior chain, upper back, and forearms.
It’s a tremendous corrective exercise; I’m not sure that I have an exercise I like more for correcting bad posture, as this one movement can provide the stiffness needed to minimize anterior pelvic tilt and thoracic kyphosis.
These benefits, of course, are contingent on the fact that one can perform the deadlift correctly to make it safe. And, sadly, the frequency of what I’d consider “safe” deadlifts has diminished greatly as our generation has spent more and more time a) at computers, b) in high-top sneakers with big heel lifts, and c) watering down beginner fitness programs so much that people aren’t taught to deadlift (or do any valuable, compound exercises) when starting a strength training program.
To me, there are two ways to make things “safe.” The first is to teach correct deadlift technique, which I already did with a 9-minute video that is free to anyone who subscribes to my newsletter (if you missed it, you can just opt-in to view it HERE). This video troubleshoots three common variations of the deadlift: conventional, sumo, and trap bar.
The second is to educate lifters on which deadlift versions are the safest versions for different individuals with different injury histories and movement inefficiencies. That’s the focus of today’s piece. We’ll start with the conventional deadlift.
While this version of the deadlift is undoubtedly the “one that started it all,” it’s also the most technically advanced and potentially dangerous of the bunch. Shear stress on the spine is going to be higher on the conventional deadlift than any other variation because the bar is further away from the center of gravity than in any other variation. Additionally, in order to get down to the bar and maintain one’s center of gravity in the right position while maintaining a neutral spine, you’ve got to have excellent ankle, hip, and thoracic spine mobility. Have a look at the video below, and take note of the position of the ankles, hips, and thoracic spine:
You’ll notice that the ankles are slightly dorsiflexed (knees out over toes). If you are crazy restricted in your ankles and can’t sufficiently dorsiflex, two problems arise:
1. You can’t create a “space” to which the bar can be pulled back toward (a lot of the best deadlifters pull the bar back to the shin before breaking the bar from the floor). You can observe this space by drawing a line straight down from the front of the knee to the floor at the 2-second mark of the above video:
2. Those who can’t dorsiflex almost always have hypertonic plantarflexors (calves). These individuals always struggle with proper hip-hinging technique, as they substitute lumbar flexion for hip flexion in order to “counterbalance” things so that they don’t tip over.
You’ll also notice that the hips are flexed to about 90 degrees in my example. I have long arms and legs and a short torso, so I have a bit less hip flexion than someone with shorter arms would need. They would utilize more hip flexion (and potentially dorsiflexion) to be able to get down and grab the bar.
Regardless of one’s body type, you need to be able to sufficiently flex the hips. You’d be amazed at how many people really can’t even flex the hips to 90 degrees without some significant compensation patterns. Instead, they just go to the path of least resistance: lumbar flexion (lower back rounding).
Moving on to the thoracic spine, think about what your body wants to do when the ankles and hips are both flexed: go into the fetal position. The only problem is that the fetal position isn’t exactly optimal for lifting heavy stuff, where we want to maintain a neutral spine. Optimal thoracic spine mobility – particularly into extension – brings our center of gravity back within our base of support and helps ensure that we don’t lose the neutral lumbar spine as soon as external loading (the lift) is introduced.
As you can see, having mobility in these three key areas is essential in order to ensure that the conventional deadlift is both a safe and effective strength exercise in your program. The problem is that in today’s society, not many people have it. So, what do we do with those who simply can’t deadlift effectively from the floor?
We’ve got two options:
1. We can simply elevate the bar slightly (or do rack pulls) to teach proper hip hinging technique in the conventional stance – and train the movement within the limitations of their ankle, hip, and thoracic spine (upper back) mobility.
2. We can simply opt to go with a different deadlift variation. This is something that, for some reason, most previously injured lifters can’t seem to grasp. They have near-debilitating low back injuries that finally become asymptomatic, and they decide to go right back to conventional deadlifts with “light weights.” They still have the same movement impairments and flawed technique, so they build their strength back up, ingraining more and more dysfunction along the way. They’d be better off doing other things – including trap bar and sumo deadlifts – for quite some time before returning to the conventional deadlift.
And, on that note, we’ll examine those two other deadlift variations in parts 2 and 3 of this series. Stay tuned!
To see how all the deadlift variations fit into a comprehensive strength and conditioning program, check out The High Performance Handbook.
Here are a few recommended reads to kick off the week:
The Truth About Gluten - Here's an excellent piece from Dr. Mike Roussell on how gluten intolerance can sabotage your nutritional efforts.
Waterhorse: The Legend of Tim Collins' Nickname - This was a funny write-up in the Kansas City Star on how Cressey Performance Athlete and KC Royals pitcher Tim Collins got his nickname while training at CP.
Why I Do Not Like YTWL Shoulder Exercises - Here's a great post from Mike Reinold - and I agree with him 100%.
Sign-up Today for our FREE Newsletter and receive a deadlift technique tutorial!