Here's this week's list of recommended strength and conditioning reading:
Elite Training Mentorship - In addition to the fantastic contributions from the likes of Mike Robertson, Dave Schmitz, Tyler English, and Vaughn Bethell, I have an in-service on frontal and transverse plane power development. This covers a lot of the unique plyo drills we utilize in our progressions with rotational sport athletes. Additionally, I have two new exercise demonstrations on how we coach lower trap activation and rotational medicine ball drills. Check it out!
Do Pain Pills Impair Muscle Growth? - This was an exceptional, well-researched article from Brad Schoenfield on everything you need to know about NSAID usage as it relates to your strength training goals.
Training the Unstable Client - Here's another one of those epic Mike Robertson posts that clearly took 14 years to write. Man, that guy is persistent. Kidding aside, this is great stuff for the fitness professionals in the crowd!
Sign-up Today for our FREE Newsletter and receive a four-part video series on how to deadlift!
Compliments of Cressey Performance coach Greg Robins, here are this week's strategies to help improve your nutrition and strength and conditioning programs.
1. Create better tension in the Turkish Get-up.
2. Add fat to your shakes and smoothies for easy calorie addition.
For those of you looking to gain weight, here is an easy way to add more calories into your daily routine. When preparing shakes and smoothies, consider adding sources of healthy fat. Many of these options are easy to include, add a considerable amount of calories, and do so without adding a lot of actual volume.
Some of my favorites additions include: olive oil, coconut, coconut oil/butter, chia seeds, cacao nibs, almonds, walnuts, and nut butters.
3. Watch the kettlebell as reference for swing technique.
It’s great when you have a coach or training partner available to help give you feedback on your exercise form. Unfortunately, this isn’t always the case. One thing I love about the kettlebell swing is this easy way to gauge whether or not your form is staying on point. Check out this table I made for your convenience.
If the bottom of the kettlebell is above the wrists at lockout, there are two probable causes. First, one may be excessively extending the spine instead of fully using the hips; the solution to this would be bracing the core at lockout to keep the rib cage down, and think about squeezing the butt cheeks together. Second, the wrists may be "breaking" - which equates to pulling your knuckles to your nose; the solution to this is to keep the wrists locked in place, but maintain a medium/low intensity grip on the kettlebell.
If the bottom of the kettlebell is in line with the wrists at lockout, you're in a good position!
If the bottom of the kettlebell is below the wrists at lockout, there are two potential causes. First, you may just be raising the kettlebell with your arms instead of using the hips; the solution is to think "swing out" and think of the arms as just "connectors" between the 'bell and your body. Second, this faulty position may come from a "death grip" on the kettlebell; you'll want to relax your grip to the same medium/low intensity I discussed earlier.
4. Activate the glutes in all three planes of motion.
Glute activation is obviously an important element in many of our warm-ups, and programming strategies. However, we tend to focus primarily on glute function in the saggittal plane. Bridging variations dominate weight rooms and gyms across the country. It’s important to consider the function of the glutes (max, med / min) in all three planes of movement, and train them accordingly. Make sure you include exercises that attack this muscle group in the frontal and transverse plane, as well as drills to train their function in all three planes at once.
As an example:
Side Lying Clams - Transverse Plane - external/internal rotation.
Side Lying Straight Leg Raise Variations - Frontal Plane - abduction/adduction.
5. Consider using balloons in breathing intensive drills and exercises.
This past weekend, I was fortunate to attend my first course with the Postural Restoration Institute. While the course was not on respiration, we were introduced to a few basic principles used within their approach to aid in respiratory facilitation.
One training aid I found particularly helpful, easy to implement, and under-utilized was - of all things - a balloon!
Using a balloon gives you feedback as to how fully you are exhaling, something many of us think we do, but tend to never fully complete. Additionally, the balloon acts as a source of resistance to help fire your abdominals. This activation is particularly important in heavily extended populations, such as athletes, and active individuals.
Give it a try by including it in drills such as the dead bug, or supine 90/90 belly breathing.
Sign-up Today for our FREE Newsletter and receive a four-part video series on how to deadlift!
I'm extremely excited to announce a project that has been in the works for quite some time: Elite Baseball Mentorships at Cressey Performance. Folks have been requesting these for years, but I resisted the urge to go through with it until the time was right - and that time is now!
Working with me on these mentorships will be two awesome minds who play a big role in helping CP provide comprehensive, synergistic programs for baseball players. Matt Blake is the pitching coordinator at Cressey Performance, and Eric Schoenberg is a physical therapist who handles some of our toughest cases. The rest of the Cressey Performance staff will also be on-hand to assist with the practical portions of the event, and answer questions during the observation periods.
The first mentorship will take place January 6-8, 2013. Here are the specifics:
Cressey Performance Elite Baseball Mentorship
Phase 1: Understanding and Managing the Pitcher
Sunday, January 6
Morning Session: Lecture
8:30-9:00AM – Registration and Introduction (Eric Cressey) 9:00-10:00AM – Understanding the Status Quo: Why the Current System is Broken (Eric Schoenberg) 10:00-11:00AM – Functional Anatomy and Proper Movements of the Shoulder and Elbow (Eric Cressey) 11:00-11:15AM – Break 11:15AM-12:15PM – Common Injuries and their Mechanisms (Eric Schoenberg) 12:15-1:00PM – Lunch (provided)
Afternoon Session: Lecture and Video Analysis
1:00-2:00PM – Flawed Perceptions on "Specific" Pitching Assessments and Training Modalities (Eric Cressey) 2:00-3:15PM –Key Positions in the Pitching Delivery: Understanding How Physical Maturity and Athletic Ability Govern Mechanics (Matt Blake) 3:15-3:30PM – Break 3:30-4:45PM – Video Evaluation of Pitchers: Relationship of Mechanical Dysfunction to Injury Risk and Performance (Matt Blake) 4:45-5:30PM – Case Studies and Q&A
5:30PM Reception (Dinner Provided)
Monday, January 7
Morning Session: Practical
8:00AM-10:00AM – Physical Assessment of Pitchers: Static and Dynamic (Eric Cressey and Eric Schoenberg) 10:00-11:30AM – Prehabilitation/Rehabilitation Exercises for the Thrower (Eric Cressey and Eric Schoenberg) 11:30AM-12:00PM – Lunch (on your own)
Afternoon Session: Observation at Cressey Performance – 12PM-6PM*
Tuesday, January 8
Morning Session: Practical
8:00AM-9:00AM - Preparing for the Throwing Session: Optimal Warm-up Protocols for Different Arms (Eric Cressey and Eric Schoenberg) 9:00-10:15AM – Individualizing Drill Work to the Pitcher (Matt Blake) 10:15-11:30AM – Throwing Program Progressions (Matt Blake) 11:30AM-12:00PM – Lunch (on your own)
Afternoon Session: Observation at Cressey Performance – 12PM-6PM*
* The afternoon observation sessions on Monday and Tuesday will allow attendees to see in real-time the day-to-day operation of the comprehensive baseball training programs unique to Cressey Performance.
Observation of live training on the CP floor with our professional, college, and high school baseball players will allow you to experience firsthand our approaches to:
• Programming
• Proper coaching cues for optimal results
• Soft tissue techniques
• Activation and mobility drills
• Strength/power development
• Medicine ball work
• Multi-directional stability
• Metabolic conditioning
• Sprint/agility programs
• Base stealing technique
In addition, you will experience:
• Live throwing sessions
• Biomechanical video analysis using the Right View Pro system
• Movement evaluation
• Live case examples
Location:
Cressey Performance,
577 Main St.
Suite 310
Hudson, MA 01749
Cost:
$899 early-bird (before December 6), $999 regular. No sign-ups will be accepted on the day of the event.
Continuing Education:
NSCA CEU pending
Registration Information: SOLD OUT
Please note that space is extremely limited. We are keeping the size of this seminar small so that we can make it a far more productive educational experience. Additionally, this event will not be videotaped. As such, I’d encourage you to sign up as soon as possible.
Hope to see you there!
Sign-up Today for our FREE Baseball Newsletter and Receive a Copy of the Exact Stretches used by Cressey Performance Pitchers after they Throw!
Today marks the third installment of a series that looks at the coaching cues we use to optimize training technique at Cressey Performance. Today, we'll focus specifically on deadlift technique coaching cues. Additionally, if you really want to learn how to deadlift from scratch, I'd encourage you to subscribe to my free newsletter, as you'll receive a video deadlift technique tutorial when you do so.
1. Touch your butt to an imaginary wall a foot behind you.
"Hips back" is a cue that works great for many people when it comes to coaching deadlift variations, box squats, toe touch progressions, and a host of other exercises requiring a good hip hinge. For those with less-than-stellar "movement awareness," I prefer to give a slightly different reference point.
You see, "hips back" is an internal focus coaching cue; it focuses on the athlete moving part of his/her body. The imaginary wall, on the other hand, is an external focus cue; it's just an inanimate object that serves as a reference point for the athlete. With the "touch your butt to an imaginary wall a foot behind you" cue, you give an athlete both internal and external focus options, so it's more likely that one of them will register. Plus, "butt" may register a bit more with folks who can't don't understand how to dissociate the hips from the lower back.
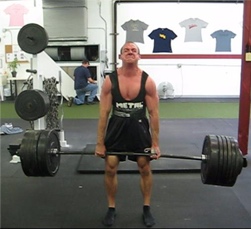
2. Show me the logo on your shirt.
Also on the deadlifting front, many individuals simply don't grasp the concept of "chest up" when they're in the bottom position of a deadlift and want to go hunchback on you. However, I haven't met a lifter yet who doesn't understand what I mean when I stand in front of them and say, "Show me the logo on your shirt." Again, "me" is an external cue that helps to fix things up.
Take note of the New Balance logo on the front of my shirt during this deadlift; is there ever a point during the lift that you don't see it?
This isn't just for singles, either. You'll see the logo on Tony's shirt on every rep on this set of eight reps.
Now, let's compare two heavier lifts - one that was awful on this front, and two that were significantly better. This first one was taken in August of 2007. Notice how the logo disappears, and my spine looks like it's going to explode?
Now, compare that to the deadlifts (1:40 mark through the end) in my mock/impromptu powerlifting meet two weeks ago. You'll notice that you never lose sight of the logo on my shirt.
3. Don't just lift; put force into the ground.
I've found that folks often get so caught up in the moment when they approach heavy weights on the deadlift that they will simply do anything it takes to get the bar up (reference my ugly August 2007 deadlift from above). However, what they fail to realize is that they'll be stronger if they put themselves in the most biomechanically correct position possible.
In the context of the deadlift, this means not allowing the bar to get too far away from the body. If you do, it's like sitting on a seesaw opposite someone, but letting them move further away from the center point; you've made them feel heavier without actually changing the weight. In other words, crushing big weights on the deadlift is about keeping the bar close to the primary axis of movement: the hips. It's why most lifters will be slightly stronger on a trap bar deadlift than a conventional deadlift; the weight is positioned closer to the hips. And, it's also why folks with long femurs usually can lift more weight with sumo deadlifts (and do so more safely).
Regardless of the deadlift variation in question, I've found that more advanced lifters can really benefit from thinking more about just putting force into the ground. This doesn't mean you have to stomp your heels down (I actually used to do that, but don't any longer), but rather just engaging your posterior chain to take tension out of the bar and ensure that the bar starts out in the right path: close to you. Some cues that go hand-in-hand with this are #2 from above (show logo) and "pull back, not up."
Sign-up Today for our FREE Newsletter and receive a four-part video series on how to deadlift!
Here's this week's list of recommended reading. You'll be happy to note that there is absolutely no discussion of the election; I think we're all sick and tired of that by now!
8 Laws of Strength Training - This is a basic, but outstanding post from Bret Contreras. I'd call this must-read for every beginning strength training enthusiast.
Jaundice or Just Yellow? - This is an excellent post at Precision Nutrition by Spencer Nadolsky. If you eat a lot of pumpkin, give this a read.
Player Interview with Cubs Prospect John Andreoli - Current CP intern Jay Kolster interviews one of our pro guys on his hitting approach and how he prepares in the batting cage. This is a great read for coaches and players alike, as John is a guy who has worked extremely hard - and smart - to get to where he is.
Sign-up Today for our FREE Newsletter and receive a four-part video series on how to deadlift!
Here's this week's collection of strategies to improve your nutrition and strength and conditioning programs, compliments of Cressey Performance coach Greg Robins.
1. Teach/learn inverted exercises from finish to start.
2. If you’re a student-athlete, make sure that Tupperware is your best friend.
The summer is a tremendous time for college athletes to make outstanding progress. Athletes can train almost every day, get plenty of rest, and enjoy Mom’s home cooking. At the very least, they are tapping into a well-stocked fridge and pantry. August comes, everyone heads back to school, and it’s not too long until we get e-mails from many of these athletes. Each one is the same, and each one has a fairly simple solution.
Generally the problem is that they either can’t eat enough, the food they want is only available sometimes (ex. greek yogurt at breakfast, but not lunch or dinner), or the quality is inconsistent.
When I was in college, I actually made some of the best physique gains of my life. In fact, my freshman year was when my fitness kick truly began. I treated the cafeteria like a grocery store. In addition to eating what I wanted at each meal, I would bring empty Tupperware and plastic bags in my backpack. This way, I could take back veggies, yogurt, nuts, and other tasty amenities to my dorm room.
Once they were in my fridge, I had healthy snacks. Plus, if I showed up for dinner one night and everything on the menu was terrible, I could do some damage control and return back to my room afterwards to get some quality protein in.
3. Stop considering a week to be seven days long.
When people write programs, they always base it off a 7-day week. I get it, the rest of the world works off a Mon – Sun format, so your training should, too. Doing so leads to a few different ways to split up a training program, and for the most part, the common choices are 3–5 days of training with 2–4 days of rest or supplemental activity.
Don’t get me wrong; this is 100% fine, and it certainly works. However, your body doesn’t know what a week is; it has no idea a week is seven days long. Therefore, you should consider writing strength and conditioning programs in any format you choose that would be optimal for the results you are looking to achieve.
Essentially viewing a “training week” as however long you want gives you the opportunity to meet more demands while still allowing for optimal recovery. Or, it can be used to hit certain lifts,or body parts more often while still allowing other lifts or body parts that may require more time between training sessions to get rest. Here’s an example:
Traditional 4-Day Training Split w/Movement Training
Monday: Lower Body
Tuesday: Upper Body
Wednesday: Movement Training
Thursday: Lower Body
Friday: Upper Body
Saturday: Movement Training
Sunday: Off
"Spreading Things Out" Split
Day 1: Lower Body - Squat
Day 2: Upper Body 1
Day 3: Movement
Day 4: Off
Day 5: Lower Body - Accessory Work
Day 6: Upper Body 2
Day 7: Movement
Day 8: Lower/Full Body - Deadlift
Day 9: Off
By spreading my “training week” out, I have allowed two things to happen. One, I get an extra day of training to address weaknesses, or to just spread out some of the exercises from the previous model into a fifth day. Additionally, I will have more total days off in the course of a year, as the first model gives you one day off every 7 days, and the second model gives you 2 days off for every 9. Lastly, I have more days off before hitting certain lifts again, which can allow for better recovery between sessions.
Like I said, 7-day models work just fine. I just want to challenge you to think outside of the 7-day mindset, as doing so leaves some potential to do some different things with your training.
Note: Kudos to Chad Wesley Smith for introducing this concept to me. Chad utilizes a 9-Day training week with many of his athletes, and in his Juggernuat Method.
4. Spice up your heavy single arm rowing with this variation.
5. Do more “bottoms-up” kettlebell exercises.
I have often touted the versatility of the kettlebell, which are unique in large part due to their shape. In a very early installment of this series, I showed you how to hold the bell correctly. This time around, I challenge you to try a few traditional kettlebell exercises upside down!
No, not you, the kettlebell!
Turning the bell upside-down provides an awkward task to stabilize the bell in that position. Doing so can make traditional carries and presses more challenging, and also more productive, depending on the desired training effect.
Sign-up Today for our FREE Newsletter and receive a four-part video series on how to deadlift!
For this installment of exercise of the week, I have to give full credit to Cressey Sports Performance pitching coordinator, Matt Blake. A few weeks ago, Matt and I were having a conversation about ways to expand our exercise selection with respect to developing power in the frontal and transverse planes. We have medicine ball work and a host of variations of Heidens (also known as "skaters"), but you can never have enough.
As the conversation progressed, we got to talking about some of our young pitchers who struggle with finding the right timing to stiffen up on the front leg. They either stomp down early because they aren't stable enough to ride the back hip out a bit longer, or they stiffen up late and "go to mush" on that front leg. We want to train them to accept force on that front leg - and do so with the right position (a position of hip external rotation/abduction, where the athlete is decelerating internal rotation/adduction).
So, Matt asked if it would be possible to simply open the front leg up to make this a more specific deceleration position. So, the Heiden with External Rotation Stick was born.
One of the key coaching points on this exercise is that you want to jump a bit more "up" than "out," as compared to a traditional Heiden. Very simply, this upward movement gives an athlete time to reposition the hip, knee, ankle, and foot correctly to accept this force. If an athlete can't land in perfect technique (knee shouldn't cave in, and the torso shouldn't round over), he or she is jumping too far. Simply reducing the distance of the jump is a great regression. Find a distance that allows the athlete to land without these compensations (or coming up on the toes), and then gradually work to build this up.
This is just another option for developing power in rotational athletes, but certainly one that will add variety and challenge your athletes in new ways, so check it out!
Sign-up Today for our FREE Baseball Newsletter and Receive Instant Access to a 47-minute Presentation from Eric Cressey on Individualizing the Management of Overhead Athletes!