Courtesy of the imagination of Cressey Sports Performance - Florida co-founder Shane Rye, the cross-behind 1-arm cable row is a new horizontal pulling variation we've been using quite a bit lately.
This drill not only offers all the typical postural benefits of properly-executed horizontal pulling, but also trains the fascia system to a greater degree than typical rowing variations. You see, as the trailing leg steps behind, you create a significant stretch along the entire lateral line - especially during the eccentric (lowering) phase of the movement. To some degree, it's a loaded lean away lateral line stretch:
We'll typically program this for sets of 8-12 reps as an assistance exercise. Additionally, as you can see in the video, adding an opposite arm reach is a great way to encourage extra thoracic rotation.
If you're looking to learn more about how I evaluate, program, and coach at the shoulder joint, be sure to check out my popular resource, Sturdy Shoulder Solutions.
Sign-up Today for our FREE Newsletter and receive a four-part video series on how to deadlift!
Today's guest post - the first in a new series - comes from Greg Robins.
It’s been a while, and oh how I have missed the electronic pages of EricCressey.com. Quick and Easy Ways To Feel and Move Better was fun, but after 50+ editions, I needed something new.
To piggyback off the idea of quick useful, intelligent tips, I have decided to create a fresh new look. This time around I have decided to speak to the strength-training enthusiast in particular. In short, this new series will be devoted to those in the crowd who are most concerned with – above all else – getting stronger.
My aim is to keep this easy-to-apply and simple strategies to help you get stronger. I will organize each week into four categories, or “pillars of success” in the gym. They are mindset, planning/programming, nutrition/recovery, and technique (via a quick instructional video or photos).
Given that this is the first installment, I figured we’d start of with a BANG, so here are two in each category.
1. Mindset: success in strength training takes sacrifice.
I’ve been fortunate enough to reach many of my own goals, but also to spend time around others who have had tremendous success in their chosen endeavors. The list includes CEOs, professional athletes, entrepreneurs, elite level strength athletes, physique competitors, decorated military leaders, and a host of other “successful” individuals. There are a plethora of commonalities among these people, but the one I want to focus on is the extraordinary amount of sacrifices these people make to accomplish their goals.
To be frank, none of us will attain the strength measures we want, the body we want, or the life we want without making sacrifices. While some may be afforded a hand-up, nobody who truly reaches an admirable level of success receives a hand-out (kudos to my girlfriend for introducing me to the hand-up vs. hand-out analogy).
If you want to do something out of the ordinary, you will make sacrifices on a daily basis that separate you from the majority of people. If what you wanted to achieve was doable by simply going through motions, showing up, and following the masses, it would not be considered extraordinary. I suppose this is common sense., but let’s face it: common sense isn’t so common anymore.
The real advice here is that one must be aware of why they are making sacrifices. Why are you choosing to get to bed rather than to watch the late night game? Why are you choosing to have one beer instead of seven? Why are you leaving early to make sure you can grab groceries before the store closes? As it is so commonly put, what is your why? Lose site of this and sacrifices become tedious chores, your goals become your master, and your life one of self-inflicted servitude. Choose instead to keep yourself focused on the goal.
2. Mindset: selfishness is a rather darker, but necessary, quality of the perennially strong.
There are a few darker truths to reaching uncommon heights. One of them happens to be one I mull around with in my head quite a bit. The truth of the matter is that in order to take extremely good care of oneself requires a degree of selfishness. In order to continually make progress, one must continually find ways to improve upon what they’re already doing. In terms of strength training, one must continue to train at a higher level in some capacity. This also means they must recover at a higher level. Training at a higher level may mean that more focus need be placed on the training sessions, including spending money on equipment or coaching, traveling further, staying longer, and so on.
In terms of recovery, it most definitely means finding ways to reduce outside stressors, improve sleep, and dial in nutritional measures. Put in various situations, without enough regard for what YOU want, the aforementioned things will not happen often enough.
How often do we tell people with poor health to care for themselves more – to essentially put themselves, and their needs first, more often? At a much smaller level we are acknowledging that the health and vitality we want them to achieve will take some selfishness. It would be wrong to imagine that if someone wanted to achieve higher than ordinary levels of health and performance, it wouldn’t take more selfishness…because it will. It’s a darker truth, but one you can learn to communicate and help others understand so as not to appear to be merely self involved.
3. Planning and Programming: regulating on the fly.
Many informed gym goers have become savvy on following programs, utilizing technology to monitor readiness, and simply finding every way possible to “optimize” the training process. I must say, of all the strongest people I have ever been around, watched, read about, looked up to, none seem to rely on said measures.
Instead they understand the basic principles of training. When you understand the basics well – very well – you will be able to see the forest through the trees. When you see the big picture, regulating training on the fly isn’t over complicated.
Here’s a good place to get started:
You need to do more than you did last time. That’s the basic premise anyhow. With that, a plan can be formed by looking at the past training and improving on it. At a certain point, weight cannot be continually added to the bar in the same fashion. Therefore, training will revolve around two kinds of sessions. The first is geared toward the amount of weight on the bar. The second is either on the speed the weight moves, and or the amount of times weight is moved.
In any plan, there will be times when things don’t go as planned. At those times, simply keep in mind what the purpose of the training is. If the goal was to move a certain load, and you can’t do it for the planned amount, move it less times that day. If the goal was to move it fast and it’s slow, adjust to a weight you can move fast. If the goal was to move it a certain amount of times, lower the load, and move it the required amount of times.
4. Planning and Programming: unilateral stability is not limited to single-leg exercises.
Single-leg exercises are great if you want to get strong at single-leg exercises, or have some limitation that keeps you from doing bilateral exercises. Why would someone want to get strong on single-leg exercises? Pretty much for every reason possible, unless their overriding goal is to be extremely good at bi-ateral exercises! Simply stated, too much attention and energy must be given to these exercises in order to get them brutally strong that could otherwise be spent getting better on two legs, if that is your goal.
Single-leg stability, which for the sake of this tip I will differentiate from single-leg strength, is something everyone should posses. We do, after all, function in split-stance positions, kneeling positions, and on one leg all the time.
You do not need to do lunges, split squats, step-ups and so forth in order to gain acceptable levels of single-leg stability. This is good news for the squat and deadlift enthusiasts. You will want to keep a good level of unilateral stability so instead just focus more of your accessory exercise choices on movements that test single-leg stability. Examples include half-kneeling and split-stance anti-rotation presses, chops, and lifts, for starters.
Other ideas include carrying variations, and even simple things like low level sprinting, and – dare I say – walking more!
5. Nutrition: eat carbohydrates.
To my own detriment, I spent most of my lifting career still strapped in for the low-carb ride. That was really a big mistake. I initially saw great physique changes when I adopted a low carb approach, and thus I turned to it all the time. However, the truth is that what I really did was stop eating too much processed crap, and eating too much in general.
Carbohydrates are the fuel your body wants be a powerful machine. Simply put, fuel appropriately for the demand you are placing on it. If your goal is to be bigger, stronger, and faster, don’t trade in your oatmeal for a buttered-up coffee.
That said, if your training is sporadic and uninspired, and your life outside of the gym mostly sedentary, then by all means, watch the carbohydrates. If you are training 4+ days each week and trying to progressively push the limit of what you can do, eat more carbohydrates.
6. Nutrition: invest in a rice cooker.
To build off my last point, I prefer to keep my carbohydrate sources as “real” as possible. I won’t lie, I like a good bowl of cereal, and cornbread is something I could easily live on. The majority of the time I stick to five major sources of carbohydrates, and while I’ll divulge them all eventually, the first one is jasmine rice. It tastes better, digests easier, and has a better consistency than any other rice I have tried. I easily consume upward towards 8 to 10 cups of it (dry measure) in a given week. That translates to a lot more cooked. And, on that note, I wouldn’t be nearly as excited about rice if I didn’t have a rice cooker.
This simple gadget will run you anywhere from $15 to $30 and is well worth it. Simply add one part rice to two parts water, press the button, and prepare the rest of your food in the 10 minutes it takes to cook. If that’s too hard for you, then there’s no hope for you as a chef. If you’re someone who struggles to put on size, make the rice cooker as routine as making coffee each morning. I’m willing to bet an added cup or two of rice to your normal intake will have you started back in the right direction.
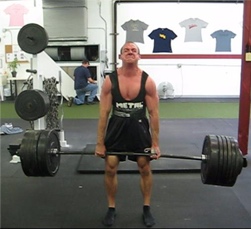
7. Technique: keep the armpits over the bar.
8. Technique: understand the difference between flexion/extension movements and flexion/extension moments.
Additionally, if you need some programming guidance to prioritize the squat, bench press, or deadlift, check out our collaborative resource, The Specialization Success Guide.
Sign-up Today for our FREE Newsletter and receive a four-part video series on how to deadlift!
Today's guest post comes from Bret Contreras, author of the recently released 2x4: Maximum_Strength.
Many strength coaches, personal trainers, and strength athletes claim that the squat is the best exercise for promoting gluteal muscle development. Recently, the hip thrust has stumbled onto the scene, and its reputation for building impressive backsides has gained traction.
There is currently no published research examining the gluteal hypertrophic effects of squatting or hip thrusting, yet anecdotally we’re aware of their glute-building potential. While nobody can say for sure right now which is best for gluteal growth between the squat and the hip thrust, I hope that by the end of this article, you’ll be convinced that both exercises should be employed for optimal glute development.
Hypertrophy Science
According to hypertrophy researcher, Brad Schoenfeld, there are three primary mechanisms to muscle growth. The most important mechanism appears to be mechanical tension. A close second in terms of importance appears to be metabolic stress. Finally, we have muscle damage, which appears to be of slightly lesser importance. As it currently stands, we don’t know for certain how to optimize these three stimuli in our programming in order to maximize muscle growth. The way I see it, until more is known, we should do our best to hit every base in our training. Therefore, we want to perform exercises that create the most tension in the glutes, produce the most metabolic stress in the glutes, and create reasonable amounts of damage in the glutes. How do squats and hip thrusts fare in regards to the three mechanisms of muscle growth?
Let’s take a deep look at what happens biomechanically and physiologically in the glutes when we squat and hip thrust.
Gluteal Biomechanics During the Squat
Let’s say you have the bar loaded up to around 80% of your one-rep maximum (1RM). You set up and take the bar off out of the rack. The upper glutes help stabilize your pelvis as you walk the bar backward. Once you get set, the glutes calm down. Now you start descending. Glute activation during the eccentric phase is very low – around 20-30% of maximum voluntary contraction (MVC). At the bottom position, the point where everyone thinks is so amazing for glute activation, is where the glutes actually reach their lowest activation during the rep – around 10-20% of MVC. I realize that this hasn’t been mentioned in any journal. It’s something I’ve noticed over the past year with the last fifteen or so individuals I’ve tested in EMG. These are highly experienced squatters, including several Arizona state record holders in the squat.
Now, before you call me crazy, please not that a similar phenomenon is seen in the erector spinae as they’re stretched under load; this has been deemed the lumbar flexion relaxation phenomenon. As the glutes are stretched out, their activation diminishes. This could be related to the passive-elastic force that they produce in this position, or some other reason, possibly related to the changing sarcomere length or the changing muscle moment arm length.
At this point, you explode out of the hole. This is where the glutes do their thang – during concentric actions. Glute activation will reach around 80-120% of MVC as you rise upward, peaking around halfway up, and gradually diminishing before you reach the top. You pause for a brief moment, and then resume the next repetition.
Mean activation is fairly low – around 50-70% of MVC – since the top portion of the squat is rather unloaded for the glutes, and since there is usually a considerable pause in between reps as the lifter takes a deep breath, resets, and gets tight, and since the glutes don’t fire very hard eccentrically during the lift. Because of this, you won’t feel a pump or a burn in the glutes when you squat, since blood in the gluteal region has plenty of time to escape during the set. However, you will develop glute soreness in the days following the workout, due to the fact that the glute fibers are stretched eccentrically to long muscle lengths while being activated, albeit at low levels. But this is only true for the lower gluteal fibers; the upper fibers of the glutes will generally fire at around 30-40% of MVC during a heavy squat.
Gluteal Biomechanics During the Hip Thrust
Now let’s discuss the hip thrust. Just as in the case of the squat, let’s say you’re using around 80% of 1RM. The bar is placed onto the hips. The body is wedged into place. Before the lift begins, the glutes are silent. The lifter then thrusts the hips upward until full hip extension is reached. During this concentric shortening, peak activation will typically reach around 120-200% of MVC, and this level of activation will be elicited in both the upper and lower gluteal fibers. The peak is reached at full hip extension, as the glutes reach their shortest muscle length. This could be due to the changing sarcomere length or the changing muscle moment arm length.
On the way down, the eccentric EMG activity mirrors the concentric activity, gradually diminishing until the bottom of the range of motion is reached. The movement is quickly reversed. Due to the rapid movements and consistent tension on the glutes, mean activation during the hip thrust is extremely high – around 100% of MVC. Due to the high levels of activation and constant pumping of repetitions, levels of metabolic stress are very high as well. Incredible “glute pumps” and burning will typically set in from multiple sets of hip thrusts. However, since the glutes are not fully stretched at the bottom of the hip thrust, muscle damage will not be very severe.
Theoretical Imposed Adaptations
As you can see, the squat and the hip thrust are actually quite different in biomechanics. Let’s examine some commonalities and differences.
Both exercises make for excellent glute exercises due to the bent knee position, which shortens the hamstrings and places more burden on the glutes for hip extension (when the hamstrings are shortened, they cannot produce maximum force due to active insufficiency).
Both exercises require dual actions out of the glutes. In a squat, the glutes must fire to create hip extension torque, but they must also fire in order to create hip external rotation torque to prevent knee valgus (caving in of the knees). In a hip thrust, the glutes fire to create hip extension torque, but they must also fire in order to create posterior pelvic tilt torque to prevent anterior tilting of the pelvis and lumbar hyperextension.
Squats can be limited by back strength, which is not the case for hip thrusts. Squats require more balance and coordination, whereas the hip thrust is very stable and simple to perform. The hip thrust is generally limited by glute strength, meaning that the set reaches failure when the glutes can no longer raise the hips. Squats move the hips into deeper hip flexion.
Let’s see which exercise outperforms the other in various biomechanical and physiological categories in the chart below.
As you can see in the hypothetical chart, the squat outperforms the hip thrust in 2 of the 7 categories, whereas the hip thrust outperforms the squat in 5 of the 7 categories.
The Verdict
Now, it doesn’t take a genius to imagine how combining the squat and the hip thrust would elicit greater adaptations than performing either exercise alone. In terms of imposed neural adaptations, the hip thrust requires more neural drive to the glutes, but there may be neural benefits to including squats due to the myotatic “stretch” reflex. In terms of mechanical adaptations, the two movements target different ranges of motion and therefore different gluteal muscle lengths, which likely lead to different mechanical adaptations as far as fascicle length and pennation angle are concerned. For full range gluteal strength, a more complete neurological stimulis, and full development of the upper and lower gluteal fibers, you’ll want to perform both the squat and the hip thrust. Either exercise alone won’t suffice. The good news is that we don’t have to choose between squats or hip thrusts for maximal glute development; we should perform both movements.
Squats elicit moderate levels of activation while promoting tolerable levels of gluteal muscle damage. Hip thrusts maximize tension and metabolic stress on the glutes and do a better job of hitting the upper fibers. The two exercises combine to produce one heck of a glute hypertrophy stimulus.
If you're looking for a great resource to take your strength training program to the next level, I'd highly recommend Bret's 2x4: Maximum_Strength. It's on sale this week at a great introductory price.
Sign-up Today for our FREE Newsletter and receive a four-part video series on how to deadlift!
Today's guest post comes from Cressey Sports Performance coach, Greg Robins.
Hi, my name is Greg, and I have a problem.
I love the barbell.
In fact, I would be perfectly happy just training with the bar, a rack, a bench, and some plates. Call me crazy, but every exercise that has ever made a serious impact on my physique and strength levels involved the barbell.
To be honest, most people don’t use the bar enough. It’s not surprising, given the state of a typical “gym” these days. For every three or four bars, there must be a few hundred other pieces of equipment.
I continually challenge people to use the bar more often. Usually, my advice centers on doing more variations of the basic lifts. For me, the staple lifts never get old. However, I know plenty of people who thrive on variety in their training. With that in mind, here are five lesser-used exercises that include the barbell.
1. Barbell Rollouts
Rollouts are a great exercise, but not everyone has a wheel or other fancy implement. Not a problem! In fact, using a barbell is just as effective, if not more effective.
One benefit is that you can make the bar heavier or lighter. This may seem like a trivial difference, since the bar stays on the floor. However, you will notice that a 185-pound bar is a heck of a lot harder to pull back to the starting position. This will make your lats work harder, and tax your core. The best part? It makes your lats and abs work together, as they should!
)
2. 1-arm Barbell Rows
Heavy rowing should be a staple in most people’s programs, especially those of you who want to move some appreciable weight in the gym. This variation is a serious grip challenge. It’s also a great way to load up past what the gym offers in DBs; just use a strap so you can hold on. However you choose to do it, the basic premise is simple: perform a row in the same fashion as 1-arm DB row. In this case, keep the barbell between your legs, and make sure to use 10- and 25-pound plates so you can keep a decent range of motion.
3. Weighted Carries
Most folks look immediately to farmer’s handles, DBs, and KBs to do weighted carries. That’s all well and good, but the barbell lends itself very well to a few loaded carries as well. Among my favorites are a barbell overhead carry, a barbell zercher carry, and a 1-arm barbell suitcase carry.
Each offers a totally different advantage. Overhead helps people work anti-extension properties in full shoulder flexion. The Zercher carry is great as an anti-extension exercise as well, and a better choice for those who can’t get overhead safely. Lastly, the suitcase carry trains core stability in virtually every plane, and even challenges the grip quite a bit.
4. Self Massage
Forgot your PVC pipe? No worries! The barbell with a small plates on each hand can make for a roller as well. It’s not for the more tender individuals, but works perfectly fine for people who have a longer history doing self-massage.
I also like the fact that the bar is much thinner than a roller, putting more direct pressure on the areas of interest. Try this baby out on your lower extremities and lats next time you hit the gym.
5. 1-arm Overhead Exercises
I’ve written previously about the benefits of bottoms-up KB exercises. They create a lot more need for shoulder stability, and tax the grip. However, the barbell can offer a similar benefit.
Since the bulk of the weight is now further from your hand, the forearm and shoulder demands increase BIG time.
It’s a great challenge on 1-arm shoulder presses, as well as Turkish Get Ups. Don’t believe me? Give it a try.
If you’ve been hunting down some new physical challenges in the gym, these should definitely get you moving. Train hard and use the barbell!
Greg will be presenting his popular "Optimizing the Big 3" training workshop at Cressey Sports Performance in Massachusetts on August 2. This event is a great fit for lifters who have an interest in improving the squat, bench press, and deadlift - and may want to powerlift competitively. And, it's also been very popular with strength and conditioning professionals. For more information, click here.
Sign-up Today for our FREE Newsletter and receive a four-part video series on how to deadlift!
I'm a big fan of inverted row variations, as they not only build a strong, functional upper back, but also challenge core stability at the same time. Unfortunately, for more advanced lifters, they can become too easy very quickly. With that in mind, I thought I'd use today's post to introduce ten ways that you can progress these variations to increase the difficulty.
1. Do them correctly!
The first progression for most people is to simply perform the exercise with correct technique. The most common errors I see in most folks' technique are:
forward head posture
elbows drifting behind the body (scapula doesn't retract, so the lifter substitutes extra movement of the humerus)
hip sagging (the body doesn't stay in a straight line)
If you'd like some quick refreshers on how to make these look good, check out these videos:
2. Change the grip.
Just as we see with pull-up variations, going to a pronated (overhand) grip will increase the difficulty of inverted rows, as compared to neutral (palms facing one another) and supinated (underhand) grips.
3. Try some mechanical advantage drop sets.
While we're on the topic of which grip set-ups are harder than others, we can use this to our advantage to do some drop-off sets. If you're someone who can bang out inverted reps pretty easily and want a crazy challenge, try doing the first half of your set pronated, and then switching to supinated for the second half when you fatigue. I like suspension trainer variations for this approach, as it's easiest to go pronated, to neutral, to supinated without having to let go of the handle.
4. Add isometric holds at the top.
The top position is without a doubt the most challenging, so you can increase the time under tension - and therefore the difficulty - by adding 1-3 second pauses at the top of each rep.
5. Elevate the feet.
This progression is somewhat "assumed," but most people overlook the fact that you can elevate the feet a lot further than you might think. I like to use the 24" box.
You can also utilize various elevations for mechanical advantage drop sets. Go from a more extreme elevation, to a subtle elevation, to no elevation, and then even to a more upright position to finish things off. A set of 20-25 inverted rows can be a fantastic finisher.
6. Load with chains.
Chains might be the single greatist luxury one almost never gets in commercial gyms. We're fortunate to have them at Cressey Sports Performance, and they're a complete "game changer" if you can get your hands on them. They're also a great way to add extra loading to inverted rows:
7. Wear a weight vest.
This one seems logical, but there's a problem: there still isn't what I'd consider to be a great weight vest on the market. The heaviest ones are too bulky and always seem to fall apart. The lighter one are simply too light, and the velcro straps always seem to stop working in a matter of months of use. If you've got one, by all means, use it - but I actually prefer #7...
8. Load with a backpack.
About 5-6 years ago, I bought a Dell computer that came with a padded backpack. The computer was mediocre at best, but the backpack proved to be really useful in the gym! You see, the extra padding made it conducive to adding extra loading, as you can slide plates up to 25 pounds (the diameter on anything heavier is too much to fit). Just strap it on your chest and wear it in reverse for your inverted rows. I've got two 25-pound plates in for this demonstration:
9. Use Fat Gripz.
Adding load and range of motion aren't the only way to increase the difficulty of inverted rows; you can also challenge the grip more aggressively. I really like Fat Gripz for this purpose, as they're super affordable and wrap over any barbell, dumbbell, or suspension trainer to make for a thicker handle.
10. Go to one-arm variations.
You can do inverted row variations one arm at a time, too. In doing so, you add a little more of a challenge to rotary stability of the core. Here's the basic version, although you can expand upon it by adding a reach at the bottom (toward the floor) and top (toward the rack) with the non-working arm.
Inverted rows are a staple exercise, but that doesn't mean that they need to be boring! Try these progressions - and even combine some of them - and you'll find that you're able to include an inverted row variation in just about every strength training program you complete.
Sign-up Today for our FREE Newsletter and receive a four-part video series on how to deadlift!
Check out this week's exercise of the week: the side bridge row. I think you'll find it to be a great progression you can add to your strength training programs.
For some reason, the pullover has become one of those old strength training exercises that has fallen out of favor with in the iron game. I'm not sure why, as it definitely has some utility on a number of fronts, provided that you do it correctly. Check out today's video to learn the "why" and "how" of the dumbbell pullover:
Sign-up Today for our FREE Newsletter and receive a four-part video series on how to deadlift!
The TRX Y is a fantastic exercise for correcting bad posture and strengthening the muscles surrounding the shoulder girdle. Unfortunately, it's easy to fall into bad traps with technique on this exercise. In today's post, I discuss some of the more common problems we see with the TRX Y - as well as the coaching cues we use to correct them.
The TRX Y is a tremendous addition to your corrective exercise and strength training programs, so be sure to put these coaching cues into action to reap all the benefits of performing this movement.
When my first book was published back in 2008, a lot of people were surprised that I included speed deadlifts, either because they felt too easy, or because they didn’t think that deadlifting that wasn’t “heavy” couldn’t be productive. Interestingly, when their deadlifts invariably shot up after completing the four-month program, nobody was questioning their inclusion. With that in mind, I thought I’d use today’s article to outline my top five reasons for including speed deadlifts in one’s strength training program.
First, however, I think it’s important to outline what a speed deadlift is. Simply take any variation of the deadlift, and perform it at a lighter percentage: 35-80% of one-rep max (1RM) for sets of 1-5 reps. The higher the percentage, the lower the rep scheme, and vice versa. Examples include 8x1 at 80% of 1RM, 6x3 at 50% of 1RM, and 4x5 at 35% of 1RM. It’s possible to add chains or bands to the exercise, too, if you have access to them. You would rest anywhere from 30s to 120s between sets.
The most important factors, however, are perfect technique and excellent bar speed.
The bar should feel like it is exploding off the floor straight through to lockout.
Now, let’s get down to the reasons you might want to include it in your program.
1. Technique practice
I’ve coached a lot of deadlifts in my career, and people tend to fall into one of three categories:
a. Great technique (~5% of people)
b. Great technique until the load gets heavy (~60% of people)
c. Terrible technique (~35% of people)
In other words, 19 out of 20 people’s technique will go down the tubes as soon as the load gets heavy, so they might as well work on technique as they gradually build the weights up.
When you first took driver’s education class, you didn’t go straight for 65mph on the highway, did you? Nope, you drove around a parking lot, and then headed out for some back roads with very little traffic. Deadlifts are the same way; master the easy stuff before you get to the advanced stuff.
2. Improved bar speed off the floor
Imagine two lifters, both of whom are attempting 500-pound deadlifts. Lifter A puts a ton of force into the ground quickly at the start, and the bar jumps off the ground. Lifter B puts the same amount of force into the ground, but it isn’t applied as quickly, so the bar comes off a bit more slowly. Which lifter is more likely to complete the deadlift? My money is on Lifter A. Bar speed off the floor matters, and that is a very hard thing to teach at higher percentages of 1RM.
What you have to realize is that explosive strength (also known as rate of force development) is dependent on the INTENT to apply force rapidly (lift quickly), not the actual bar speed. An isometric muscle action can be explosive even though the bar doesn’t actually move; just imagine an elite deadlifter pulling against a bar 500 pounds heavier than his 1RM. He’s still applying a lot of force to the bar – and doing so quickly – but the bar isn’t moving. Take a look at my missed deadlift at the 2:12 mark of this video, as an example. You’ll see the bar bending, even if it isn’t moving; there is still force being applied. Advanced lifters get that.
The problem is that less experienced lifters don’t appreciate that you can be explosive in an isometric action; they have to have the feedback of the bar moving fast to teach them that they’re actually being explosive. And, that’s where speed deadlifts can be a great teaching tool and practice mechanism.
3. Power development
In an old installment of The Contreras Files, Bret Contreras did a great job of making a case for submaximal conventional and trap bar deadlifts (30-40% of 1RM) as potentially being as valuable as Olympic lifts in terms of the peak power production, in light of some recent research. I think we all still have questions about this comparison, as the Olympic lifts require an athlete to apply force for longer (greater ROM) on each rep (allowing for greater carryover to athletes), and more seasoned Olympic lifters may be able to demonstrate higher power numbers simply from better technique. However, the important takeaway message with respect to my article today is that submaximal deadlifts can, in fact, be a great option for training peak power - and I'd definitely recommend them over Olympic lifts for folks who don't have a qualified Olympic lifting coach available to teach technique.
4. Double extension is probably safer than triple extension in older, uncoordinated, inexperienced exercisers.
I'll probably get some nasty comments for this point; oh well.
We know that as people get older, the age-related loss in power is a huge deal. So, training power is important for not only folks who are trying to get stronger and more athletic, but also folks who just want to preserve power for quality of life purposes. I'd love nothing more than to be able to do loads of jumping, sprinting progressions, and Olympic lifts with a middle-aged population, but I'm just not sure that's a good idea in light of the number of degenerative Achilles tendons there are in the crowd, and how poorly many folks move. These are exercises toward which we can build, no doubt, but early on, double extension exercises for training power can still be beneficial.
I think this is one of many reasons that kettlebell swings have become so popular; they allow you to train power via double extension with a lot of the same benefits as the aforementioned modalities, but more safely. Speed deadlift variations can work in much the same way: double extension, compound exercise, plenty of opportunity for power development, and less risk. Eventually, when you want to start to introduce some eccentric challenges and triple extension, skipping drills, uphill sprints, and sled sprints are all good ways to do so gradually.
5. A way to train squats and deadlifts on the same day without feeling like poop.
Heavy squats are hard, and so are heavy deadlifts. Doing both on the same day is brutal - and it can increase your injury risk in training. Accordingly, powerlifters need to lower the intensity on one of the two if they want to get in plenty of quality work on both.
On this front, a training approach that worked really well for me during my powerlifting career was two have two lower body days per week, and break them up as:
Day 1: Squat for Speed, then Deadlift Heavy
Day 2: Squat Heavy, then Deadlift for Speed
Speed deadlifts allowed me to train bar speed, pull frequently enough to enhance technique, and get girls to like me - all without feeling like poop. It was a win/win situation.
Speed deadlifts aren't the be-all, end-all of training initiatives, but then again, nothing is for everyone at every time. One thing that makes them unique is that they yield benefits to beginner, intermediate, and advanced lifters - but for all different reasons. Try incorporating them here and there in your training and I think you'll find them to be valuable.
For more deadlifting tips, I'd encourage you to check out our free newsletter opt-in offer. When you sign up (no charge), you'll receive a detailed 9-minute video tutorial and three-part follow-up series on the deadlift. You can sign up here: