It's been a while since I posted an "Exercise of the Week," but hopefully today's offering will atone for that, as this is one of my favorite exercises to program in the late off-season period for our athletes. Check out the video below to learn how to deadlift using a trap bar and bands.
For more deadlift technique insights - including a nine-minute instructional video and three-part follow-up series, sign-up today for our FREE!
Today marks the third installment of a series that looks at the coaching cues we use to optimize training technique at Cressey Performance. Today, we'll focus specifically on deadlift technique coaching cues. Additionally, if you really want to learn how to deadlift from scratch, I'd encourage you to subscribe to my free newsletter, as you'll receive a video deadlift technique tutorial when you do so.
1. Touch your butt to an imaginary wall a foot behind you.
"Hips back" is a cue that works great for many people when it comes to coaching deadlift variations, box squats, toe touch progressions, and a host of other exercises requiring a good hip hinge. For those with less-than-stellar "movement awareness," I prefer to give a slightly different reference point.
You see, "hips back" is an internal focus coaching cue; it focuses on the athlete moving part of his/her body. The imaginary wall, on the other hand, is an external focus cue; it's just an inanimate object that serves as a reference point for the athlete. With the "touch your butt to an imaginary wall a foot behind you" cue, you give an athlete both internal and external focus options, so it's more likely that one of them will register. Plus, "butt" may register a bit more with folks who can't don't understand how to dissociate the hips from the lower back.
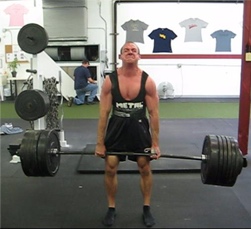
2. Show me the logo on your shirt.
Also on the deadlifting front, many individuals simply don't grasp the concept of "chest up" when they're in the bottom position of a deadlift and want to go hunchback on you. However, I haven't met a lifter yet who doesn't understand what I mean when I stand in front of them and say, "Show me the logo on your shirt." Again, "me" is an external cue that helps to fix things up.
Take note of the New Balance logo on the front of my shirt during this deadlift; is there ever a point during the lift that you don't see it?
This isn't just for singles, either. You'll see the logo on Tony's shirt on every rep on this set of eight reps.
Now, let's compare two heavier lifts - one that was awful on this front, and two that were significantly better. This first one was taken in August of 2007. Notice how the logo disappears, and my spine looks like it's going to explode?
Now, compare that to the deadlifts (1:40 mark through the end) in my mock/impromptu powerlifting meet two weeks ago. You'll notice that you never lose sight of the logo on my shirt.
3. Don't just lift; put force into the ground.
I've found that folks often get so caught up in the moment when they approach heavy weights on the deadlift that they will simply do anything it takes to get the bar up (reference my ugly August 2007 deadlift from above). However, what they fail to realize is that they'll be stronger if they put themselves in the most biomechanically correct position possible.
In the context of the deadlift, this means not allowing the bar to get too far away from the body. If you do, it's like sitting on a seesaw opposite someone, but letting them move further away from the center point; you've made them feel heavier without actually changing the weight. In other words, crushing big weights on the deadlift is about keeping the bar close to the primary axis of movement: the hips. It's why most lifters will be slightly stronger on a trap bar deadlift than a conventional deadlift; the weight is positioned closer to the hips. And, it's also why folks with long femurs usually can lift more weight with sumo deadlifts (and do so more safely).
Regardless of the deadlift variation in question, I've found that more advanced lifters can really benefit from thinking more about just putting force into the ground. This doesn't mean you have to stomp your heels down (I actually used to do that, but don't any longer), but rather just engaging your posterior chain to take tension out of the bar and ensure that the bar starts out in the right path: close to you. Some cues that go hand-in-hand with this are #2 from above (show logo) and "pull back, not up."
Sign-up Today for our FREE Newsletter and receive a four-part video series on how to deadlift!
When it comes to strength training programs, the basics work. They always have, and they almost always will. However, sometimes, they don't. The more advanced you get, the more often you'll need to shake things up to ensure continued progress.
Sometimes this is as simple as taking a deload week, changing your exercise selection, undertaking a specialization program, or bringing in a hype guy to pad your ego.
With that in mind, I thought I'd use today's post to introduce a way you can integrate some variety in your strength training programs to avoid plateaus and keep things interesting. That strategy is to go concentric-only. Let me explain.
The eccentric (lowering) portion of each rep is what causes the most muscular damage and post-exercise soreness. A common deloading strategy that many lifters have employed is to reduce the amount of eccentric work in a strength training program, instead utilizing concentric-only (or predominantly concentric) lifts. These strength exercises include deadlifts (uncontrolled eccentric or dropping the weight), high pulls, step-ups, sled pushing/dragging, and Anderson squats. Have a look at this video and let me know how much eccentric work I actually did:
Then, consider that a step-up variation under load allows a lifter to attain some of the benefits of single-leg training without all of the debilitating soreness one feels when sitting down to the toilet for the 3-4 days following walking lunges.
And, consider sled pushing. It might make you hate life and lose your lunch, but it won't make you sore.
What folks might not consider is that this doesn't just have to be a deloading strategy; it can also be a loading strategy. It goes without saying that if you are employing more concentric-only exercises, you can train more frequently. So, for those of you who are considering squatting or deadliting 3x/week in a specialization block, you might consider getting more concentric-only work in so that you can still groove movement patterns and load considerably, but without the same degree of tissue-specific damage.
Utilizing more concentric-only variations can also be very helpful with in-season athletes when you want to avoid soreness at all costs, as I wrote here. However, it's important to note that this is not a long-term training strategy. Rather, it should be a short-term change of pace, as eccentric control is tremendously important for athletes and fitness enthusiasts alike. Experiencing eccentric stress is crucial to prevent injuries, performing at a high level, and building muscle mass. Nonetheless, start thinking about how some concentric-only work might help to take your strength training programs to the next level.
In collaboration with Cressey Performance Coach Greg Robins, here are this week's tips to get your nutrition and strength and conditioning programs on track.
1. Avoid quad dominance on trap bar deadlift technique.
2. Eat more pumpkin!
Fall is here! For those of you who don't know, I love fall. The air smells better, the leaves put on their party pants, football arrives, sweats and hoodies become fashionably acceptable (by my standards), and, of course, pumpkin flavored everything becomes available! While pumpkin tastes great, it's actually quite good for you, too! For starters, pumpkin seeds are a great source of essential fatty acids. That's probably not breaking news to you, but you know what is? Pumpkin oil actually exists! It is delicious as a dressing, and an easy addition to shakes and smoothies. Just make sure not to cook with it, as the heat will destroy the important fatty acids.
You may have noticed that pumpkins are orange - very orange, actually. That means they, too, provide the health benefits found in other vividly orange fruits and vegetables. These include high amounts of carotenoids and vitamin C. Carotenoids help fight free radicals in the body, cardiovascular diseases and infection. Just like carrots, the high lutein & zeaxanthin content protects the eyes, and prevents formation of cataracts. You will also be happy to know that pumpkin is low calorie and serves up a tremendous amount of quality fiber. Do you like pumpkin too? If so, please do me a favor and let's get some recipes posted up in the comments section!
3. Be careful about looking to professional athletes for nutrition advice.
In a recent study conducted at the Rudd Center for Food Policy and Obesity at Yale University, researchers investigated the use of sports references in the marketing of food and beverage products at supermarkets. Every product fettered in two major supermarkets with a sports reference was purchased and evaluated for its nutritional merit, via the Nutrient Profile Model. Researchers found that"72.5% featured a character exercising, 42.2% were endorsed by a professional sports entity, and 34.0 % were child-targeted." The median nutrition score, out of a possible 100 (being the healthiest), was 36! Additionally, more than two thirds of the beverages purchased were 100% sugar sweetened. Needless to say, the message being delivered to kids is not great. Therefore, it's important for the rest of us to serve as better examples for these kids. After all, many young athletes will not play sports professionally, but the lessons they learn in the gym and on the field can serve them for life.
As an example, just last week I was in the office with Chris Howard not even an hour after I had told one of our college prospects about my usual shake ingredients, when he received a text message: "Where can I buy chia seeds and coconut oil?" Furthermore, not a week goes by that I'm not greeted with the oh-so-pleasant sound of: "I made that shake, it was great!" or "I tried kale last night, it was actually pretty good!" Little tips and cues can go a long way when they come from the right person.
4. Shut everything off to really relax.
I (Eric) am a complete workaholic; that probably isn't a surprise to anyone who has followed me for an extended period of time. One thing I've learned over the years is that I can't just shut my brain off for a few hours by going out to dinner or catching a movie; it's really always going. That's a blessing and a burden. On the positive side, it helps me to come up with a neverending content stream for this blog, but on the not-so-positive side, I can get easily distracted when I should be spending quality time with family and friends.
With that in mind, I've discovered that I need to really get away if I'm going to relax. The only time my brain really turns off is when I don't have my laptop with me, and my cell phone is either turned off or in a dead zone. I've discovered this on two trips up north to Maine this summer. The end of the day rolled around, and I realized I'd managed to turn my brain off with respect to work for the entire day - and that's a big deal for me. With a view like this, my morning reading wasn't too stressful!
So, if you're a workaholic like I am, make sure that when you plan time off, it means technology off, too.
5. Taste the fish before you try to learn how to fish.
I'm sure many of you have heard the Chinese proverb, "Give a man a fish and you feed him for a day. Teach a man to fish and you feed him for a lifetime."
In the context of strength and conditioning programs, this means that many folks would benefit from learning to write their own programs. However, it's easy to get overwhelmed with this task if you haven't already done a lot of strength and conditioning programs to get a feel for how a session should flow, what exercises should be included, how you respond to fluctuating training stress, and a host of other factors. So, it's not a bad idea to taste the fish (try some programs) before you run out to buy a fishing pole and bait, then spend all day knee-deep in water (attempting to write your own program).
When you are ready to try to write something up for yourself, check out this webinar.
Here are some strength and conditioning and nutrition tips to help you lose fat, gain muscle, get strong, and scare obnoxious kids off your lawn, compliments of Cressey Performance coach, Greg Robins.
1. A friendly reminder: you're not that special.
After recently perusing the internet, I felt the need to give you this friendly reminder. I came across (as I am sure many of you have) the commencement speech delivered by David McCullough, Jr. to the 2012 Wellesley High School graduating class. I enjoyed his speech greatly, and found that much of it can be applied to training, nutrition, and athletics.
You're not that special. The reason you're not getting stronger likely has nothing to with your program. The reason you're not losing body fat is probably not a major fault in the nutrition plan you were given. The athletes who impress me the most are the ones who pick up their teammates. They're the ones who celebrate wins and mourn losses as a team, not the ones who advocate their own success and dwell upon their individual shortcomings.
You aren't making progress because you aren't consistent. You aren't losing fat because you're not following that nutrition plan. You aren't impressing coaches because you are not willing to be a team player. Stop worrying about what strength and conditioning program you're on, seek out those who know what they're doing, and devote yourself to that approach. Stop dissecting your nutritional approach and truly embody the basics of better eating. Stop keeping your athletic talents on a pedestal, show up to practice every day, and work hard to make yourself and your teammates better. Stay humble, stay hungry.
As an interesting little aside to this, check out this recent report that New England Patriots coach Bill Belichek removed all jersey numbers from practice uniforms this week as a means of building team unity. Nobody gets special treatment, even if they're a well-known name.
2. Focus on bar speed as much as you focus on bar load.
One of the biggest mistake I see - particularly with intermediate to advanced lifters - is thinking that they need to be setting personal records in every single training session. While you'll certainly hit a few PRs employing this strategy (and there are certainly times to get after them), this expectation is a quick way to not only get discouraged, but burned out on training.
Let's say that Tank's best trap bar deadlift is 415.
Do you really think that - at the end of the day - his body will appreciate a huge difference adaptation-wise between grinding out a rep at 435 and absolutely smoking a single at 400? The time-under-tension difference on one rep is trivial, the injury risk is dramatically higher with the PR attempt, and you run the risk of developing poor technique habits under significant load.
Don't get me wrong; you should still seek to constantly get stronger in your strength training programs. However, you should appreciate that you can still get stronger by leaving a rep or two "in the hole" in some of your sessions, particularly as you get older and more experienced. And, as Anthony Michal pointed out in a recent guest blog for Bret Contreras, you can still get strong at 75-85% of one-rep max - even if a large percentage of your training is performed there.
3. The pullover is a forgotten gem, and we can make it better!
The DB pullover can serve as an outstanding exercise for those who can safely perform it. The benefits of the exercise are three-fold. First, it build tremendous strength in the anterior "core" as one resists excessive lumbar hyperextension. Second, the exercise provides a nice "active stretch" for the lats. Third, it can be a great strength exercise for the lats when someone has medial elbow issues that prevent them from doing the intensive grip work that chin-up and pull-up variations mandate.
Athletes should be cued to keep the rib cage down as the shoulders move further into flexion. Also, make sure that athletes contract the glutes while in the bridge position, and don't allow a forward head posture to occur.
4. Fitness professionals should be supportive of injured athletes and clients.
At Cressey Performance, we receive a lot of referrals of athletes who have recently undergone surgery and/or physical therapy. It is no surprise that many of these athletes are not in the greatest place mentally about their injuries. Can you blame them? As an athlete, your world largely revolves around playing sports and an injury can lead to a bit of an identity crisis; sports are a huge part of your life that can be taken away overnight. With that in mind, how important is it as a strength coach to keep these athlete's positive about their return to the game? Furthermore, what impact to do we have on their outlook?
A recent study published in the Journal of Strength and Conditioning Research looked at the perceived social support from strength coaches among these injured athletes. The results found that:
"...the strength coach (SC) had a significant psychosocial impact on student-athletes' overall psychological well-being during reconditioning. This study provides evidence of the vital psychosocial role that SCs can play during an injured student-athlete's reconditioning program."
Make sure that you do not ignore an athlete because he or she may be unable to fully participate (or participate at full intensity) in your strength and conditioning program. Give positive feedback, attention, and show them that you care. It can make the difference in their recovery and there is no greater feeling than helping an athlete beat the odds and return to top shape post-injury.
5. Find ways to make fitness social.
We often hear about how you need to "shut up and squat" when you're in the weight room, but the truth is that the overwhelming majority of lifters who are successful long-term are great friends with their training partners. Nobody can be "on" all the time, and while it's important to get serious when you get under the bar, you'll usually find a lot of joking around between sets in even the most accomplished powerlifting and Olympic lifting gyms on the planet. Training is supposed to be fun, and if it isn't, you need to find a way to make it more enjoyable.
At Cressey Performance, the Thanksgiving morning lift is always very popular, and we notice that many clients really get extra motivated when they see our staff training hard, too.
We have athletes who schedule their training sessions so that they can lift with friends for extra motivation, and even kids who book sessions when certain professional athletes are in so that they can draw inspiration from those who are living their dreams. I also love it when we get coaches from other facilities, colleges, and pro teams training with our staff when they visit CP, as you get to see what they're doing and chat a bit between sets.
Whether it's recruiting your spouse for a walk in the park, calling a buddy to spot you on the bench, or rounding up a team of college roommates to do an adventure race, it's valuable to find ways to get friends in on the fitness fun.
Sign-up Today for our FREE Newsletter and receive a four-part video series on how to deadlift!
There might not be a more obnoxious and stubborn athletic injury than the hamstrings strain. When it is really bad, it can bother you when you're simply walking or sitting on it. Then, when a hamstrings strain finally feels like it's getting better, you build up to near your top speed with sprinting - and it starts barking at you again. In other words, a pulled hamstrings is like a crazy, unpredictable mother-in-law; just when you think you've finally won her over, she brings you back down to Earth and reminds you how much more she liked your wife's old boyfriend.
However, not all hamstrings pain cases are true strains; more commonly, they present as a feeling of "tight hamstrings." If one is going to effective prevent this discomfort, rehabilitate it, or train around it, it's important to realize what is causing the hamstrings tightness in the first place. Here are five reasons:
1. Protective Tension of the Hamstrings
This is readily apparent in someone who has a crazy anterior pelvic tilt, which puts a big stretch on the hamstrings, which posteriorly tilt the pelvis. When someone is extremely anteriorly tilted, the hamstrings are constantly "on" to prevent someone from ending up with extension-based back pain, such as spondylolysis (vertebral fractures), spondylolisthesis (vertebral "slippage"), and lumbar erector tightness/strains. This is a problem most commonly seen in females (greater anterior pelvic tilt than men) and athletes:
Doing a lot of longer duration static stretching for the hamstrings in this population usually isn't a great idea, as you run the risk of making someone more unstable - particularly in the case of females, who have less rigid ligamentous restraints (more congenital laxity) to protect them. To that end, our approach with these folks is to use the warm-ups to foam roll the area, then do some hamstrings mobilizations to transiently reduce stiffness in the hamstrings.
After this reduction in stiffness, we work to build stability in synergists to the hamstrings in posterior pelvic tilt. In other words, there's a heavy emphasis on glute activation and anterior core recruitment both with a strength training program and postural reeducation for the other 23 hours of the day.
At the end of the training session, with the male athletes, we may do some shorter duration hamstrings stretching just to "dissipate" a little eccentric stress. I like ten seconds in each of these three positions:
The thing to remember is that while you can do everything right with these athletes in training, what they do with their posture during the rest of their lives is of paramount importance. If they continue to stand around in anterior tilt and don't help the new stiffness they've developed "stick," they'll continue to over-rely on their already tight hamstrings.
2. Neural Tension
Just because you feel hamstrings tightness doesn't mean that the hamstrings are actually the source of the problem. In fact, it's not uncommon at all for those with lumbar disc issues to present with radicular pain, tightness, or numbness/tingling into the legs - especially the hamstrings. The symptoms may also come from nerve entrapment (most commonly the sciatic nerve) on soft tissue structures further down the chain. Just aggressively stretching the hamstrings can actually make these symptoms worse, so it's important to see a medical professional to rule out causes further up with the appropriate clinical exams, such as the slump test.
3. Truly Tight Hamstrings
In order for hamstrings to really be short, one would have to spend a lot of time with the knee flexed and hip extended - so just imagine the position you're in at the top of a standing leg curl. That's a hard pose to hold for an extended period of time, much less do so on a regular basis.
That said, some folks do get somewhat close to that on a daily basis in the sitting position, and are therefore the most likely to really have "tight hamstrings." They have to be in posterior pelvic tilt and knee flexion for a considerable chunk of the day - and even then, it's still pretty tough to be truly short, as they are still in hip flexion.
These folks usually can't distinguish hip flexion from lumbar flexion, so if you do a standing hip flexion assessment, rather than maintain the neutral spine we see in this photo, they'll go into lumbar flexion (butt will "tuck under").
The same trend will usually be noticeable with any kind of squat unless they have a tremendous amount of core stiffness to overcome the posterior hip stiffness that's present. If you test these folks on an straight leg raise, it isn't pretty, as the pelvis is already posteriorly tilted. In a pelvis that starts in "neutral" on a straight leg raise, roughly the first 1/3 of movement that you see comes from posterior tilt of the pelvis before the femur ever starts to flex on the acetabulum of the pelvis. These folks are usually already posteriorly tilt, so that 1/3 is already used up; you're really only measuring hip flexion and not hip flexion PLUS posterior pelvic tilt. And, as you can imagine, if someone is truly short in the hamstrings, that straight leg raise isn't going to be pretty. Obviously, these folks usually have a terrible toe touch pattern as well.
This should also educate you on why you can't treat all hamstrings strains the same. In the protective tension example earlier, we needed to work to regain stability to hold a position of a bit more posterior pelvic tilt. We'd cue glute activation, and use exercises that draw folks back into posterior tilt (e.g., reverse crunches). If you have someone has a pulled hamstrings because they are truly short from already being in posterior pelvic tilt, though, some of these cues and exercises would be contraindicated. You'd be feeding the dysfunction.
While manual therapy and stretching for the posterior hip is valuable, again, it must be followed by stabilization work at adjacent joints with the pelvis in a neutral position. These folks can benefit from training hip flexion above 90 degrees as well, as it educates them on how to flex the hip without rounding the lumbar spine. This is one reason why I think a lot of the chop and lift exercises we've learned from Gray Cook are so fantastic; they teach us anti-rotation and anti-extension stability in various positions of hip flexion while the pelvis is in neutral. They make changes "stick" better.
4. Previous Hamstrings Strain
Not to be overlooked in this discussion is the simple fact that the single-best predictor of hamstrings strains is a previous hamstrings injury. One you have an injury, that area may never be the same from a tissue density standpoint - whether it's the surrounding fascia or the muscle or tendon itself. A previous injury can leave athletes feeling "tight" in the region, so regular manual therapy can certainly help in this regard.
Anecdotally, the athletes with the long-term problems seem to be the ones with the pulls up on the gluteal fold, right where the hamstrings tendons attach to the ischial tuberosity. The area gets "gunked up"in a lot of athletes as it is because of all the tissues coming together and exerting force in a small area, but it's especially problematic in those who have a previous injury in the region. Perhaps more problematic, though, is the fact that we sit on our proximal hamstrings attachments - and that isn't exactly good for blood flow and tissue regeneration.
I haven't seen any research on it, but I have a feeling that if you looked at this region in a lot athletes with ultrasound (similar to this study with patellar tendons), you'd find a ton of people walking around with substantial degenerative changes that could be diagnosed as tendinosis even though they haven't actually hit a symptomatic threshold. My guess is that it's even worse in the posterior hip region because a) we sit on it, b) the ischial tuberosity is a more "congested" area than the anterior knee), and c) the study I noted above used 14-18 year-old athletes, and degenerative problems will get worse as one gets older (meaning this study likely undercut the true prevalence across the entire population).
Very simply, an athlete with a previous hamstrings strain needs to stay on top of quality manual therapy on the area, and be cognizant of maintaining mobility and stability in the right places. They have less wiggle room with which to work.
5. Acute Hamstrings Strain or Tendinosis
Of course, the fifth reason you hamstrings might be tight is because you might actually have a hamstrings injury! It could be an actual hamstrings strain, or just a tendinosis (overuse issue where tissue loading exceeds tissue tolerance for loading). There is no one perfect recommendation in this regard, as a tendinosis or grade 1 hamstrings strain is going to be much more tolerable than a grade 3 hamstrings strain where you have bruising all along the back of your thigh.
In terms of maintaining a training effect with the less serious ones, here are a few suggestions:
a. When you are ready to deadlift, use trap bar deadlifts instead of conventional or sumo deadlift variations. I explain a bit more about how the positioning of the center of gravity makes this more hamstrings friendly HERE.
b. Shorten up your stride on single-leg exercises. This makes the movement slightly more quad dominant, but allows you to still get the benefits of controlling the frontal and transverse planes with appropriate glute and adductor recruitment at the hip.
c. Go with step-up and reverse sled dragging variations. Eliminating the eccentric component can take a considerably amount of stress off the hamstrings, and both these exercises get the job done well.
d. If you're going to squat, start with front squats at the beginning, and reintegrate back squat and box squat variations later on, as they will be more hamstrings intensive.
e. Understand anatomy. If you are in hip flexion and knee extension, you're going to really be stretching the hamstrings and likely irritating them in the process. Select exercises that don't hit these painful end-ranges, and then gradually reintroduce more dramatic ranges of motion as the issues subside.
f. Do hill sprints before you do regular sprints. Your stride is going to be a bit shorter with hill sprints, and that'll take a considerable amount of stress off the hamstrings at heel strike (pretty good research on uphill vs. downhill sprinting HERE, for those who are interested). Just don't go out and run as hard as you can the first time out; propulsive forces are still quite high.
Of course, this just speaks to how to train around a pulled hamstrings; there is really a lot more to look at if you want to really understand why they occur and how to prevent or address them. In my eyes, this post was necessarily "geeky," as it is important that we don't dumb down complex injuries to "just stretch it out." This recommendation is analogous to a doctor just telling someone to take some NSAIDs for regular headaches; it doesn't get to the root of the problem, and it may actually make things worse.
One of the biggest concerns players have when it comes to in-season strength and conditioning programs is whether or not a particular exercise will make them sore. It's a valid point, when you consider the profound effect soreness can have on a baseball athlete's performance - both physically and mentally. As such, it's important to select exercises that provide a great training effect, but won't necessarily create a lot of soreness for a player.
The first important point to recognize is that strength exercise familiarity will minimize soreness. In other words, if an athlete has already done an exercise in the previous 7-10 days, it shouldn't make him very sore (if at all). This is one reason why I like to introduce new exercises in the week prior to the start of the season; we can "ride out" those exercises through the first 4-6 weeks of the season without worrying about soreness.
Of course, once you get past that initial stage, it's a good idea to change things up so that athletes will continue to progress and not get bored with the strength training program. One way to introduce new strength exercises without creating soreness is to minimize eccentric stress; so, essentially, you're selecting exercises that don't have a big deceleration component. This is tricky, as most athletic injuries occur from poor eccentric control (both acutely and chronically). So, we can't remove them completely, but we can shoot for a 50/50 split. To that end, we'll typically introduce our more intensive lower-body eccentric strength exercises (e.g., Bulgarian Split Squats) on a day when an athlete can afford to be sore (e.g., the day after a pitcher starts) for a few days. If that isn't a luxury, we'll simply go much lighter in that first week.
To that end, here are five "general" strength exercises I like to use in-season with many of our athletes.
1. Step-up Variations - I'm normally not a big fan of step-ups for off-season programs because they don't offer a significant deceleration component, but they can be useful in-season when you're trying to keep soreness out of the equation. Anterior-Loaded Barbell Step-ups are a favorite because they still afford you the benefits of axial loading without squatting an athlete.
2. Deadlift Variations - It goes without saying that I'm a huge fan of the deadlift (check out this tutorial if you need suggestions on How to Deadlift), as deadlift variations afford a host of benefits from strength, power, and postural perspectives. They're also great because there isn't much of an eccentric component unless you're doing stiff-leg deadlift variations. With that in mind, we utilize predominantly trap bar and sumo deadlift variations in-season.
3. Sled Pushing/Dragging - A lot of people view sled training as purely for metabolically conditioning guys, but the truth is that it actually makes for a great concentric-only strength exercise while helping to enhance mobility (assuming you cue an athlete through full hip extension on forward pushing/dragging variations).
Just make sure to keep the load heavy and distance short.
4.1-leg Hip Thrusts off Bench - This is a great "halfway" exercise with respect to eccentric stress. For some reason, even if you lower under a ton of control and with additional load (we drape chains over the hips), this exercise still won't make your posterior chain sore. A big shout-out goes out to Bret Contreras for bringing it to the forefront!
5. 1-arm DB Bulgarian Split Squats from Deficit - The asymmetrical load to this already asymmetrical (unilateral) exercise allows you to get a training effect without a ton of resistance (especially with the increased range of motion provided by the deficit). It'll still create some soreness, but it's another one of those "halfway" exercises where the soreness isn't as bad as you'd expect, especially if you phase it in a bit lighter in week 1 of the new strength training program.
These are just five of my favorites, but a good start, for sure. Of course, we still need to do a better job of educating "the masses" about how important it is to even do an in-season strength training program!
Sign-up Today for our FREE Newsletter and receive a four-part video series on how to deadlift!
Today, we have a guest blog from former Cressey Performance intern Eric Oetter, who is well on his way to a great career in physical therapy. Eric is an extremely bright up-and-comer from whom you'll be hearing a lot in the years to come. Here's a little sampling.
As part of the “pre-launch” phase for his new collaborative project, Elite Training Mentorship, Eric posted an outstanding video covering the lower-extremity assessment protocol he uses at Cressey Performance. For those who haven’t yet seen it, follow the link here; you won’t regret it.
In the video, Eric mentions three different factors that can contribute to mobility deficits at the hip: muscular restrictions, capsular restrictions, and bony restrictions. While the first two – muscular and capsular – can be relatively easy to decipher based on the test position of the hip, identifying bony restrictions can be tricky unless you’ve got access to a client’s radiological imaging. For this reason, it’s important to appreciate any structural variations in the skeletal system that can underlie joint malalignment at the hip.
The focus of this piece is a structural variation called hip anteversion. We’ll be covering the joint morphology associated with anteversion, along with a quick orthopedic test and some implications for programming.
What is hip anteversion?
Excerpted from the 2002 text Diagnosis and Treatment of Movement Impairment Syndromes, Shirley Sahrmann describes hip anteversion as the following:
“ … the angle of the head and neck of the femur is rotated anteriorly, beyond that of the normal torsion with respect to the shaft. The result is a range of medial hip rotation that appears to be excessive, whereas the lateral rotation range appears to be limited.”
Essentially, clients who present with this structural abnormality were born with, or have acquired, a more internally oriented neutral position for their femurs as they sit in the acetabulum (or hip socket). To be classified as anteverted, the femoral head and neck must be rotated more than 15° anteriorly with respect to the plane of the femoral condyles (Sahrmann 2002). (Conversely, a posterior rotation of the femoral head and neck would constitute a retroverted hip.)
When observed standing, clients with hip anteversion will often present with femoral adduction and genu valgum – the classic “knock-kneed” posture. As kids, these clients likely eschewed “indian-style” for W-sitting – a position much more congruent with their natural femoral alignment.
While some might also classify “pigeon-toes” as an indicator for anteverted hips, this is not always the case. In the presence of anteversion, some clients – especially athletes – will develop a tibial torsion as a result of the applied stresses to the lower extremities. This adaptation allows for a neutrally aligned sub-talar joint in the face of morphological changes up the kinetic chain.
The largest implication of hip anteversion or retroversion is a significant discrepancy between hip internal and external rotation. As described in the Sahrmann quotation above, hip anteversion creates an apparently large amount of internal rotation (IR) with a reciprocal loss of external rotation (ER).
I liken these morphological changes to those seen in the retroverted shoulder of an overhead throwing athlete. The total hip range of motion (IR + ER) can present at around 90°, or “normal”, but these measures are drastically skewed in one direction of rotation.
Whereas a retroverted shoulder presents a favorable adaptation in baseball, the same cannot always be said for the athlete with anteverted hips.
If undiagnosed or mismanaged, hip anteversion can create pathology. Expect issues like knee pain, back pain, and hip instability (Sahrmann 2002). For this reason, it’s imperative to recognize anteversion when it presents and apply the programming modifications necessary to accommodate this structural abnormality.
So how can I test for it?
Although checking IR and ER in both supine and prone can highlight limitations in the capsule or surrounding hip musculature, you’ll need an extra orthopedic test at your disposal to clear the skeletal system. For this purpose, we’ll use the Craigs’s test.
Assuming you’re following the assessment outlined in Eric’s video, the best time to perform a Craig’s test is immediately after you’ve assessed a client’s hip rotation in prone, especially if you detect a glaring asymmetry between IR and ER.
Note the client in the photos below – here, we see an excessive amount of IR (~50°) met with limited ER (only ~20°). With a rotational deficit of ≥30°, this client may have some torsional issue at play; thus, a Craig’s test indicated.
With the client remaining in prone the knee held in flexion, the Craig’s test is performed by first palpating the same side greater trochanter, a landmark on the femur that protrudes laterally about 5 inches below the iliac crest. Make sure to apply flat-hand contact with the pads of the fingers – this posture allows for greater sensory feedback and precision. Once this position is assumed, begin internally and externally rotating the femur through its full range of motion.
As you rotate the leg, you’ll notice the greater trochanter tracking against your fingertips, becoming more or less prominent depending on the direction of rotation. Start shortening your oscillations until you determine the position at which the trochanter is most prominent laterally and pause once you locate it. At this range of rotation, the femoral head is optimally situated within the acetabulum.
We get a positive Craig’s test when the hip rotation at the point of ideal femoral alignment is ≥15° into IR. Also, we can now classify the hip as anteverted, providing useful insight for the dexterous coach.
Check out the video below to see a Craig’s test performed on our client from above.
One thing worth noting – a 1992 study by Ruwe et al. showed the Craig’s test to be more reliable than radiological techniques in the assessment of femoral torsion. So, even if you have client X-rays available, a Craig’s test is still worth administering.
If the Craig’s test is positive, how should I alter programming?
Now that we’ve performed a Craig’s test and determined whether or not any torsional qualities exist, it’s time to write an effective program that respects our findings. Here are a few do’s and don’ts to consider when programming:
• DON’T stretch the hip into external rotation – this only creates impingement. We wouldn’t force the retroverted shoulder of a pitcher into an end-range sleeper stretch, so we need to take the same approach with an anteverted hip. Even though the hip is a much more durable joint, there’s no reason to drive motion that a client simply doesn’t have, as this only serves to jam the femoral head against the acetabulum.
• DO increase the amount of core work in clients with femoral torsion. When someone is stuck in internal rotation at the hip, the kinematics of the lower-extremities become predisposed towards a pronation pattern (sub-talar pronation, tibial/femoral IR, and anterior pelvic tilt).
The hip external rotators often become excessively stiff and overused, as they are constantly checking motion into adduction, internal rotation, and flexion. While increasing external rotator strength will improve the first two, we can employ the posterior fibers of external oblique and rectus abdominis to aid in flexion control, creating a more stable pelvis. By doing so, we’re also increasing stiffness at the lumbar spine, fighting any compensatory motion created by the hip external rotation deficit.
As far as exercise selection goes, focus on half-kneeling chops/lifts and anti-extension – both integrate the hips and core simultaneously to check hip flexion ROM. I especially like rollout variations for clients with hip anteversion, which are highlighted in Eric’s video below.
• DON’T introduce quad-dominant lifts until the client shows dramatic improvements in hip stability. The pronation pattern I described above is essentially a cookbook for ACL and MCL injuries. In a population that is likely anteriorly tilted at the pelvis and anterior weight bearing, the last thing we want to do is make them even more reliant on their quads. An adroit posterior chain should precede any anterior chain-focused movement.
• DO hammer the posterior chain as if your life depended on it. While this statement could serve as a mantra for most general population programming, it is even more important when dealing with anteversion of the hip. These clients sometimes present with femoral control so poor, our first goal is to simply get them to baseline.
Mastering stability in the sagittal plane takes precedence. Start bilateral with deadlift and box squat variations and increase stability demands as the client advances. Great second tier progressions include single-leg RDLs, single-leg hip thrusts, and bowler squats, all of which introduce frontal and transverse plane stability.
Lastly, exercises that force the femur into an abducted and externally rotated state are contraindicated – sumo deadlifts provide a great example. Even though pulling sumo is a fantastic variation for hip strength, it can create malalignment in the acetabulum if the hip is anteverted. In this case, it’s safer to stick with either trap bar deadlift or conventional deadlift variations.
Conclusion
Hip anteversion isn’t something you’ll likely see in every client. Johns Hopkins Medical School reports the prevalence to be ~8-10%, but that number varies based upon cultural norms and neurodevelopmental patterns, which can alter skeletal growth.
Regardless, it is an important structural variation to recognize and program for, especially in an athletic population. Taken as supplement to Eric’s lower-extremity video, I hope this article provides you another piece towards building a better assessment.
About the Author
Eric is currently a senior at the University of Georgia majoring in Exercise and Sport Science, with plans to pursue a Doctorate of Physical Therapy. After concluding a Division-1 football career at the Georgia Institute of Technology, Eric has ardently pursued his passion for coaching, garnering experience with clients of all ages and ability levels through internships at both Indianapolis Fitness & Sports Training and Cressey Performance. His articles can be found on EricCressey.com, 8weeksout.com, and in Fighting Fit magazine. You can follow him on Twitter or reach him via email at ecoetter@gmail.com.
Sign-up Today for our FREE Newsletter and receive a four-part video series on how to deadlift!
I know we have a lot of "rising stars" in the fitness and strength and conditioning communities reading this blog, so I thought I'd throw out some of my top coaching suggestions along these lines.
1. Always coach at 90-degree angles.
You'll never see everything you want to see from a 45-degree angle, so you're better off directly in front and/or to the side of the one performing the exercise. Imagine what happens when you are coaching deadlift technique, for instance.
From the side, you can observe neutral lumbar-through-cervical spine, whether the athlete is pushing through the heels or toes, and whether the movement is turning into too much of a squat.
From the front, you can watch for hip shifts, knock-knees, turning-out of the toes, and grip width (in the case of the conventional deadlift and sumo deadlift).
From a 45-degree angle, you can see some stuff - but never with as "unobscured" a view as you'd prefer.
2. Never cross your arms.
This is the single-best way to say "Don't talk to me; I'm in a bad mood." The problem is that you might not even be in a bad mood, but that's the way clients and athletes perceive it. "Open arms" equals "open to interaction."
3. Don't sit down.
How athletic is this posture?
The only way you could make yourself any more unappealing as a strength coach or personal trainer is to rock a turtleneck like the one the guy in the photo has. Standing up gives you a better view of the training room and makes you more approachable.
That said, a lot of coaches and trainers may get cranky knees and lower backs from standing on hard training surfaces for hours and hours on-end. If this is the case, you've got a few ways to break the wear and tear:
a) Demonstrate more exercises - simply getting moving will help things out, especially if you are doing a lot of ground-to-standing transitions
b) Put a foot up on a bench or weight rack here and there - going to single-leg stance can redistribute your weight and give you breaks in the action (while keeping you standing)
c) Play around with footwear and training surface - In a given day, I might coach in two different pairs of shoes and even go barefoot for a bit. I think our lower extremities like the variety (and I generally feel best in my minimalist footwear or barefoot). It's also helped me to bounce back and forth between the harder rubber training surface and the softer turf we have at Cressey Sports Performance.
4. Find out whether clients/athletes like "demonstrate" or "describe."
Some people are visual learners; you need to show them what you are asking them to do. This is especially true among beginners, and those who don't have strong athletic backgrounds (as well as those who are very forgetful).
Other people just need to hear the "what" and a few coaching cues, and they'll go right to it and be successful. They'll actually be annoyed with you if you slow things down too much and get in their way when they are ready to train. These are generally the more experienced exercisers who may have already mastered some derivative of the exercise in question (for instance, learning a 1-arm DB Bulgarian Split Squat from Deficit after they've already learned a regular Bulgarian Split Squat).
As an interesting anecdotal aside to this, last year, we had a professional baseball player come to us who had previously trained at a large facility in a group with more than a dozen other players who were all doing the same program off the same dry erase board. He spent much of his first day with us bad-mouthing the other facility, saying that all they did was "grab-ass" and "stand around," never getting anything done. After his first session, he made a point of saying how much better he liked our business and training model. The reason was very apparent: he was a "describe" learner in light of his previous training experience, but he'd been plugged into a "demonstrate" model with a lot of less experienced athletes. All they did was get in his way.
It's important to identify what kind of learner people are early on in their training with you - but also to appreciate that their learning style may change when they're presented with unfamiliar exercises.
5. Find different ways to demonstrate energy.
Many up-and-coming coaches worry that they aren't "Rah Rah" enough to be successful in this field. They seem to think that the only way to win people over is to be over-the-top excited all the time. The truth is, though, that the majority of the most successful people in the industry aren't in-your-face yellers, non-stop clappers, or bouncing-off-the-wall coaches. Guys like Todd Durkin and Dave Jack who have seemingly endless energy and great coaching ability are actually rare exceptions in our field (and I learn a lot about coaching each time I watch those two).
In reality, a lot of the other high-energy guys I've encountered use that enthusiasm to cover up for a lack of knowledge, and athletes eventually see through it. Plus, it's impossible to be high-energy all the time, so when these individuals are having rough days, they often lose their #1 coaching asset. You simply can't have bad days as a coach or trainer.
That said, there are a lot of ways to show enthusiasm without yelling all the time. Having a spring in your step is an extremely valuable asset in a trainer or coach's toolbox. If you were to watch me at Cressey Sports Performance, I never "amble" around; I always have spring in my step and am getting from Point A to Point B quickly, as it allows me to do more coaching (and interact with more people) in a given hour.
Being excited about what you're coaching is also paramount; tell athletes/clients what it's doing for them and why that's important.
Creating relationships should be a means of building excitement as well. Ask clients about their backgrounds, how they're doing, and what their goals are. People get excited and motivated when they find out that you are interested in them.
There are countless other ways to demonstrate energy on a daily basis: picking the right music, clapping your hands, creating competition among athletes, sending emails/Facebook posts/Tweets to athletes before they come in to train, or pairing up certain clients who you know will push each other. The only limitation is your creativity - and you'll find that it's easier to create energy once you know clients well, as you'll know exactly which buttons to push to get the reaction you seek.
These are just five coaching tips that immediately came to mind when I sat down to write this post this morning, but there are surely hundreds more that warrant attention. If you're an up-and-coming strength and conditioning coach or personal trainer, above all else, I'd encourage you to get out and observe coaches in the industry. Don't just watch their programming or exercise selection; rather, pay attention to their mannerisms, the flow of the facility, and how their staff carries themselves. You'll realize quickly that there is a lot more to successful coaching than just X and Os.
Sign-up Today for our FREE Newsletter and receive a four-part video series on how to deadlift!
I love writing multi-part features because it really affords me more time to dig deep into a topic of interest to both my readers and me. In many ways, it’s a challenge on par with writing a short book, whereas individual blogs tend to be quick bullet points. That said, here were five noteworthy features from 2011 at EricCressey.com:
How to Deadlift: Which Deadlift Variation is Right for You?- Part 1 (Conventional Deadlift) - This kicked off a three-part series on why certain deadlift variations may be more appropriate than others for certain lifters. Be sure to read installments 2 and 3: the Sumo Deadlift and the Trap Bar Deadlift.
Coffee Consumption and Health: The Final Word - Part 1 - As I noted the other day, one of the biggest surprises for me in 2011 was that my readers were psyched to get nutrition content at EricCressey.com, and Brian St. Pierre's guest blog on coffee consumption and health was one such example. Be sure to check out Part 2 as well.
How to Fit Core Stability Exercises into Strength and Conditioning Programs - Part 1 - This two-part feature was published late in the year, but that didn't stop it from receiving enough traffic to rank in the top five at year-end. It was a follow-up to the Functional Stability Training seminar that Mike Reinold and I presented at Cressey Performance in November. Click here for part 2.
Is Dairy Healthy? The Whole Story - Part 1 - This three-part feature was another great guest submission from Brian St. Pierre on a hotly debated topic in the nutrition world. Check out Part 2 and Part 3 as well.
Speaking of features, that wraps up this third installment of the "Best of 2011" series; I'll be back soon with the top videos of 2011.
Sign-up Today for our FREE Newsletter and receive a four-part video series on how to deadlift!


