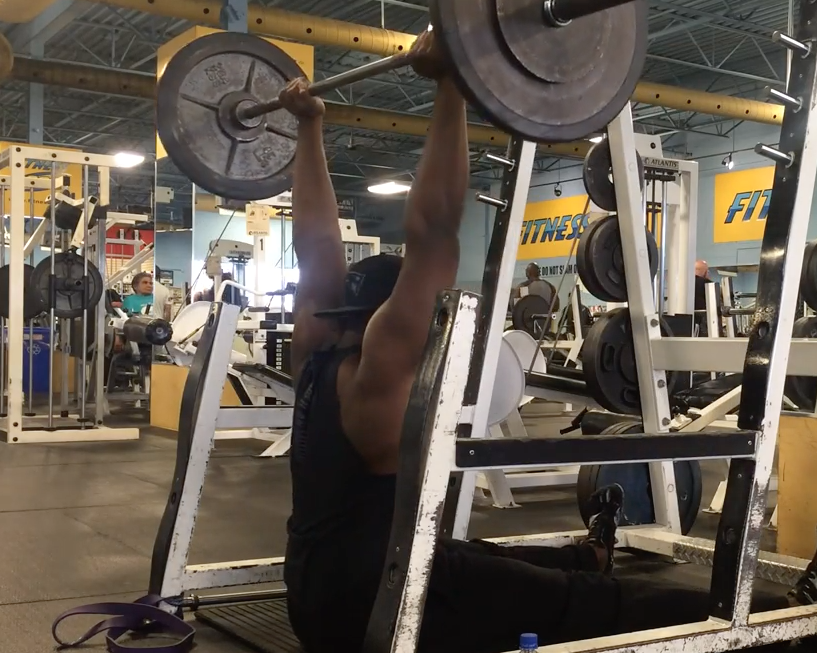
Strength Exercise of the Week: The Z Press
Today’s Exercise of the Week guest post comes from Lee Boyce.
We all know the benefits of overhead pressing. As long as the shoulder girdle is in an acceptable position to handle them, they’re worth their weight in gold for health, strength, and mobility – when performed correctly. Many lifters and athletes find strength improvements on a typical standing overhead presses stall out because of the compensatory mechanisms that enter the lift as the loading increases. Specifically, poor core control can lend to an overarched position that causes much more lumbar spine stress than the exercise should ideally produce.
This usually becomes present to a certain degree, even with what most would consider “good form” when pressing. In the video below, I was quite happy with this technique, but nevertheless, a heavy press shows that some lumbar extension is unavoidable, despite plenty of pressing strength left in the tank.
The solution to this issue is simple. Instead of backing off on overhead pressing, a better idea would be to start training the lift by eliminating the lower body from the equation using the Z Press. This fixes the pelvic position and kills the chances for any shifting of the hips, thus locking the spine into a neutral position. There’s an added benefit to this. Using this setup makes it incredibly difficult to perform reps with poor form – if you lean back too far to compensate, you’ll lose balance since your feet aren’t planted. If you slouch, the bar will go straight down.
The Z Press asks for good mobility as a prerequisite. Trying a Z press may expose shoulder mobility issues a lifter wasn’t aware he had. For many, it’s difficult to load the bar over the spine at full lockout, while keeping the spine neutral. To get the bar to the proper position in space, the hips may drift forward, or the spine may extend.
One other benefit of the Z press is enforcing the correct rhythm to be used when performing reps of a standing barbell press. Knowing when to flare the elbows, and when to time the “head through” position is important. This timing is really put to the test with the Z Press since there’s no pelvic adjustment or leg drive that can be used to “save” the lift. For a live-action demonstration, check out the video below.
Coaching Cues
1. Set the pins in the squat cage just below shoulder level. There shouldn’t be more than 6 inches between where it rests and your starting position. That’ll make it easy to pick up and drop off while in position.
2. Set your feet according to your hip anatomy and mobility. A wider leg width may be good for someone with structural hip limitations, while those with stellar mobility will feel better with a narrower stance. Be sure the set-up you choose enables you to maintain a neutral spine position.
3. Remember to sit tall. Assume that your typical overhead pressing posture will be tough to pull off from a seated position with the legs in front of you. Overemphasize sitting tall, and you’ll be in the right place.
4. Once the bar clears the forehead, push your head and chest “through the window” as best you can. This will put the spine under the bar and load it correctly over the body. Achieve a full lockout at the top.
5. Don’t be afraid to let the elbows flare out in the final 1/3 of the movement.
6. Many people won’t have the mobility to maintain upright posture while sitting flat on the ground. To regress this movement, sit on a step platform or bumper plate to start. The slightly larger hip angle will help keep the spine upright. If you watch my video again, you’ll see I’m sitting on a 1” rubber mat, which is just what I need to perfect my form at this time. Your end goal should still be to reach the floor.
7. If you have shoulder issues barbell pressing, then feel free to modify this movement by performing it with a neutral grip and dumbbells.
8. Just because your lower body is out of the picture, it doesn’t mean the hips aren’t involved. The hip flexors usually work hard to stabilize the pelvis through the movement, and chances are they’ll feel worked and tight by the end of your workout. Release and stretch them before and after.
About the Author
Lee Boyce (@CoachLeeBoyce) is a strength coach, writer, and former collegiate level sprinter and long jumper. In 2013, he was named to the training and treatment staff for Team Jamaica at the Penn Relays. He’s regularly featured in the largest fitness publications as a writer. Visit his website at www.LeeBoyceTraining.com or check him out on Facebook.


