4 Training Principles to Make the Most of Your Speed Work
Today’s guest post comes from Cressey Sports Performance – Florida coach Derek Kambour. It’s timely, as Lee Taft’s Certified Speed and Agility Coach course is on sale for $150, and it’s mandatory viewing for each of the coaches on the CSP staff. Lee’s had a profound effect on our movement training progressions, as you’ll see below. Enjoy! – EC
With the current global pandemic, you’re seeing more and more people training outside. I don’t think I’ve seen this many people going for walks, going out for long distance runs, and even sprinting since I was in elementary or middle school (before the internet became popular). Many of the athletes that we’ve been training at Cressey Sports Performance have had to adjust their training due to not having access to our facility. The majority of them will not have access to equipment and will have to address other elements of their training to maintain a training effect. One of those areas is their sprint work. Since many athletes will be shifting their focus away from heavy strength training and more towards sprints and movement based work, I thought this would be a good time to go over some key principles for athletes and coaches to think about when it comes to getting the most out of their sprint work.
1. Posture/Position
This is usually the first thing we look at when developing an athlete’s speed capabilities. This is an athlete’s foundation when it comes to speed. Simply put, if an individual can’t demonstrate appropriate posture and maintain good proximal position, then nothing else is really going to matter. There are a bunch of ways that you can go about addressing an individual’s posture. At CSP, we really like to use a variety of wall march drills. These drills are basic, but they’re great for allowing athletes to get a feel for ideal postures and positions. We will use certain variations depending on what the athlete needs to work on. For all these variations, we’re looking to see around a 45-degree angle where the head and neck is in a straight line all the way down to the foot/heel that is on the ground. The four primary variations that we will use include:
a. Glute Wall March ISO Holds – this is first variation that we will use with athletes as an introduction to acceleration posture and projection angles. This gives them a feel for proper position and provides context for further progressions that we may use. We’ll often prescribe 3-5 reps/leg with each rep being a 5 second hold.
b. Glute Wall March ISO Holds w/Mini-Band – This is a great variation to further challenge the postures and angles that we addressed with the first variation. The addition of the mini band will challenge the athlete’s ability to maintain position and gives the athlete immediate feedback on their ability to achieve hip separation.
c. Glute Wall March 1-2’s – Eventually, we want to make this drill a little more dynamic. Again, we’re looking to reinforce posture with the added challenge of maintain position while going through a rapid limb exchange.
d. Wall Load & Explode – I really like using this variation for emphasizing the horizontal projection angles required for linear acceleration.
Usually, it won’t take long for athletes to master these wall drills. Eventually, we want them to progress to more dynamic movements such as marches and skips where maintaining good posture becomes a bit more challenging. If an athlete demonstrates the ability to maintain positional integrity during basic marches and skips, we’ll progress to an arms overhead variation for both. For our purposes, we’ll have most of our athletes perform arms overhead marches and skips for the added benefit of getting shoulder flexion and upward rotation for our throwing athletes.
2. Arm Action
Along with posture, arm action tends to be one of the lowest hanging fruits when it comes to improving acceleration mechanics. I’m not a huge fan of spending a ton of time on arm action drills. Usually, effective verbal cues will do the trick when it comes to improving arm mechanics. With acceleration, we’re looking for much longer arm action where the backside arm is close to or at full extension, and the front side arm is closer to the chin or possibly the eyes, depending on the athlete. This longer separation is required in order to help propel the mass forward, and it goes along with the longer ground contact times you see with acceleration. Again, I usually rely on verbalizing this to athletes through simple cues, but I do like this Arm Action Series that I stole from Lee Taft (you can see it HERE). I’ll use this series with athletes during their warm-up or in between sets of their actual sprint work if I feel as though they need a better “feel” for their arms in a more specific body position.
Arm action is usually a pretty quick fix. If it is a major point of emphasis and something that the individual has clearly been struggling with, then be sure to be a stickler about it when it comes to dynamic warm-up activities such as your marches, skips, etc.
3. Direction of Force Application
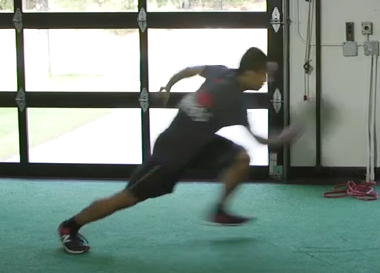
With acceleration, we are looking for maximal horizontal force application where the projection angle is roughly 45-degrees, like the angles that are explored during the wall drills that I mentioned earlier. This projection angle is largely going to depend on where the athlete applies force or where their foot strikes into the ground after completing the first step. If we are talking about starting from a staggered 2-point or 3-point stance, when the athlete takes off, we are looking for a piston-like leg action where the back-leg comes through and punches forward and then quickly punches down and back into the ground. What I’ve found is that an athlete’s speed, whether they are running a 10, 20, or 40-yard sprint, is going to be dictated by the first two steps. An athlete that can nail the first two steps of acceleration, is going to set himself up for a pretty successful sprint. This isn’t always easy to do, especially for younger athletes.
Reinforcing good leg action during marches and skips is a good place to start. You will often see athletes get too cyclical with their leg action where their heel comes too close to their butt. These are typically the individuals who will strike the ground out in front of their hips, leading to them “popping up” on initial acceleration. My go-to for athletes who have a hard time striking down and back is incorporating band resistance. I’m a big believer that in order to go fast, you sometimes need to slow things down and give athletes the time to get a feel for good position and what their body is doing. This is what band resistance essentially does. I’ll use this tool on marches, skips, and, one of my favorites, A-runs. I love using A-runs to teach the piston-like leg action and to help athletes with striking the ground under their center of mass.
There are times when athletes will execute proper leg action during these lower level activities, but then they can’t figure out how to transfer it to their sprint work. In this case, I’ll either a) have them perform these activities in between sets of their actual sprint work instead of just having them done in the beginning of their warm-up, or b) have them perform whatever sprint variation they are doing with band resistance and then immediately come back to that sprint variation without band resistance.
When I’m first introducing sprint mechanics to an athlete, I’ll usually play around with what starting position works best for them and where they feel most comfortable. Some athletes may prefer a lower position (3-point start) whereas other athletes (especially taller athletes) may prefer a variation where they initiate the sprint from a slightly higher projection angle (falling start).
4. Elasticity
Elasticity or elastic strength is arguably the most important trait or physical quality when it comes to sprint performance. Elastic strength refers to the ability to produce large amounts of force in a short period of time. There have been numerous studies that show how elite sprinters can put tremendous amounts of forces into the ground at a much faster rate compared to non-elite sprinters. How do we train the ability to put force intro the ground at a high rate? Sprinting is the most obvious answer, but this can also be accomplished through fast stretch shortening cycle plyometric activities as well. The nice thing about developing elastic strength is that it doesn’t require any equipment.
When preparing an athlete to sprint, we want to prepare specific tissues through plyometrics in a progressive manner going from least intensive to most intensive. Along with many of the dynamic warm-up activities mentioned (marches, skips, A-Runs), we like to use 1-leg Medial-Lateral Line Hops as a low-level activity to prepare the tissues of the lower leg. The middle ground can be used for activities like Pogo Jumps, Hurdle Jumps variations, and Depth Jump variations. Prior to sprint work, I like to transition to plyometric drills that address specific technical elements that translate a little more to sprinting, my favorite being bounding. With bounding, you’re developing an athlete’s stiffness, elasticity, coordination, and timing.
Hopefully, this will give some ideas as to how you can improve your sprint training as we continue to make it through this difficult time. Be safe, everyone!
Note from EC: If you’re looking to learn more about Lee’s approach to programming and coaching speed and agility work, I highly recommend his Certified Speed and Agility Coach course. The information is top notch, and it’s on sale for $150 off through Sunday. You can learn more HERE.
About the Author
Derek Kambour serves as a Strength and Conditioning Coach. Prior to joining the staff, Derek completed an internship at CSP-FL in the fall of 2018. Prior to joining the CSP-FL team, Derek coached a variety of athletes and clientele at performance facilities in New Jersey. He graduated from Montclair St. University with a degree in Exercise Science and is a Certified Strength and Conditioning Specialist (CSCS) through the NSCA. Derek is also a competitive powerlifter. You can follow him on Twitter and Instagram.


