Long Toss: Don’t Skip Steps in Your Throwing Program
My good buddy Alan Jaeger has gone to great lengths to bring long tossing to the baseball world. I discussed why I really like it and what some of the most common long toss mistakes are in two recent posts:
Making the Case for Long Toss in a Throwing Program
The Top 4 Long Toss Mistakes
However, one thing I didn’t discuss in those previous blogs was the status quo – which is essentially that long toss distances should not exceed 90-120 feet. These seemingly arbitrary numbers are actually based on some research discussing where a pitcher’s release point changes and the throwing motion becomes less and less like what we see on the mound. Alan looked further into the origins of the “120 foot rule,” and informed me that these programs began in the late 1980s/early 1990s and were based on “post-surgery experience” of a few rehabilitation specialists.
Yes, we’re basing modern performance-based throwing programs for healthy pitchers on 20+ year-old return-to-throwing programs that were created for injured pitchers. It seems ridiculous to even consider this; it’s like only recommending body weight glute bridges to a football player looking to improve his pro agility time because you used them with a football player who had knee or low back pain. It might be part of the equation, but it doesn’t improve performance or protect against all injuries. Let’s look further at how this applies to a throwing context, though.
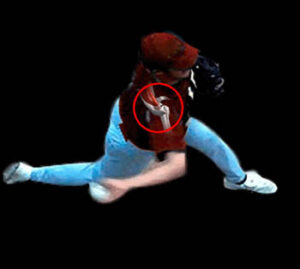
A huge chunk of pitching injuries – including all those that fall under the internal impingement spectrum (SLAP tears, undersurface cuff tears, and bicipital tendinosis), medial elbow pain (ulnar nerve irritation/hypermobility, ulnar collateral ligament tears, and flexor/pronator strains), and even lateral compressive stress (younger pitchers, usually) occur during the extreme cocking phase of throwing. That looks like this:
It’s in this position were you get the peel back mechanism and posterior-superior impingement on the glenoid by the supra- and infraspinatus. And, it’s where you get crazy valgus stress (the equivalent of 40 pounds pulling down on the hand) at the elbow – which not only stresses the medial structures with tensile force, but also creates lateral compressive forces.
In other words, if guys are hurt, this is the most common spot in their delivery that they will typically hurt.
So, logically, the rehabilitation specialists try to keep them away from full ROM to make the surgical/rehab outcomes success – and you simply won’t get full range of motion (ROM) playing catch at 60-120 feet.
Effectively, you can probably look at the “progression” like this:
Step 1: 60-120 ft: Low ROM, Low Stress
Step 2: 120+ ft: Medium ROM, Medium Stress
Step 3: 240+ ft: High ROM, Medium Stress
Step 4: Mound Work: High ROM, High Stress
In other words, in the typical throwing program – from high school all the way up to the professional ranks – pitchers skip steps 2 and 3. To me, this is like using jump rope to prepare for full speed sprinting. The ROM and ground reaction forces (stress) just don’t come close to the “end” activity.
Only problem? Not everyone is rehabbing. We’re actually trying to get guys better.
Long Toss. Far. You’ll thank me later.
Want to learn more? Check out Alan’s DVD, Thrive on Throwing, to learn more. He’s made it available to my readers at 25% off through this link.
Sign-up Today for our FREE Baseball Newsletter and Receive a Copy of the Exact Stretches used by Cressey Performance Pitchers after they Throw!


