5 Common Hip Training Mistakes
Today’s guest post comes from Dean Somerset, the co-creator of the excellent new resource, Complete Hip and Shoulder Blueprint. It’s on sale at a $60 off introductory discount. I really enjoyed going through the product and highly recommend it. In the meantime, without further ado, I’ll turn this over to Dean. -EC
I’ve been fortunate enough to work with a broad array of people and hips, ranging from post-total hip replacement to pro hockey players and Olympic athletes in multiple sports. I’ve seen general fitness folks with normal aches and pains, and even people missing the odd hip here and there.
The good thing about training a broad range of clients is that you get to see what happens when a population isn’t homogenous. Imagine if I only trained total hip replacement clients. I would have zero idea of how a hip worked if it wasn’t made of titanium and ceramic. I would also never move through internal rotation and flexion without fear or popping that hip out of its socket. If I only ever trained hockey players, I’d never know life without groin pulls or femoroacetabular impingement (FAI).
This also helps me to see what kinds of things work really well across different populations without issue, as well as the concepts that seem to stick well through all phases of training, while also seeing what stuff falls completely apart across different outcomes and inputs.
While there are a lot of potential variables and details to consider with each of the specific and non-specific populations I outlined above, there are also some simple and consistent things that you can take away from them all that makes my life as a trainer much easier. These things also help to deliver better results all around, and I wanted to share some of my failures and realizations to help your training as a result.
#1: Don’t assume symmetry.
When I started training, every text or manual said to have feet pointing in the same direction to prevent “imbalances.” The belief was if you do anything different between left and right sides, you’re going to develop these nefarious things that will limit your progress and ruin your life, so to speak.
While preventing poor performance or development is entirely admirable and a massive goal of any training program, it’s somewhat inaccurate to say standing in a symmetric stance prevents asymmetry. This is especially true if there’s a degree of asymmetry in the structure of the hips, knees, or feet.
Zalawadia et al (2010) showed that the angle of anteversion or retroversion of the femur could be significantly different from left to right, sometimes more than 20 degrees worth of difference!
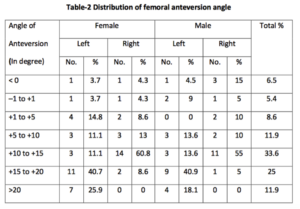
What this means is your left or right leg might point in a different direction simply due to the angle differences between the two structures. Moreover, it means putting them both into a symmetric stance would actually push one into a different alignment with the hip socket or femoral neck angle relative to the pelvis, which would actually CREATE imbalanced tension through both sides of the hip.
This means if someone is standing in a symmetric stance and doing something like a squat, but feel one hip doing something funky, it could be because they have some structural issues (or maybe they have some other soft tissue stuff), but it’s not working in symmetric stance. If turning one foot out into a new position makes them feel awesome and helps them get stronger and more stable, it might be worth chasing that rabbit down the hole.
#2: Stretching isn’t always the answer.
Piggybacking on the concept of structure, there’s a lot of range of motion limitation that could be attributed to bone-to-bone contact compared to a muscles ability to stretch through a specific length.
D’Lima et al (2000) found that hip flexion ROM could be as low as 75 degrees with 0 degrees of both acetabular anteversion (whether the hip socket points forward) or femoral anteversion (when the neck of the thigh bone points either forward or backwards), but as high as 155 degrees, with 30 degrees of both acetabular anteversion or femoral anteversion. An increase in femoral neck diameter of as little as 2mm was able to reduce hip flexion range by 1.5 – 8.5 degrees, depending on the direction of motion.
These ROMs are pretty much the absolute limit of ability in these individuals, because accessing a range beyond this bone-to-bone contact is like me trying to find more space in my bedroom by pushing my face through a wall. Sure, I could technically do it, but something bad will likely happen by trying. Another way to achieve the range would be by moving from an adjoining segment once the first one is used up. If I go to tie my shoes, but run out of hip range of motion somewhere around my knees, I’ll round my back to get the job done.
For many of the people I was working with in our Complete Shoulder and Hip Blueprint resource, as we were trying to improve their mobility to help them do stuff like squat deeper or tie their shoes, they would hit a physical wall and not be able to get through that regardless of what soft tissue modality or active smashing we could do to the area. It also didn’t matter how much time we spent working on static or active stretch modalities. I can swing my face around the room in the earlier example all day long, until I get to a wall. I can’t swing my face through that wall all that easily.
The big question then comes to how much of that free space between their bones ramming into each other can they access and use. If you can get your knee to your chest when on your back, but squat looking like a new-born deer with legs going everywhere and looking like you’re going to fall over at any moment, there’s a mismatch. And, we need to help you access that range a lot more effectively. This can also be position and direction specific.
Often active range of motion will be more beneficial in creating a usable ROM that’s within that individual’s aptitude of control versus static stretching, which will help people make muscles longer, but may not help them use them in a specific position or direction.
#3: Don’t forget that vertical and horizontal force vectors are similar, but different – and both make you better.
Let’s say I’m training a 16 year-old basketball player and a 65 year-old grandmother who has some hip arthritis. Both of them would require some training in how to perform a hip hinge in one way or another, but they would occasionally do the movement in the same way. They would start the movement by rounding their low back and essentially think of getting their chest closer to the floor versus sitting their hips back without initiating through the low back. They have completely different morphologies and training histories, but they access the movement the same. In other words, they could benefit from a different type of training environment to see the development of that hinge, especially if I’m looking to load it up without smashing out their spines.
In many ways, the deadlift is the same as a hip thrust or glute bridge in that the movement is supposed to be initiated from the hips with stable feet and minimal movement from the lumbar spine. The big difference between the two is the direction of force application through the spine and hips, as well as the volume of torque development at the initiation and conclusion of the rep movement. A deadlift produces the greatest torque at the bottom of the movement when the hip is flexed and the least at the top when standing tall, whereas a hip bridge produces the max torque at the end of the extension. There’s also more shear force through the spine at the start of the movement versus throughout the movement on the hip thrust due to the placement of load and length of lever arm.
What this means is that if you’re looking to train hip extension – but deadlifts are problematic for the rounding of the spine or shear force on the spine (especially for someone with any potential discogenic issues or spinal pathology) – a deadlift may not be an ideal option compared to a hip thrust. If someone can’t or shouldn’t do a deadlift with vertical force development or tolerance, but they can hip thrust without issue, we’re going to hip thrust until their face explodes and glutes shred their denim. The shorter lever length working on the spine means they can expose the hips to more load with less force on the spine, and, in turn, generate a training effect without potential limitations of vertical loading. For the two hypothetical clients above, the ability to pull the weight from the floor isn’t as important as developing a training effect while minimizing injury risk.
#4: Don’t focus too much on posterior chain and forget hip flexion movements.
Some of the most common exercises – squats, deadlifts, lunges – tend to focus on forms of hip extension, but very few programs involve some form of hip flexion work. While it’s difficult to access the end ranges and create some high force like you can with some stupid heavy deadlifts, you can still work on training the ability to access that range with some degree of control.
A word of warning: these absolutely suck to do, but you should still do them.
Rapid and high force hip flexion is a massively beneficial movement for any athlete who requires running or change of direction movements, and also for anyone who has to preload before performing rapid hip extension, which means pretty much everything. It’s not something that should take the place of any extension-based exercise, but using it to help create some balance between front and back can give a lot of benefits. You don’t need to go 50/50 with posterior and anterior exercises, but throwing the odd one in every now and then can pay big dividends. Think one set for every five sets of posterior chain work in a week.
#5: Don’t forget that only two people NEED to deadlift from the floor.
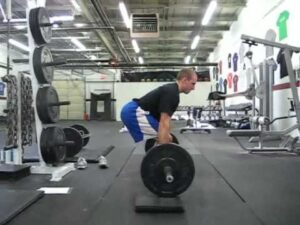
The pre-set bar height for a deadlift is the radius of the plates, which means you have to grab that 1-1/8” bar sitting 8.75 inches from the flat ground. This is fine for someone if they’re 5-feet-tall and have the mobility to do anything they want, and even for the limber 6-foot-tall individuals out there who can get their knees to their chest without problem. But what about the guy who is 6’8” with a long torso, or the girl who is 5’8” and has a retroverted acetabulum? Both can’t grab that bar without running out of hip flexion range of motion about a hands length above the bar, meaning to get there they now have to flex their spine. This typically shouldn’t be a problem, but any forced flexion with uncontrolled motion under load could be disastrous.
We can see people who use this lumbar flexion mode to make up for a hip limitation by looking at their low back when they’re flexed. If they’re using their low back to initiate the movement, you’ll see a distinct arching out of their low back at the segment that’s moving, as well as some significant hypertrophy of their erector spinae at that group compared to the rest of their spine.
If I’m worried about keeping someone’s low back happy, having them pull from the floor and seeing them initiate the movement with their lumbar spine versus from their hips could be a starting point of failure. This could be via in limiting performance by using tonic versus phasic muscles, or via increasing the relative strain on a sensitive spinal segment that eventually becomes irritated.
[bctt tweet=”Only competitive powerlifters and Olympic lifters are REQUIRED to deadlift from the floor.”]
Everyone else isn’t required to do this, except on the internet where random rules are made up to test people’s manhood/womanhood all the time.
For most lifters, using a slightly higher surface to pull from (either a rack pull or elevating the weights with some mats or onto other plates) can make the difference between lifting with discomfort from the floor or feeling absolutely flawless and strong with no pain or problems. When training people who don’t make their livelihoods on a powerlifting or Olympic lifting platform, that’s a big win.
These are all concepts covered in the new video resource from Dean and Tony Gentilcore, Complete Shoulder & Hip Blueprint. This video series contains 11 hours of HD video, offers NSCA continuing education credits, and can help trainers, therapists and exercise enthusiasts alike take their training knowledge to the next level. To sweeten the deal, the product is on sale for $60 off the regular price as an introductory special through this Saturday at midnight. Click here for more information; you’ll really enjoy checking it out (because I sure did!).

