Frontal Plane First?
Early in my career, I was adamant that athletes needed to dominate the sagittal plane before worrying about the frontal (side to side) and transverse (rotational) planes. In other words, show me a good squat, deadlift, and lunge before you worry about fancy functional exercises. There were, however, two shortcomings with this perspective.
First, sports involve all different planes of motion, so our athletes were already experiencing a lot of work in the frontal and transverse plane in their daily sport practices and games.
Second, even when we were doing sagittal plane exercises, there was a lot of work taking place in other planes of motion. As an example, you can’t go through knee flexion and extension during a squat without tibial, internal and external rotation. And, in any good lunge, you’re doing a ton of stabilization work in both the frontal and transverse planes to make sure you’re in correct alignment during the exercise.
Accordingly, we pivoted. We prioritized exposing athletes to these drills much sooner, and the results have been outstanding. In today’s post, I wanted to highlight the frontal plane in particular.
In life, we can lose the frontal plane quickly. Too much sitting, a lack of athletic participation/diversification, and imbalanced strength and conditioning programs all may contribute. The average person doesn’t move side to side much in daily life, and very few people prioritize adductor (groin) stretching. With that in mind, let’s use today’s post as a quick roadmap for reclaiming some frontal plane proficiency.
Step 1: Posterior pelvic tilt
Structure always driving function, and the attachment of the adductors on the pubis (bottom part of the pelvis) is significant: they pull the pelvis down and into anterior tilt. In fact, anatomically, the adductor longus (most commonly strained groin muscle) attaches on the adductor aponeurosis – which just so happens to also have an attachment from the rectus abdominus, which posteriorly tilts the pelvis. In other words, there’s clear anatomical tug of war over the pelvis: the adductors pull down and forward, while the abs pull up and back.
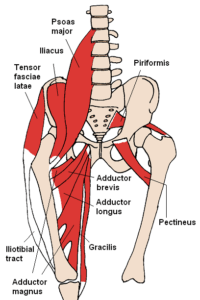
Source: Beth ohara – Own work, CC BY-SA 3.0, https://commons.wikimedia.org/w/index.php?curid=545389
If you want to get rid of that dense/fibrotic/short/nasty feeling in the adductors, start by getting the pelvis a bit of posterior tilt to neutral. This also has massive implications for sports hernia cases, but that’s an article for another day!
Hooklying Breathing with Low Reach – This is an easy place to start for most. Keep the lower leg “stacked” and work some force into the ground – especially through the medial aspect of the foot. You should feel the hamstrings – especially medially – turn on a bit – as you posteriorly tilt the pelvis. On inhale, try to expand the rib cage uniformly (not the belly), and then use a prolonged exhale. There are more nuances to how we teach this based on evaluation findings, but for the sake of this article, just get the positions and the feelings right.
If you do this correctly, the front of your hips should feel a lot more free – and I’d expect better hip flexion and internal rotation measurements. Better abduction range-of-motion often comes along for the ride as well.
Step 2: Soft Tissue Work
It’s great if you have a massage therapist, but if you don’t, here are a few options with the foam roller and medicine ball:
You’ve got plenty of other focal and diffuse manual therapy initiatives, so try some out and see what yields the quickest improvement.
Step 3: Length
You don’t get a lot of adductor length in your daily life, so you need to get it in your warm-ups. Here are a few favorites for me:
Split-stance kneeling Adductor Mobilizations – I came up with this all the way back in 2005 and love that it’s stood the test of time. It’s no surprise, though, because it’s rooted in anatomy: you have adductors that flex the hip, and others that extend it. You have to go through a full range of flexion and extension to get length in both.
Adductor Stretch with Extension-Rotation – Take the last one, and challenge thoracic rotation and the fasical system a bit more.
Half-kneeling Adductor Dip – This is a good regression to the previous drills for those with really limited hip internal rotation.
Step 4: Strength
You’ve got to get into weight-bearing to get these patterns to stick. Here are good places to start:
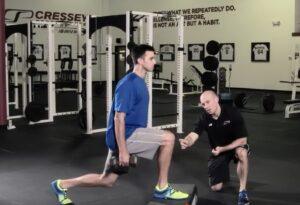
TRX Assisted Alternating Lateral Lunge – The suspension trainer minimizes the load of your body weight, so you can groove patterning more easily. I use this a lot with beginners who aren’t ready for lateral lunge variations with the landmine, kettlebells, and dumbbells.
1-arm KB Lateral Lunge – Rack Position
1-arm KB Slideboard Lateral Lunge with Eccentric Band Overload
Adductor Slides – Much harder than they look!
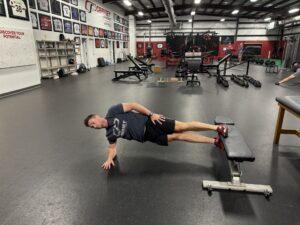
1-leg Side Bridge, Top Leg on Bench – You can go to a short-lever variation by putting the knee (instead of the foot) on the bench.
Once you’ve hit all these checkpoints, you can start to integrate faster speeds of motion and rotation: heiden variations, medicine ball drills, and 3D Strap (Variations 1 and 2). Once the foundational competencies are in place, your only limit is your imagination. And, in integrating these drills to training, you become gradually more bulletproof in the unpredictable chaos that sports (and life) throw at you.
Wrap-up
As you can see, training in the frontal plane doesn’t to be so black and white; there are many subtle levels of progressions that make it possible to everyone to derive benefit.
Archives: