Home Posts tagged "Elite Baseball Mentorship" (Page 4)

Is Thoracic Spine Extension Work Necessary? – Part 2

Today is Part 2 of a detailed series on the thoracic spine from Eric Schoenberg.  If you missed it, be sure to check out Part 1. -EC

At this point, we need to quickly touch on the concept of “neutral.”  This is certainly a hot topic in the physical therapy and strength and conditioning worlds, as it should be.  For our purposes, we like to be clear that when someone is too flexed (i.e. fully slumped posture), our cue is to “extend back to neutral.”  In addition, when someone is too extended, the cue would be to “flex back to neutral.”  This holds true in all segments of the body and in all three planes of motion (e.g. pelvic tilt, genu valgus, etc.)  The problem that we tend to see is we don’t grade our correction and “overcorrect.”  This results in fixing one problem only to create a new one in the opposite direction.  

In Malcolm Gladwell’s new book, David and Goliath, he refers to this as the “inverted U curve.”  Its application here is that IF an athlete truly lacks T-spine mobility, then once we properly gain it, continued efforts to improve (rather than just maintain) this mobility will ultimately create a brand new problem (hypermobility).  This needs to be considered when we write new programs and lends itself nicely to the importance of thorough evaluation and re-evaluations.

invertu

To quickly recap part 1, for the purpose of this series, a cue to “extend the T-spine” is really a case of moving out of excessive flexion and learning to control flexion throughout the throwing motion.

In part 2 of this series, we will focus on the postural alignment and movement examination and its implications in developing an individualized exercise prescription for the athlete.  As a quick side note, it is of particular importance to recognize that the body segments don’t work in isolation.  This is a simple statement; however, when attempting to capture the role of a particular body segment or group of exercises, we are missing the big picture if we try to develop a concept without appreciating the kinetic chain.

In our opinion, the hallmark of an effective examination is the ability to properly identify the athlete’s unique postural alignment and movement tendencies.  These exams must be done with the shirt off to appreciate the bony and soft tissue anatomy. With respect to the thoracic spine, we first identify whether that athlete is in flexion, neutral, or extension.

Here's an example of an athlete with a flattened T-spine, and shoulder blades that have no idea what to do!

FlattenedTSpine

Additionally, we need to appreciate the position of the scapula and its impact on the appearance of perceived thoracic flexion.  An athlete that presents with scapular anterior tilt, abduction, and/or internal rotation can easily fool you into thinking that the athlete’s upper back is “rounded” or kyphotic. An athlete with a flat thoracic spine (hypokyphosis) will have a more prominent scapula due to lack of normal contour of the T-spine and ribcage.  In extreme cases, we will see the following:

1. Hypokyphosis (lack of T-spine flexion)

Hypokyphosis

2. Scheurmann's Disease (greater than 60 degrees, and structural)

Scheurmanns

On x-ray, these cases will show a change in the normal vertebral “wedging.”  The intervention in this case is NOT to attempt to fix the mobility issue, but first determine if the issue is osseous/structural in nature.  Just like any other joint (the hip immediately comes to mind), you can’t stretch bone and any attempt to do so will result in an unhappy athlete!  These are extreme examples, but certainly something that warrants inclusion in this article.

However, more commonly in the physical therapy or strength and conditioning settings, we will see more “middle of the road” cases where there is too much or too little thoracic mobility. As you can see in the lateral view below, this athlete appears to be in excessive thoracic flexion, but it's really just anterior tilting of the scapulae.

SideView

However, in the posterior view, you'd be able to appreciate that the T-spine is relatively extended compared to accepted norms (40° flexion = normal curve). 

Moving forward, static alignment does not tell the whole story, so don’t test it alone and don’t let it fool you.  All too often, I hear people trying to prove a point about pitching mechanics or exercise technique and the only proof is a still photo.  This practice needs to stop because it is impossible to capture the complexity of human movement and make a conclusive statement from a screen shot. This concept is why the combination of the postural exam and movement analysis is so critical.

Athletes don’t get injured when they are standing still. They get injured moving (incorrectly!).  For that reason, watch your athlete’s move.  The concepts of FMS or whatever collection of multi-joint movements you like to combine to form a “movement examination” are great tools to collect data on your athlete’s preferred movement patterns.  However, it is also critical to watch the athlete perform the unique movements of their chosen sport. 

In our case, we like to talk to our athlete’s about pitching and we certainly like to watch them throw.  Asking questions like:  “What do you struggle with mechanically” or “where do you break down when you get tired” gives us valuable insight into movement tendencies and injury risk.  With respect to exercise, we observe closely to make sure we are achieving the desired result of the exercise.  In addition, we ask our athletes where they feel a particular exercise to help determine activation patterns and sequencing (motor control).

In addition to watching our athletes throw/pitch, swing, and/or run, we employ simple movement tests such as standing bilateral shoulder flexion (and abduction) to gather critical information about movement quality, timing, and relative stiffness. 

With respect to the video above, consider the excessive extension moment at the thoracic (and lumbar spine) due to increased relative flexibility resulting from poor anterior core stiffness.  This video brings up a lot of questions in my mind:

  • Does this athlete need more mobility work into thoracic extension? 
  • If he attempted these exercises, how can you be sure the motion will even come from the right place?
  • If an athlete is truly “lax” congenitally, then why would they lack mobility at the T-Spine and nowhere else?  
  • Are you sure his lack of shoulder flexion is due to decreased thoracic mobility? 
  • Or, is he too flexible in his spine and too readily pulls into extension due to the stiffness of his lats? 

My point here is we need to consider the fact that improperly prescribed exercise will make the athlete worse than no exercise at all.  So, if you’re not sure, don’t guess.  Refer out or continue to re-assess until it becomes clear what the athlete needs.

Another simple movement test that we will have the athlete perform is standing thoracic flexion and extension.  Here we will assess the timing (quality), location, and amount of available range of motion that the athlete is working with.

It is also good practice to watch an athlete perform an exercise prior to putting it in his program. 

This athlete (also pictured above) demonstrates faulty movement by not getting out of extension at the top of his pushup prior to initiating the “pike” portion of the yoga push up.  When corrected, in the video below, he did a better job of getting his T-spine in position to allow his scapula to have a better platform to upwardly rotate and elevate as his hands moved overhead.  This was not a mobility issue; this was a patterning or motor control problem.

I should mention that in a full examination, we would consider movement testing of thoracic rotation and sidebending, ventilation, rib cage alignment, quadruped position/movement, etc.  But, for the purposes of this series, we again are choosing to focus primarily on the sagittal plane.  Pay attention to the way in which the athlete returns from flexion to get a good idea of his/her recruitment strategies.

In conclusion, the combination of static posture, movement testing, and unique athletic movement allows us to create a well-rounded profile of the athlete’s strengths and weaknesses.  Be sure that your examination a) identifies areas of limitation that need to be addressed and b) determines the reason why the athlete has these impairments.

In the third and final part of this series, we will discuss the concepts of relative flexibility and motor control as it relates to the topic of thoracic spine extension.

Also, if you’re interested in more information like this, we would love to see you at one of our Elite Baseball Mentorships, with the next one taking place in June. Click here to learn more.

Home_page1

Sign-up Today for our FREE Newsletter and receive a four-part video series on how to deadlift!

Name
Email
Read more

Is Thoracic Spine Extension Work Necessary? – Part 1

Today’s guest post comes from my friend and colleague, physical therapist Eric Schoenberg.  Eric is an integral part of our Elite Baseball Mentorships, and here, he kicks off a three-part series that I think you'll find very educational - even if it is a bit "geeky" along the way.  It'll test what you know and make you question some of the stuff you do with your training and work with clients. -EC

I’ll start by saying this is a classic case of giving an athlete what they need, not what we predict or assume they will need.  Let’s be clear up front: there are a lot of athletes that lack thoracic extension and rotation and certainly can benefit from T-spine mobility work.  This is especially true for your general population clients that live in flexion all day – although not every “average joe” is stuck in flexion; this is a wrong assumption!  However, for the purpose of this series, I am going to make a case for the following statement:

Not every individual - especially in baseball populations - needs thoracic extension and rotation mobility drills!  

In fact, to take it a step further, I would argue that in some cases, performing these types of exercises will actually make the athlete worse.

During our Elite Baseball Mentorship in August, I mentioned in passing during the postural examination portion of the breakout session that a lot of athletes present with flattened thoracic spines and some are actually relatively extended.  I followed this up by stating that some people don’t really need any T-Spine extension work.  This simple statement was met with a lot of surprise and follow up questions.

As a result, Eric and I thought it would be a good idea to explore this concept in greater detail.  As is often the case, a relatively benign statement takes on a life of its own and turns into a multi-part blog series.  As we develop these concepts, please feel free to share your thoughts and experiences in the comments section below.

footer_logo-3

The general assumption of the group was that everyone was kyphotic and T-spine extension was a default group of exercises that EVERY athlete needed.  This premise, however, does not take into account a host of key considerations, such as:

  • Defining T-Spine Extension. (part 1)
  • Anatomy and role of the Thoracic Spine, (part 1)
  • Scapulothoracic joint kinematics, (part 1)
  • Importance of a thorough static postural alignment and movement examination, (part 2)
  • Scapular position/prominence, (part 2)
  • Effect of the T-Spine on adjacent joints such as cervical spine, lumbar spine, pelvis, scapula, humerus, and ribcage, (part 2)
  • Concept of relative stiffness, (part 3)
  • Faulty motor control resulting in limited thoracic flexion (yes, lack of flexion!), (part 3)
  • Timing and amount of relative T-spine extension and rotation in the pitching delivery. (covered in part recently by Matt Blake and Eric C. here and here.)

174px-Gray_111_-_Vertebral_column-colouredIn an attempt to properly define thoracic spine extension with respect to the baseball player, we must first look at functional anatomy. The thoracic spine, with its rib attachments from T1-T10, is built for stability – most notably to protect the internal organs.  In addition, the T-spine has thinner intervertebral discs, a feature that adds to its relative inflexibility.  The sagittal alignment of the thoracic spine is kyphotic: 40 degrees in adults. (Neumann D.A. 2002).  With that said, we are not really talking about the T-spine being “extended”, but instead are talking about the relative amount of flexion that an athlete is in.  With that description, it’s important to appreciate that T-spine extension drills are working to put an athlete into an acceptable amount of flexion!  It is this flexion (or convexity) that provides a surface for the concave, ventral surface of the scapula to “float” on and create the scapulothoracic joint. (medial border of scapula and ribs 2-7).

For these reasons, we need to not just label an athlete as being “kyphotic” or having a “flat T-spine.”  Instead, we should attempt to define which segments of the T-spine have static or dynamic alignment issue and/or movement dysfunction and address them accordingly.

An important concept to look at is the T-spine is comprised of 12 vertebrae, so we will often find components of flexion, extension, and rotation within those 12 segments. Crosbie, et al. reports that the majority of T-spine extension occurs in the lower T-spine during overhead arm movement. This makes sense due to the thoracolumbar junction and the shape of the lower thoracic vertebrae.  The T10-T12 vertebrae are similar in size and function to the lumbar vertebrae.  T10 has a different rib articulation than T2-9 and T11/T12 have no facets on their transverse process for rib attachments (thus, increasing relative mobility).  So, more often than not, when we see anterior pelvic tilt, and lumbar extension compensation, we can assume that the lower T-spine is doing the same thing.  So what if, for the purposes of this article, we grouped the lumbar spine as T10-L5?

Gray91

As a quick aside, it is recognized that the thoracic spine moves in three planes of motion.  More specifically, with respect to the frontal and transverse plane, with single arm elevation, the upper T-spine (T1-T5) has ipsilateral coupling of the lateral bending and rotation, whereas in the mid-lower T-spine T6-T12, we see contralateral coupling of lateral bending and rotation.  So in the frontal and transverse planes, the T-spine essentially works as two distinctly different subgroups.  This is important to consider when prescribing exercises to address a perceived movement impairment.  In addition, it is important to remember that the thoracic spine and hips (along with a stable lumbar spine) provide the rotational separation needed to excel in the game of baseball. However, for the purposes of this article, we will focus on the sagittal plane motion of flexion/extension.

As we continue to look at the sagittal plane, but shift our focus to T1, we see a smaller vertebrae (see picture above) that more resembles C7 (and other cervical vertebrae) than the caudal segments (T2-T9).  A case can be made that T1 (cervicothoracic junction) functions more like a cervical vertebrae than a thoracic vertebrae.

This leaves us with T2-T9: eight segments with an extreme mobility problem!  This is where we are really trying to mobilize “out of too much flexion” to get to an acceptable (neutral) position to allow for enough scapular (namely upward rotation and elevation) and glenohumeral motion to give us enough “space” to throw a baseball without causing an impingement.

So how can we be sure that we are following all these rules in three planes of motion when we are performing our T-spine mobility drills?  Are we in fact gaining motion in the correct segments within the context of their coupled motions?  Or, are we simply “mobilizing” what moves easiest and taking the “path of least resistance”?

Check back later in the week for part 2 of this series to read more about evaluation of static alignment and movement testing.  In addition, we will discuss how scapula position can fool us and (in part 3) how too many “abs” can be a bad thing.

In addition, if you’re interested in more information like this, we would love to see you at one of our Elite Baseball Mentorship, with the next one taking place in June. Click here to learn more.

Home_page1

Sign-up Today for our FREE Newsletter and receive a four-part video series on how to deadlift!

Name
Email
Read more

Common Arm Care Mistakes: Installment 2

In our first installment of this series on arm care, I discussed scapular positioning.  In this second installment, I'll cover another big mistake I commonly see throwers make:

Doing a ton of rotator cuff exercises before throwing.

Pre-throwing warm-up approaches constitute a great example of extremes. On one hand, you have the guys who crush an energy drink and do a few arm circles and then go right to throwing - and they're obviously not doing enough.  On the other hand, you have some guys who go through 30 different exercises for the cuff and scapular stabilizers. - and before you know it, it's an hour later and they're exhausted, yet still haven't picked up a ball.  As always, the answer is somewhere in the middle.

We have many examples available across multiple sporting disciplines that show the impact of fatigue on performance and injury risk. At the other end of the spectrum, not warming up sufficiently can be equally problematic. As such, it's about finding the sweet spot for every pitcher.

I generally try to "lump" each of our throwers into one of three categories: tight, loose, or middle-of-the-road.

The tight guys need to go out of their way to extend their warm-ups so that their body temperature is higher before they pick up a ball.  These are the guys who commonly don't hit their best velocity numbers until after the third inning or so.  The goal of the warm-up is primarily to get length (potentially even with some manual stretching, if indicated) - and follow it up by doing a bit of activation work to establish some good stiffness in the right places (anterior core, posterior rotator cuff, scapular upward rotators).  To me, this group requires the longest warm-up, but even still, it's 20 minutes, tops.

The loose guys are the ones who have considerable joint laxity (hypermobility). 

As a result, we really don't need to establish any new range-of-motion; we need to enhance stability in the ROM they already have.  Loose guys are always the most likely to get thrown under the bus with bad arm care programs.  Stretch them, and you'll make them worse or injured.  Do too much cuff or scapular stabilizer work before they throw, and they'll fall off early in terms of velocity and health. With this group, we don't do much ground-based mobility work; we prefer to get them standing up and moving around.  They'll work in movements like prone external rotation to "groove" true external rotation, and get some rhythmic stabilizations, too.

Again, we're talking about 15 minutes at most.

The middle-of-the-road guys are, as you might imagine, a combination of the previous two groups.  They don't need quite as much mobility work as the tight guys, nor do they need quite as much stability work as the loose guys. It's more of a balancing act, but we're still not exceeding 15-20 minutes.

If you're looking for a general guideline on what our guys might do, here's a brief synopsis:

A. foam rolling - 5 minutes
B. mobility drills - 8-10 minutes
C. scapular control drills (wall slide variations, prone trap raises, etc.) - 2 minutes
D. rotator cuff activation drills (prone external rotation, rhythmic stabilizations, and maybe 1-2 sets of band exercises) - 2 minutes
E. easy movement training and sprint build-ups (5 minutes)

As you can see, at most, this takes 24 minutes.  And, this number comes down because not everyone does every exercise.

Exchanging quantity for quality in the warm-up has been one of the most important modifications we've made in the past with injured or underperforming throwers we've seen.  The benefits are due to both the addition of valuable exercises, but more significantly, taking away an excessive amount of unproductive work that's just piling fatigue on top of the rotator cuff before throwing.

With all this in mind, if you're "that guy" who takes forever to warm up, it's probably time to cut back.  As former CSP pitching coordinator Matt Blake joked, "If you need a post-workout shake after your warm-up, you're doing it all wrong."  Start thinking about ways to make the pre-throwing period more efficient - and then get your volume in at a later point in time.

Sign-up Today for our FREE Baseball Newsletter and Receive Instant Access to a 47-minute Presentation from Eric Cressey on Individualizing the Management of Overhead Athletes!

Name
Email
Read more

Common Arm Care Mistakes: Installment 1

As you probably already know, I see a ton of baseball players on a weekly basis.  And, the majority of them come in with some pre-existing perceptions on what good arm care really is.  These ideas relate to exercise selection, coaching cues, frequency, timing, load, and a host of other factors.  I'm a firm believer that just about everyone does some things that are appropriate, and some things that are wrong. 

This may be "right vs. wrong" in a general sense. An example would be that it's always right for baseball players to strengthen their rotator cuff and scapular stabilizers.  And, it's always wrong to do so many arm care exercises before throwing that the cuff is actually fatigued before a thrower picks up a ball.

There are, however, specific cases of right and wrong.  For instance, if someone has a ton of congenial laxity (joint hypermobility), it's wrong to stretch their shoulders out, as you're making unstable joints more unstable.  However, if it's a very stiff individual, stretching may very well be completely indicated and productive.

To that end, I want to kick off this series to educate my baseball audience on how to evaluate arm care options so that you can ensure that they're the best fit for you.  Here's our first mistake:

Assuming all shoulder blades start in the same position.

There are tens of millions of throwing shoulders around the world, and each one of them responds slightly differently to a throwing stimulus - and this has been well documented.  The problem, however, is that when creating arm care programs, not a lot of people take into account that scapular (shoulder blade) position is going to differ - sometimes dramatically - from one throwing athlete to the next.  As examples, check out these two resting scapular positioning photos:

depressionanteriotiltadductedscap


On the left, you have an anteriorly tilted, abducted, and depressed scapular presentation.  This is what we often expect to see with throwers (usually with a bit more asymmetry, though). On the right, though, we have a very adducted scapular posture; the shoulder blades are almost touching the spine (the medial border of the scapula should be roughly three inches away from it).

The classic "down and back" cue that gets thrown out to just about everyone for every exercise could give both of these guys issues, but for different reasons.  The left example would potentially preferentially recruit lat (which is already cranking the shoulder girdle down) over lower trapezius, so we'd get more scapular depression instead of the posterior tilt and adduction we're seeking.  The right example would yank aggressively toward the spine with the rhomboids and "fight" the shoulder blades as they try to upwardly rotate.  Down and back isn't a good cue for this scapular presentation because he's literally as far back as he can possibly go.

This goes to show you that resting posture governs function, and function (or lack thereof) governs whether or not you're going to get hurt.  If you don't take resting posture into account, how can you be sure that you're creating the type of movement that you seek?

Thsi is just one more reason why I don't believe in "organizational arm care programs."  If every posture presentation and subsequent functional performance is different, why are we painting them all with the same broad stroke instead of giving them the individual attention they need?  Check out this video example, where I talk about how different folks might need different cues for the prone 1-arm trap raise, a commonly prescribed arm care exercise. 

Looking for more insights like this?  Check out one of our Elite Baseball Mentorships, where we discuss scapular posture and movement evaluation techniques (along with many other topics) in great detail.  We just announced our next Phase 1 (Upper Extremity) event: June 14-16.

footer_logo-3

Sign-up Today for our FREE Baseball Newsletter and Receive Instant Access to a 47-minute Presentation from Eric Cressey on Individualizing the Management of Overhead Athletes!

Name
Email
Read more

Improving Thoracic Mobility in Throwers

It goes without saying that all rotational sport athletes need adequate thoracic spine (upper body) mobility in order to create appropriate separation as they work to transfer force from the lower extremity to the upper extremity during swings, throws, shots, and changes of direction.  In a throwing population, however, you need to take some special precautions as you work to build it.

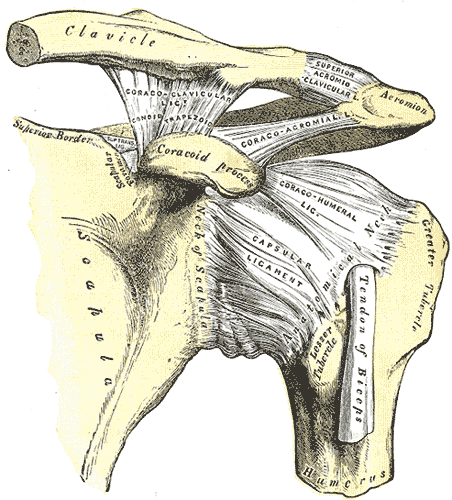
One thing we know about pitchers is that their shoulder external rotation improves over the course of a season, and this likely takes place because the ligamentous structures in the front of the shoulder become looser. In this image of a left shoulder, it would be the area labeled "capsular ligaments:"

ghligaments

Effectively, the looser one's anterior capsule is, the more external rotation one will have.  The problem, however, is that if this area becomes too loose, the biceps tendon must pick up the slack as an important anterior stabilizer during external rotation.  Additionally, there are many nerve structures at the anterior shoulder that can be irritated because the humeral head isn't controlled.  This is yet another reason why it's not a good idea to stretch a throwing shoulder into external rotation.  In this video, I go into greater detail:

This knowledge gives rise to two thoughts:

1. If we lack thoracic rotation, our arm will drag during the pitching delivery, as it's a means of creating better separation (albeit in the wrong places).  Guys who have quick arms can often make up for it, but still inevitably irritate the anterior shoulder over time.  So, if your thoracic rotation stinks, you'll need to try to find more external rotation in the wrong places.  Additionally, if we lack thoracic extension, we often substitute lumbar extension (lower back arching) to maintain an upright torso.  These guys wind up with low back pain, oblique strains, and hip issues.

2. We can't just throw any thoracic mobility drill at throwers, particularly in the early off-season, when the anterior shoulder is all stretched out and it may be the path of least resistance.  As an example, the kettlebell arm bar might be a great drill for many folks in the population, but I would never use it with a thrower:

Instead, particularly in the early off-season, we need to pick drills that heavily emphasis thoracic movement independent of humeral (arm) movement. Here's a progression we might use over the course of the off-season:

Off-Season Months 1-2 (and during the in-season phase): Supine Alternating Shoulder Flexion on Doubled Tennis Ball, Thoracic Extension on Roller, Rock-Back Quadruped Extension-Rotation

tspineexte

Off-Season Months 3-4: Side-Lying Windmill, Bent-Over T-Spine Rotation

You'll notice that these options integrate a lot more humeral movement.  In many cases, you can use them earlier in the off-season, but only if they're coached really meticulously to ensure athletes are moving in the right places.

We use these exercises right after our foam rolling and positional breathing drills during the warm-up, and before anything we'd do to directly work on scapular stabilization and rotator cuff strength/timing.  Hopefully, this article gives you a little feel for not just some of the exercises we may use, but also the way we'd program them throughout the competitive season.

If you'd like to learn more about how we manage throwers, be sure to register for one of our Elite Baseball Mentorships.  The next one will take place June 14-16 in Hudson, MA.

footer_logo-3

Sign-up Today for our FREE Baseball Newsletter and Receive Instant Access to a 47-minute Presentation from Eric Cressey on Individualizing the Management of Overhead Athletes!

Name
Email
Read more

Pitching Performance: Understanding Trunk Position at Foot Strike – Part 2

Today is part 2 of a collaborative series on a key portion of the pitching delivery from Matt Blake and me. In case you missed part 1, you can check it out here.  In today's installment, Matt delves into the mechanical side a bit deeper and introduces some drill work and examples of where trunk position can go astray.

In order to understand where this extension at landing is coming from and how we can control it in the throw, we have to look at it with a more global perspective and realize that there were preceding movements that were driving this pattern into the landing position.

In part one, we used a picture of Tim Lincecum to exemplify a heavily extended position, but one thing you’ll notice is that the foot positioning in his stride pattern is actually driving a lot of the extension in the torso at landing. If we take a look further back in his delivery, you’ll notice that he has a considerable front leg swing that pulls a lot of his weight forward, causing him to land closed off. In order to keep the segmental separation unfolding efficiently through his target line, he is forced to include more extension in his throw. Here is a brief clip with a couple markers throughout the delivery to highlight the movements in question.

The issue then becomes that the same leg swing Lincecum uses to create power in his stride pattern is also what makes it susceptible to inconsistency, because of the timing and degree of pre-stretch it requires to make the driveline efficient.  Ideally, you would just be able to tell Lincecum to straighten out his stride line, and the problem would be solved. Unfortunately, it’s not always that easy. He has been using a stride pattern that is front leg swing dominant with a closed orientation at landing for years to help create the necessary tension it takes to throw the ball 95mph.  So, to that end, he’s nearly cemented these patterns – for better or worse.

With that in mind, sometimes it’s easier to give a pitcher some drill constraints to help find the tension in a different manner before they get back on the mound and try to recreate the new line of tension for which we’re looking.

In this case, we’ll introduce some simple drills to close the kinetic chain down a bit and move through a progression that goes from static in nature to a more dynamic and athletic movement pattern. Ideally, we’d cue our way through each drill depending on where we need to alter the individual’s line of tension until we’re able to repeat the new motion at full speed on the mound.

To give you an example of one of the more static drills in our “lead-up” sequence to help set the pattern in place, here is a simple demonstration of the “stride drill” with a three-step progression.

In this example, the intensity was obviously low for the sake of demonstration, so some of the variables of the throw are not exact.  With that said, we do also use this drill in a more explosive capacity during some of our weighted ball and velocity drill series in order to turn up the intent and attempt to create some hand speed.

To give you an example of what this looks like in an amateur pitcher with an excessive extension pattern that may lead to some inconsistency, here are three videos depicting the wind-up and then corrective stride drill work:

Wind-up

Stride Drill

Stride Drill with Load

Obviously, these drills aren't quite where we want them to be yet, as there is still plenty to correct, but that was the idea: I want you to see where most “live-arm” high school athletes are before they acquire an efficiency of movement. This athlete, in particular, has pretty good stuff and works about 86-89mph with this particular delivery. If he can control his feet a little better and know where his weight is positioned, he can control his pelvis and rib orientation in the stride phase, and he’ll be able to create some cleaner sequencing. 

One the flip side of that, I want to emphasize with an athlete like this is that, yes, I do want him to throw hard with intent, but I also want him to be in positions to compete in the strike zone on a consistent basis. These don’t necessarily have to be competing interests if we understand how our movements can work together and not fight each other.  The main point ends up being that these drills, if cued properly, are attempting to have him consider more efficient movements, and in turn, a more stable and centered delivery.

At the end of the day, as much as we want to control extension in the delivery, by having a strong anterior core that can help limit the amount of hyperextension we get in the lumbar region, most high level throwers have some level of extension in their sequence. The key for me is getting the athlete to understand if it’s excessive or if it’s controlled extension that we can managed within normal limits on a consistent, repeatable basis. If it’s not, we need to be able to find the corrective measures to bring it under control.

In Part 3, EC will cover some core stability exercise progressions he utilizes to help athletes build stability in these positions. In the meantime, if you'd like to learn more about how we manage throwers, be sure to register for one of our Elite Baseball Mentorships.  The next one will take place December 8-10.


footer_logo-3


Sign-up Today for our FREE Baseball Newsletter and Receive Instant Access to a 47-minute Presentation from Eric Cressey on Individualizing the Management of Overhead Athletes!

Name
Email
Read more

Pitching Performance: Understanding Trunk Position at Foot Strike – Part 1

Cressey Performance Pitching Coordinator Matt Blake and I collaborated on today's piece, which kicks off a three-part series. I think you'll find it to be a great example of how crucial it is for pitching experts and strength and conditioning specialists to work together to help athletes get to where they need to be. -EC

Today, we’re going to be taking a look at a key phase of the pitcher’s delivery that we like to identify when doing video assessments; this phase is the trunk positioning at foot strike. In doing so, we’re going to dig in on some variables that may make or break this position for pitchers.

The trunk orientation at foot strike is a key indicator because it’s a critical moment in the delivery that captures the momentum and potential energy that we were attempting to build in the stride phase.  Just as importantly, foot strike is the instant at which we begin to convert it into kinetic energy that moves up the chain.

In order to efficiently capture this energy, our body has to be set up properly at landing to both accept the ground reaction force in our legs and induce a sequence of stretch-reflex mechanisms throughout the body to optimize our hand speed at ball release. This is where the term “Hip and Shoulder Separation” originates; this commonly thrown-around concept is quite often bungled because of how people strive to get it. Without getting into stride phase mechanics, let’s just look at a couple key identifiable traits that we like to see at landing.

gre

Our model for this example will be Zach Greinke, because of his ability to create elite velocities in a highly repeatable manner from a body type to which most pitchers can relate. In order to do that, he’s got to be powerful and efficient, and (with or without knowing it) he has to get into some highly leveraged positions to create hand speed.

The first thing we want to identify is where the torso stacks up over the stable base we’ve tried to create at landing. The key landmarks we make note of here are 1) the degree of pelvis rotation that is leading the sequencing, 2) an effectively braced lumbar region, and 3) a balanced use of thoracic extension/rotation and scapular retraction, and 4) where the head is oriented. All of these markers need to be working together to create a lag effect from the initial rotation of the pelvis, up the spine to the shoulder girdle, and into the distal aspects of the throwing arm.

This “lag effect” or “segmental separation” has been documented in a handful of studies at this point, and is very evident in elite throwers, so we’re not going to dive into this too much. Instead, today’s post is more about identifying what the segmental separation looks like in these throwers and how it might be overdone at times.

The key in creating this separation effectively is keeping our target in mind and making sure these sequenced rotations are expressed in the right direction.  If you’ll notice the picture of Greinke above, he’s very adept at getting this separation without “selling out” for it by creating excessive lumbar extension (lower back arching) and letting his ribs flare upwards. He’s in an effective position to keep his ribs and pelvis functioning together so as to keep his intra-abdominal pressure for an effective bracing pattern.  In other words, the ribs need to stay down and pelvis can't tip forward excessively as he raise his arms to throw.

479px-Grays_Anatomy_image392

This is an important concept because a lot of athletes may be able to create “separation,” but they’re not doing it in a manner that allows their core to stabilize effectively over their pelvis upon landing. If there’s too much counter-rotation or extension in the lumbar region, we may be getting more “pre-stretch” than we can handle, and getting it from the wrong place, as the lumbar region is designed to be stable and resist this extension and rotation.  If this is the case, we may not be able to recall the stretch we’ve created, missing our temporal window to transfer force, and in turn, leaking energy. This doesn’t just mean losses in velocity or poor command, though; it can also lead to both acute and chronic injuries. 

We want the lumbar region to create an effective bracing pattern that simply allows us to channel the energy created in the lower half and then use our thoracic mobility to effectively “lengthen the whip.” If this isn’t the case and we become over-reliant on the lumbar region for this separation, we can begin to see lower back issues, or oblique strains on the non-dominant side from the excessive stretch in a region that is not structurally designed for a lot of range of motion.   As further anecdotal evidence, I (Eric) have never seen a player – pitcher or hitter – with an oblique strain who had what I’d deem acceptable anterior core control.

That being said, below is an example of two pitchers who set up in different postures, one relying on more torso extension than the other to create “whip” in the throw.

grelin

Now, obviously, the pitcher on the right has had a history of success at the highest level, so we're not saying you can’t pitch like this, but aside from the potential health issues in trying to mimic this level of extension, we also see amateur pitchers who have a hard time realizing an effective release point due to the excessive range of motion required to get from Point A to point B.

With pitchers like this, a lot of times you’ll see them miss consistently up to the arm side or compensate by cutting balls off to their glove-side instead of being able to backspin them there.  This is due to a host of factors, but mainly because they’re not able to sustain their braced rotation and create an effective driveline to release from this position.

The other piece of the puzzle that needs to be understood at landing is how we create effective  centration patterns in our joints.  Key examples in the pitching delivery are the front hip where the femoral head meets the acetabulum (pictured on left) and the throwing shoulder where the humeral head meets the glenoid fossa of the scapula (pictured on right).

hipGray342shouldGray326


We’ll leave the hip socket alone for now, but let’s try to understand why it’s important to create a relatively neutral orientation in our lumbar region for the sake of keeping our shoulder healthy.  

In order to get proper function at the glenohumeral (ball and socket) joint, we need the scapula to get to the right amount of upward rotation on the rib cage so our humeral head can center itself in its socket and get the rotator cuff to function in its true role of dynamic stabilization during external rotation (and, later, out front at ball release).

grelin2

If we are in a hyperextended position because we’re driving through an excessive combination of both lumbar and thoracic extension, we may be putting our shoulder blade in a depressed and downwardly rotated position that isn’t optimal for timing purposes in the throw.  In other words, the arm gets up, but the shoulder blade can’t – meaning the golf ball is falling off the tee.

If this is the case and we can’t upwardly rotate the scapula on time to keep the humeral head centered, we can run into an excessive amount of superior humeral glide.  Unless the rotator cuff is bull-strong to hold the humerus down in the socket, we have to rely heavily on other active and passive restraints (long head of biceps and glenohumeral ligaments, respectively) of the shoulder.  These problems are exacerbated by the fact that the humerus is externally rotating to get to the lay-back position, and when this happens, the humeral head has a tendency to translate forward.  So, the cuff, biceps tendon, and glenohumeral ligaments are all working hard to prevent both superior and anterior migration of the humeral head.  And, the biceps tendon is twisting and tugging at its attachment on the superior labrum; this is known as the peel-back mechanism for superior labral injuries. 

If you’re a visual learner and none of the previous paragraph made sense to you, don’t worry.  Check out this video and things should make sense:

Yet again, don’t get us wrong, there’s a lot of velocity to be had in these excessively extended positions, assuming they are timed up right, but the long and the short of it is, you’re probably not Tim Lincecum. If you’re attempting to sell out for these lengthened positions, you better have a real nice blend of hip mobility and stability, a ton of anterior core strength, some thoracic mobility and scapular stability and a boat load of athleticism to sustain these positions over the long haul. A quick arm won’t hurt, either!

These issues don’t normally present themselves during the first inning of a start in April, but they do have a tendency to linger underneath the surface until a point where your body is fatigued and the incessant abuse of throwing a baseball time and time again takes its toll, bringing you to threshold.

At the end of the day, we’re not going to be the internet warriors who tell Tim Lincecum he’s doing it all wrong, because he’s not, but we are going to warn the millions of amateur pitchers who aren’t Tim Lincecum that they need to be aware of how they’re attempting to create separation in their throw. More often than not, amateur pitchers are trying to write checks their body can’t cash for that ever elusive 90mph throw. Our advice to you is to dig in and learn more about how the body moves along your way. You’ll find that more often than not, you can do more with less, assuming you’re getting the range of motion in your throw through the right segments and optimizing the timing of your sequencing.

As much as it is the guys who have considerable amounts of laxity who throw hard, it’s the guys who combine it with right amount of stability to create the relative stiffness necessary to stay healthy over the long haul. Needless to say, there’s a lot more that goes into creating the durable high level delivery, but that should give you a couple key points to think about as you begin to figure out how you’re going to make yourself a better player this offseason.

In Parts 2 and 3 of these series, we'll cover some drills you can utilize to prevent or correct these problems.  In the meantime, if you'd like to learn more about how we manage throwers, be sure to register for one of our Elite Baseball Mentorships.  The next one will take place December 8-10.

footer_logo-3


Sign-up Today for our FREE Baseball Newsletter and Receive Instant Access to a 47-minute Presentation from Eric Cressey on Individualizing the Management of Overhead Athletes!

Name
Email
Read more

Smart Things We Did With Starting a Fitness Business – Part 2

In part 1 of this article, I talked a lot about the financial portion of starting a training facility.  If you missed it, definitely give it a read before you move forward with this article, as this second installment won't mean much if you have no money when you start up!

With part 2, I'll focus more on the actual decisions we made with respect to planning our staff, business model, and actual gym space. We'll pick it up with point #4, as Part 1 included the first three.  What's funny about these points is that I can distinctly remember sitting down for dinner at Applebee's with my business partner, Pete, and discussing them.  We wrote our notes on a napkin.

4. We started small.

Cressey Sports Performance 1.0 could have been politely described as a dungeon.  This is actually the view on the second day.

First Picture

It was very rough on the eyes, so we had to put in a lot of renovations in the first few weeks to make it more aesthetically appealing.

CP1

Still, in spite of what we invested on this side of things, it still wasn’t what I’d consider a showcase location. Rather, it was our "test facility."  We had to make sure that our business model was sustainable and profitable before writing checks our butts couldn't cash.  In other words, we made a good decision by starting small.

That first facility was only 3,300 square feet.  The rent and utilities were very reasonable, and it allowed us to get profitable quickly.  Just as importantly, it helped to give the perception of "busyness" that you want in order to create good energy in the gym.  Had we gone to 10,000 square feet right off the bat, we would have dug ourselves a much deeper hole – and I question whether we would have been able to establish a great training environment early on. Rather, it might have felt like a personal training studio – which doesn’t exactly get young athletes excited.  While we longed for a larger facility, we resisted the urge - and instead opted to satisfy our temptations by getting panoramic shots of our ~1,500 square foot weight room to make it seem really big to us.

cp1

Only nine months later, we moved three miles east to CSP 2.0.  It was 6,600 square feet.

Then, 18 months later, we knocked down a wall to bump it up to 7,600 square feet by taking on some new office space.

Finally, 2.5 years later, we essentially doubled our space again, going to our current 15,000+ square-foot space.

The other hidden benefit of gradually increasing your space is that you can get away with making facility design mistakes along the way, as you simply commit them to heart and then work them into your next expansion.  You don't get that luxury if you start at 25,000 square feet, especially since you're usually more worried about paying rent than managing the "flow" of the facility and optimizing the client experience.

The moral of the story is to start small and give yourself room to grow. This might mean you need to sign shorter-term leases to allow for these adjustments, or just seek out a building that you know has room into which you can expand.

5. We purchased equipment our clients needed, not just stuff we thought would be fun to have.

This is a basic lesson, but an important one nonetheless.  We all (hopefully) learn the difference between "need" and "want" at a young age.  However, the ability to make this differentiation often escapes fitness entrepreneurs when they plan their new facilities and are perusing equipment catalogs and websites.  Don't buy stuff you want to train yourself; buy stuff you need to train your clients.

Just like 25,000 square feet isn't necessary if you only have five clients, a $10,000 machine probably isn't necessary - especially right off the bat. You probably don't need a leg curl - let alone four different varieties of leg curls.  It's much easier to add items later than it is to have to continually look at (and pay off) an unnecessary piece of equipment you never use.

As an interesting frame of reference, in our last facility expansion, we added about 7,500 square feet, but only two pieces of equipment: an extra set of farmer's walk handles and a Prowler.  We just needed more space.

Remember that it's your expertise and the training culture and environment you create - not equipment bells and whistles - that brings people back.

6. We selected a sustainable niche.

I've written at length in the past about how we found and developed the baseball "niche" and expanded our business in this avenue.  One of the key points I made what that we made a point of picking a population segment that was sustainable.  You can't pick farmers in New York City and expect to thrive, nor would you be able to train surfers in Ohio.  There are cultural, geographical, scarcity, financial, and logistical factors one has to consider in making this specialization decision.

Our "niche" came about somewhat by accident, but our development of it was absolutely, positively no accident.  In fact, our approach to baseball training and growing our business in this regard is incredibly calculated.  Believe it or not, by popular demand, we added a one-hour business development presentation from my business partner, Pete Dupuis, as part of our Elite Baseball Mentorships - and he received insanely positive reviews.

footer_logo-3

7. We complemented ourselves instead of replicating ourselves.

I've written about this in the past, so this will be brief. If you're going into business, don't just pick business partners and initial employees because they are "just like you."  Pick people whose skillsets complement yours.  If you don't, your entire staff is going to be standing around with hammers looking to smash nails when you really need a screwdriver. 

As a quick example, my goal on a daily basis is to do zero administrative business tasks; we have a business director and office manager who handle these responsibilities so that I can best leverage my strengths.

8. We established a good network.

Your network may consist of professionals to whom you refer clients (physical therapists, massage therapists, pitching and hitting instructors), or those to whom you look for business advice (accountant, equipment supply company, business consultant).  These are all relationships you can establish before your business is up and running, as they are important and must be trusted resources before you have already backed yourself into a corner where you're too busy to critically evaluate their role with respect to your business.  Essentially, my recommendation is to not just establish a network, but be meticulous early on in making sure these individuals are a good fit for your business. If you don't do this up-front leg work, these individuals can make your business look very bad at a time (start-up) when you need to look very good.

Closing Thoughts

I hope that these last five points have complemented the three from part 1 nicely in order to give you a more comprehensive perspective from which to draw when starting up a fitness business.  As you can probably tell, there are a lot of incorrect paths you can pursue if you don't critically evaluate important decisions in the planning stages.  For more insights on this front, I'd encourage you to sign up for our Business Building Mentorship that's taking place September 22-24. For the first time, it'll be offered in a 100% online format. You can learn more HERE.

Sign-up Today for our FREE Newsletter and receive a four-part video series on how to deadlift!

Name
Email
Read more

Strength and Conditioning Stuff You Should Read: 7/18/13

This week's list of recommended strength and conditioning reading (and listening) will have a heavy baseball focus.  Check out these websites:

Elite Baseball Mentorships - We've run two of these, and the feedback has been fantastic.  With that in mind, today is the early-bird registration deadline for the August 18-20 Phase 2 (no prerequisites required). We'd love to see you there!

Talking Shoulders and Elbows with Eric Cressey - This is the audio of a podcast I did for the Blue Jays Plus Podcast.  We discuss baseball injuries, player development, and a host of other topics. I come on the show at the 34-minute mark, in case you want to fast-forward to it.

EverythingElbow

The Surgery that Changed Baseball Forever - With the upcoming induction of Dr. Frank Jobe (who thought up and did the first Tommy John surgery) to the Baseball Hall of Fame, Will Carroll wrote this outstanding four-part article for Bleacher Report.  Here are the links to check out each of the articles: Part 1, Part 2, Part 3, and Part 4.

Sign-up Today for our FREE Baseball Newsletter and Receive Instant Access to a 47-minute Presentation from Eric Cressey on Individualizing the Management of Overhead Athletes!

Name
Email
Read more

Elite Baseball Mentorships: The Importance of Hip Rotation

Today’s guest post comes from my friend and colleague, physical therapist Eric Schoenberg.  Eric is an integral part of our Elite Baseball Mentorships.

The ability to properly assess, interpret, and manage hip range of motion (specifically rotation) is a critical skill in preventing injury and improving athletic performance in a baseball player.  Proper hip rotation sets up better alignment and direction in the pitching motion which sets up proper pelvic and trunk rotation and an improved ability to generate torque.  Stodden, et al. reports a direct correlation between increased hip rotation ROM and increased throwing velocity.

skoufa

As we covered in Phase 1 of the Elite Baseball Mentorship , a pitcher who does not internally rotate fully through the back hip will tend to land closed-off.  While some pitchers may use this to improve deception or get more movement on their pitchers, this positioning can lead to the pitcher (especially a less experienced one) to either miss high and arm side or attempt to throw across his body and cut the ball.  The pitcher will in turn try to “make up” velocity with his arm/shoulder due to the movement faults in the kinetic chain. This compensation is a very common cause of shoulder and elbow injury in pitchers.

Weaver closed stride

Additionally, Kibler, et al. notes that kinetic chain deficits are discovered on examination in a majority of patients with SLAP (superior labrum anterior-posterior) injuries. Deficits in hip abductor or extensor strength, deficits in hip rotation flexibility, or core strength weakness have been identified in 50% of SLAP injuries.

In Phase 1 of the mentorship program, we discussed in great detail the importance of understanding total motion of the shoulder as a key risk factor in pitching injuries. A recent study from Garrison, et al.  once again demonstrated that total ROM (ER + IR) is a better metric for predicting injury risk than GIRD (Glenohumeral Internal Rotation Deficit).

These same concepts also apply to the hip.  However, there are fewer research studies and less consistent findings of hip ROM norms in rotational athletes.  In addition, you will see some clear differences in ROM based on position (pitcher vs. hitter) which need to be appreciated when designing training and rehab. programs.

Tippett reports increased hip IR in the trail leg (vs. lead leg) of college baseball players. In contrast, Hills (2005) reported no significant difference in hip IR between the back hip and lead hip in hitters, however hip ER and total ROM was significantly greater in the back hip. Whereas, Laudner, et al. notes that in pitchers, there is less internal rotation of the trail leg than position players resulting in a less effective and potentially more dangerous throwing motion.

Anecdotally, as we look at the lead leg in a hitter, internal rotation force often exceeds available hip internal rotation ROM resulting in microtrauma to passive structures and resultant instability of the hip (i.e. abnormal gliding and shear forces of the femoroacetabular joint).  As a result, and similar to the shoulder, the athlete will lose dynamic stability (motor control) causing unequal distribution of force on the weight bearing surfaces and finally osseous (bony) or labral pathology ensues.

Finally, from a strength prospective, there is a clear difference between recruitment patterns used to hit a baseball vs. throw a baseball.  EMG studies by Shaffer and Jobe et al. show hitters rely much more on the lower half and core for power development and transfer, while using the upper extremity/hands more for position and direction.  On the other hand, pitchers seem to rely more on energy created in the core and upper extremity, potentially placing pitchers at an increased risk for upper extremity injury.

footer_logo-3

Key Takeaways

1. Failure to properly identify and correct hip ROM deficits (especially lack of hip internal rotation in pitcher’s drive leg) will result in increased injury risk throughout the kinetic chain.

2. Asymmetrical rotational patterns in baseball players result in need for training and rehabilitation programs to work rotation in both directions.

3. Continued proof of the need to respect structural changes (i.e. retroversion) as well as position specificity (i.e. pitcher vs. position player) in developing effective training and rehabilitation programs.

4. From a treatment perspective, don’t just rush to stretching what seems “tight”. Consider the principles of relative stiffness, pelvic alignment, breathing patterns, and lumbopelvic stability before we start cranking away at the hip joint.

If you would like more information regarding the mentorships, please visit our website, www.EliteBaseballMentorships.com.  The early bird registration deadline for the August 18-20 Phase 2 Mentorship is this Thursday, July 18, 2013. Click here to register.

Home_page1

Sign-up Today for our FREE Baseball Newsletter and Receive Instant Access to a 47-minute Presentation from Eric Cressey on Individualizing the Management of Overhead Athletes!

Name
Email
Read more
Page 1 2 3 4 5
LEARN HOW TO DEADLIFT
  • Avoid the most common deadlifting mistakes
  • 9 - minute instructional video
  • 3 part follow up series