Home Blog (Page 8)

Strength and Conditioning Stuff You Should Read: 5/4/20

Here's a list of recommended reading/listening since our last update on this front.

EC on the Vigor Life Podcast - I recently joined my buddy Luka Hocevar on his podcast to talk about career development and the skill sets fitness professionals will need for the future.

Athletic Shoulders with Eric Cressey - I was also a guest on the Science for Sport Podcast, where we discussed preparing shoulders for competition, and touched on the difference between the private sector and working for a team.

Youth Single-Sports Specialization in Professional Baseball Players - This study was recently published in the Orthopedic Journal of Sports Medicine, and it shows the early specialization isn't the right path for developing a professional athlete. I thought that the most interesting part of the study was Figure 5, the Reasons for Single-Sport Specialization. It's implied that pressure from parents and coaches isn't a leading cause of early specialization, but I have a hard time believing that kids specializing before age 14 make that decision all on their own, and without outside influence.

Top Tweet of the Week

Top Instagram Post of the Week


View this post on Instagram


Everything works - until it doesn't. And, pushing maximal strength is certainly no exception. 👇 Early on, building strength is an absolute game changer. A little strength goes a long way in providing the foundation for joint stability, power, and endurance. Over time, though, added levels of strength don't provide the same significant return on investment (point of diminishing returns). Instead, you need more specificity to develop these qualities. And, the stress of continuing to push for maximal strength effectively squeezes out other training initiatives because it's competing for a limited recovery capacity. Eventually, pushing maximal strength actually interferes with the development of those qualities because it's such a massive toll on the body to preserve. And, the risk of injury during training rises exponentially. Quality of life goes down dramatically as lifters are constantly banged up in their quest to gain 5-10 pounds of bar weight in an entire training cycle. "It is what it is" if we're talking about a strength sport athletes where all that matters is what's on the bar. It's a terrible path to be on if we're talking about an athlete or just someone who wants to feel, look, and perform well in their daily lives. #cspfamily

A post shared by Eric Cressey (@ericcressey) on

Sign-up Today for our FREE Baseball Newsletter and Receive Instant Access to a 47-minute Presentation from Eric Cressey on Individualizing the Management of Overhead Athletes!

Name
Email
Read more

Exercise of the Week: Adductor Slides

Today's guest post comes from Cressey Sports Performance - Florida Director of Performance, Tim Geromini.

One of the more forgotten muscle groups in the lower extremity is the adductor (groin) complex. Often, there is so much focus on glute activation and hamstrings range of motion that we overlook the adductors. As Eric has written in the past (all the way back in 2004!), depending on the population, adductors can get injured because they're either overactive or weak. In other words, they need to be both "long and strong." Enter an exercise that not only works on eccentrically creating range of motion at the adductors, but concentrically strengthening them, too!

Some of the benefits of Adductor Slides - and the associated coaching cues needed to make the most of your efforts:

1. Eccentric Control: The adductors are mostly known to absorb force in change of direction movements as they experience a ton of eccentric stress when an athlete has to cut or adjust his position. This exercise is not a traditional passive stretch as we are actively stretching the adductors into hip abduction. This should be a slow and controlled purposeful movement, keeping the hips in line with the knees. A cue that works well is “pretend there is a band attaching the Valslides together; now stretch that band.” This cue helps you understand to put force into the ground as you spread your knees as far apart as possible (another helpful cue). You are only going to go as low as your range of motion allows, so work within the range you have. Keeping your feet on the ground is a good starting point. As your range of motion and strength increases, try keeping them off the ground to progress the exercise.

2. Concentric Strength: Now that you have a sufficient stretch of the adductors, it’s time to strengthen them driving up into hip adduction. A helpful cue would be “pull the turf together on the way up.” The adductors play a big and often overlooked role in creating rotational power. At CSP, we often talk about shifting your weight from your back hip to your front hip on a medicine ball exercise, on the mound, and even in the cage. In this instance the role of the adductors is to help internally rotate the femur to create power in the lower half. Without sufficient adductor strength, you’re going to leave a lot of power on the table.

3. Anterior Core Strength: Neither of the two benefits listed above work very well if you can’t maintain a neutral spine while doing them. In other words, don't let the lower back arch. It’s important to note that the adductor muscles originate on the pubis (the bottom portion of the pelvis) and are vital in controlling pelvic stability. If you are doing this exercise on your own, it may be helpful to place an object on your low back and make sure it doesn’t fall off as you go through the movement.  Again, think slow on the way down and fast on the way up.

We typically program this exercise for 8 reps either in a warm-up or as a pairing with a rotational med ball exercise. As a regression, you can do one leg at a time while the non-Valslide knee is positioned on the ground/pad.

About the Author

Tim Geromini is the Director of Performance at Cressey Sports Performance - Florida. Prior to joining the CSP team; Tim spent time with the Lowell Spinners (Class A Affiliate of the Boston Red Sox), Nashua Silver Knights (Futures Collegiate Baseball League), Cotuit Kettleers of (Cape Cod Baseball League), and UMass-Lowell Sports Performance. You can contact him at timgero@gmail.com and on Twitter (@timgeromini24).

Sign-up Today for our FREE Newsletter and receive a four-part video series on how to deadlift!

Name
Email
Read more

Exercise of the Week: Birddog Rows

Today's guest post comes from Cressey Sports Performance - Florida Director of Performance, Tim Geromini, with a video assist from CSP-FL coach, Derek Kambour. Tim was one of the contributors on our Cressey Sports Performance Innovations resource, a collaborative effort of the CSP staff. It's on sale for $75 off through Sunday at midnight; just head to www.CSPInnovations.com and enter coupon code APRIL2020.

The Dumbbell Birddog DB Row is a very humbling rowing variation and has been helpful for our clients to lock in their horizontal pulling technique. This exercise doesn’t require as much cuing from us due to the internal feedback the client gets as the set goes on, but it is important to coach the correct set-up position before the client begins the row.

Some of the benefits of the Birddog Row:

1. Core Demands: This rowing variation requires great anti-extension and anti-rotation core control. Once you get the DB off the ground it’s important to pause and establish proper core position so you don’t rock side to side. If you’re having trouble keeping technique its best to lower the weight first and see if this clean up your form.

2. Hip Extension: Adding on to the core component of the row, maintaining a neutral spine and getting quality hip extension add a unique demand no other rowing variation can offer. In clients who are naturally in lumbar extension (arching of the lower back), the contralateral aspect of this row can help separate hip extension from lumbar extension.

3. Slower, Controlled Tempo: One of the main flaws you see in horizontal pulling is excessive range of motion at the top where the shoulder dumps forward into anterior tilt (over-rowing). To perform this exercise well, you have to slow down the rowing portion which gives great sensory feedback leading to better technique. This will also improve scapula protraction at the bottom portion for better shoulder mechanics.

4. Better Arm Path: Because of the alignment with the bench, you naturally have to leave some space between your arm and your ribs otherwise the DB will hit the bench on the eccentric or concentric portion of the row. This self-teaching benefit eliminates keeping your arm tucked in too close to your side.

5. Improved Cervical Position: It's very common in rowing variations to see cervical extension (head tilted up) or flexion (chin to chest) as compensation patterns mostly because there is no balance component to traditional rows. The birddog row has unique balance demands that add needed focus from the lifter. This leads to more of a neutral cervical spine position (double chin) to help improve balance.

We typically program this exercise for 3-4 sets of 6-10 reps per side.

To cover a wide variety of training and coaching concepts, I'd encourage you to check out CSP Innovations; it's on sale for $75 off through Sunday at midnight with coupon code APRIL2020 at www.CSPInnovations.com.

About the Author

Tim Geromini is the Director of Performance at Cressey Sports Performance - Florida. Prior to joining the CSP team; Tim spent time with the Lowell Spinners (Class A Affiliate of the Boston Red Sox), Nashua Silver Knights (Futures Collegiate Baseball League), Cotuit Kettleers of (Cape Cod Baseball League), and UMass-Lowell Sports Performance. You can contact him at timgero@gmail.com and on Twitter (@timgeromini24).
 

Sign-up Today for our FREE Newsletter and receive a four-part video series on how to deadlift!

Name
Email
Read more

Strength and Conditioning Stuff You Should Read: 4/9/20

I hope you're safe and sound in spite of the crazy times in the world today - and I hope some recommended reading and listening helps pass the time!

Upstream - For me, anything from Chip and Dan Heath is must-read material, and this solo project from Dan proved to be no exception. He looks closely at proactive concepts to reduce the need for reactive measures, and there are definitely applicable lessons for the strength and conditioning and rehabilitation communities.

Certified Speed and Agility Coach course - Lee Taft's outstanding certification is on sale through this Sunday at midnight. It's absolutely outstanding - and serves as mandatory viewing for all Cressey Sports Performance staff members.

CSAC_productimage

Symmetry Doesn't Matter - and May Cause More Problems than it Solves - The concept of asymmetry has always been very intriguing to me in light of my work in a one-sided sports like baseball. Dean Somerset shares a quick, but informative overview here.

Top Tweet of the Week

Top Instagram Post of the Week

Sign-up Today for our FREE Newsletter and receive a four-part video series on how to deadlift!

Name
Email
Read more

4 Training Principles to Make the Most of Your Speed Work

Today's guest post comes from Cressey Sports Performance - Florida coach Derek Kambour. It's timely, as Lee Taft's Certified Speed and Agility Coach course is on sale for $150, and it's mandatory viewing for each of the coaches on the CSP staff. Lee's had a profound effect on our movement training progressions, as you'll see below. Enjoy! - EC

With the current global pandemic, you’re seeing more and more people training outside. I don’t think I’ve seen this many people going for walks, going out for long distance runs, and even sprinting since I was in elementary or middle school (before the internet became popular). Many of the athletes that we’ve been training at Cressey Sports Performance have had to adjust their training due to not having access to our facility. The majority of them will not have access to equipment and will have to address other elements of their training to maintain a training effect. One of those areas is their sprint work. Since many athletes will be shifting their focus away from heavy strength training and more towards sprints and movement based work, I thought this would be a good time to go over some key principles for athletes and coaches to think about when it comes to getting the most out of their sprint work.

1. Posture/Position

This is usually the first thing we look at when developing an athlete’s speed capabilities. This is an athlete’s foundation when it comes to speed. Simply put, if an individual can’t demonstrate appropriate posture and maintain good proximal position, then nothing else is really going to matter. There are a bunch of ways that you can go about addressing an individual’s posture. At CSP, we really like to use a variety of wall march drills. These drills are basic, but they’re great for allowing athletes to get a feel for ideal postures and positions. We will use certain variations depending on what the athlete needs to work on. For all these variations, we’re looking to see around a 45-degree angle where the head and neck is in a straight line all the way down to the foot/heel that is on the ground. The four primary variations that we will use include:

a. Glute Wall March ISO Holds – this is first variation that we will use with athletes as an introduction to acceleration posture and projection angles. This gives them a feel for proper position and provides context for further progressions that we may use. We’ll often prescribe 3-5 reps/leg with each rep being a 5 second hold.
b. Glute Wall March ISO Holds w/Mini-Band – This is a great variation to further challenge the postures and angles that we addressed with the first variation. The addition of the mini band will challenge the athlete’s ability to maintain position and gives the athlete immediate feedback on their ability to achieve hip separation.
c. Glute Wall March 1-2’s – Eventually, we want to make this drill a little more dynamic. Again, we’re looking to reinforce posture with the added challenge of maintain position while going through a rapid limb exchange.
d. Wall Load & Explode – I really like using this variation for emphasizing the horizontal projection angles required for linear acceleration.

Usually, it won’t take long for athletes to master these wall drills. Eventually, we want them to progress to more dynamic movements such as marches and skips where maintaining good posture becomes a bit more challenging. If an athlete demonstrates the ability to maintain positional integrity during basic marches and skips, we’ll progress to an arms overhead variation for both. For our purposes, we’ll have most of our athletes perform arms overhead marches and skips for the added benefit of getting shoulder flexion and upward rotation for our throwing athletes.

2. Arm Action

Along with posture, arm action tends to be one of the lowest hanging fruits when it comes to improving acceleration mechanics. I’m not a huge fan of spending a ton of time on arm action drills. Usually, effective verbal cues will do the trick when it comes to improving arm mechanics. With acceleration, we’re looking for much longer arm action where the backside arm is close to or at full extension, and the front side arm is closer to the chin or possibly the eyes, depending on the athlete. This longer separation is required in order to help propel the mass forward, and it goes along with the longer ground contact times you see with acceleration. Again, I usually rely on verbalizing this to athletes through simple cues, but I do like this Arm Action Series that I stole from Lee Taft (you can see it HERE). I’ll use this series with athletes during their warm-up or in between sets of their actual sprint work if I feel as though they need a better “feel” for their arms in a more specific body position.

Arm action is usually a pretty quick fix. If it is a major point of emphasis and something that the individual has clearly been struggling with, then be sure to be a stickler about it when it comes to dynamic warm-up activities such as your marches, skips, etc.

3. Direction of Force Application

With acceleration, we are looking for maximal horizontal force application where the projection angle is roughly 45-degrees, like the angles that are explored during the wall drills that I mentioned earlier. This projection angle is largely going to depend on where the athlete applies force or where their foot strikes into the ground after completing the first step. If we are talking about starting from a staggered 2-point or 3-point stance, when the athlete takes off, we are looking for a piston-like leg action where the back-leg comes through and punches forward and then quickly punches down and back into the ground. What I’ve found is that an athlete’s speed, whether they are running a 10, 20, or 40-yard sprint, is going to be dictated by the first two steps. An athlete that can nail the first two steps of acceleration, is going to set himself up for a pretty successful sprint. This isn’t always easy to do, especially for younger athletes.

Reinforcing good leg action during marches and skips is a good place to start. You will often see athletes get too cyclical with their leg action where their heel comes too close to their butt. These are typically the individuals who will strike the ground out in front of their hips, leading to them "popping up" on initial acceleration. My go-to for athletes who have a hard time striking down and back is incorporating band resistance. I’m a big believer that in order to go fast, you sometimes need to slow things down and give athletes the time to get a feel for good position and what their body is doing. This is what band resistance essentially does. I’ll use this tool on marches, skips, and, one of my favorites, A-runs. I love using A-runs to teach the piston-like leg action and to help athletes with striking the ground under their center of mass.

There are times when athletes will execute proper leg action during these lower level activities, but then they can’t figure out how to transfer it to their sprint work. In this case, I’ll either a) have them perform these activities in between sets of their actual sprint work instead of just having them done in the beginning of their warm-up, or b) have them perform whatever sprint variation they are doing with band resistance and then immediately come back to that sprint variation without band resistance.

When I’m first introducing sprint mechanics to an athlete, I’ll usually play around with what starting position works best for them and where they feel most comfortable. Some athletes may prefer a lower position (3-point start) whereas other athletes (especially taller athletes) may prefer a variation where they initiate the sprint from a slightly higher projection angle (falling start).

4. Elasticity

Elasticity or elastic strength is arguably the most important trait or physical quality when it comes to sprint performance. Elastic strength refers to the ability to produce large amounts of force in a short period of time. There have been numerous studies that show how elite sprinters can put tremendous amounts of forces into the ground at a much faster rate compared to non-elite sprinters. How do we train the ability to put force intro the ground at a high rate? Sprinting is the most obvious answer, but this can also be accomplished through fast stretch shortening cycle plyometric activities as well. The nice thing about developing elastic strength is that it doesn’t require any equipment.

When preparing an athlete to sprint, we want to prepare specific tissues through plyometrics in a progressive manner going from least intensive to most intensive. Along with many of the dynamic warm-up activities mentioned (marches, skips, A-Runs), we like to use 1-leg Medial-Lateral Line Hops as a low-level activity to prepare the tissues of the lower leg. The middle ground can be used for activities like Pogo Jumps, Hurdle Jumps variations, and Depth Jump variations. Prior to sprint work, I like to transition to plyometric drills that address specific technical elements that translate a little more to sprinting, my favorite being bounding. With bounding, you’re developing an athlete’s stiffness, elasticity, coordination, and timing.

Hopefully, this will give some ideas as to how you can improve your sprint training as we continue to make it through this difficult time. Be safe, everyone!

Note from EC: If you're looking to learn more about Lee's approach to programming and coaching speed and agility work, I highly recommend his Certified Speed and Agility Coach course. The information is top notch, and it's on sale for $150 off through Sunday. You can learn more HERE

CSAC_productimage

About the Author

​Derek Kambour serves as a Strength and Conditioning Coach. Prior to joining the staff, Derek completed an internship at CSP-FL in the fall of 2018. Prior to joining the CSP-FL team, Derek coached a variety of athletes and clientele at performance facilities in New Jersey. He graduated from Montclair St. University with a degree in Exercise Science and is a Certified Strength and Conditioning Specialist (CSCS) through the NSCA. Derek is also a competitive powerlifter. You can follow him on Twitter and Instagram.

Read more

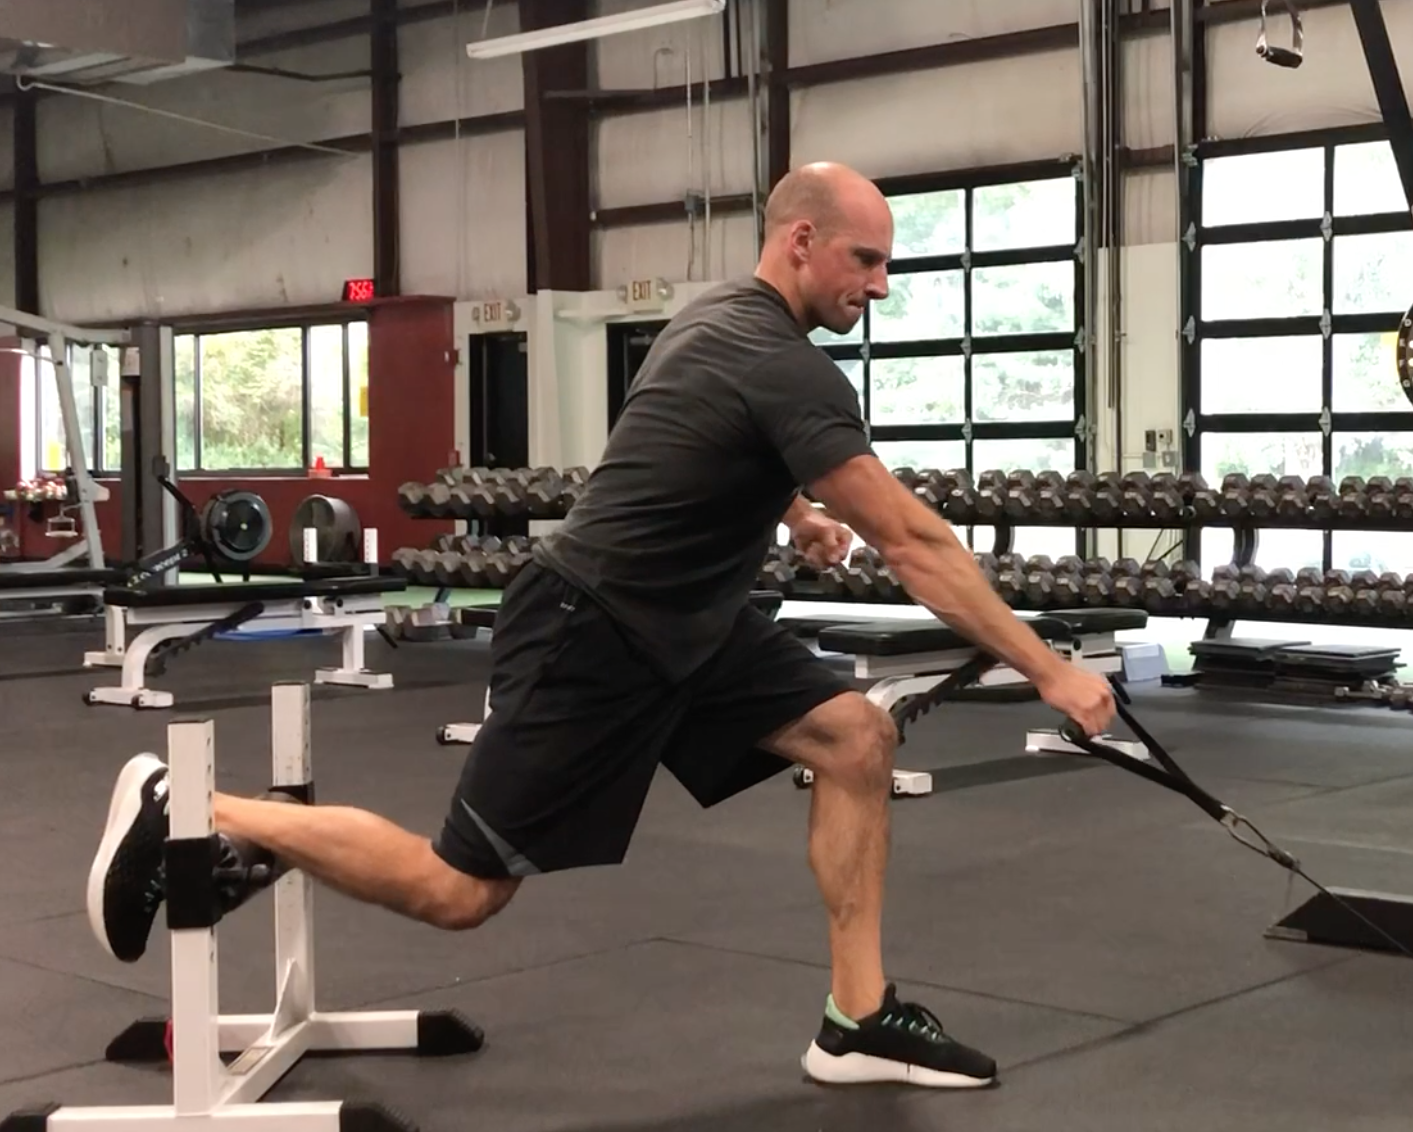
Exercise of the Week: High to Low Cable Chop Split Squat

Today's guest post/video comes from Cressey Sports Performance - Florida co-founder, Shane Rye.

There is a lot to love about the Split-Stance High-to-Low Cable Chop, so it's been a staple in our programming for years! Often, we see folks who struggle to handle frontal plane forces correctly.

Athletes who primarily train the sagittal plane tend to have difficulty centering their mass when doing single leg work or frontal plane exercises, though, so it's not uncommon to see a lot of mistakes on this. Some of the common compensations you will see are:

1. Over pronating or over supinating

2. Shifting the hips forward to access extension based postural patterns

3. Collapsing at the midsection

4. Lateral flexion (side-bending) or hip shifting

5. Valgus collapse of the knee

6. Excessive rounding of the upper back

7. Hips bailing way too far out or away (losing their center of mass)

8. Knee shifting to far over their toes etc.

As you can see, there are a lot of places where this exercise can go off the rails, so in some cases, it's a better strategy to modify the exercise than provide 500 cues to address each issue. Enter the High-to-Low Cable Chop Split Squat, one of our favorite ways to teach athletes how to handle frontal plane forces. I originally encountered this variation from Pat Davidson a few years ago, and it's stood the test of time. Thanks to Colts quarterback Jacoby Brissett for the great demonstration:

There is also a great added bonus of hammering your oblique sling system. This might help a football player learn how to properly cut, or a pitcher to effectively accept force on the front hip.

1. Your adductor and glute med should engage on the front leg. Think of this as a dynamic hip shift or dynamic adductor pullback. You should feel your adductors working hard to help stabilize your pelvis. You might even feel a stretch in your posterior hip capsule.
2. Don't allow your knee to collapse in.
3. Ensure that the front foot is stable and not overly collapsed or overly rolled out.
4. Control your breathing as you descend and ascend.
5. Don't over stride with the back leg.
6. Don't Rush!

We'll typically program this for 6-8 reps at a slow tempo (three seconds lowering, one second pause at the bottom, and three seconds up) at first, and when athletes get more proficient with it, they can speed it up.

Sign-up Today for our FREE Newsletter and receive a four-part video series on how to deadlift!

Name
Email
Read more

Strength and Conditioning Stuff You Should Read: 3/27/20

It's been several weeks since I published one of these recommended reading/listening lists; luckily (?), having both facilities closed has freed up some time to pull one together. Check these out:

Niched Podcast - My business partner, Pete Dupuis, just launched his own entrepreneurship podcast. The guests don't all come from the fitness industry, but given Pete's presence, he does an outstanding job of bringing the lessons back to relate to owning a gym or managing a clientele.

You Should Train Clients in Person Before Even Thinking About Online Coaching - With the surge in online training availability taking place right now, Dean Somerset highlights some crucial competencies that need to be in place on this front.

Chasing the Sun - I just finished up this book on the benefits of sunlight by Linda Geddes. It ties in nicely with Why We Sleep, by Dr. Matthew Walker, if you've already checked that out.

Top Tweet of the Week

Top Instagram Post of the Week


View this post on Instagram


This fantastic dissection image of the posterior rotator cuff has been making the rounds on Instagram, and rightfully so: it's a great perspective. I'll add my own spin on it: the long head of the triceps (LHOT) is the part that jumps out at me the most. It's intimately linked with the posterior shoulder, as it attaches not only on the infraglenoid tubercle of the scapula (bone), but also blends with the joint capsule and labrum. This makes it an important posterior shoulder stability structure. Additionally, it's not uncommon - particularly in an overhead throwing population - to see a Bennett's lesion (extra bone formation on the inferior/posterior border of the glenoid) that creates a "speed bump" over which the rotator cuff has to go during the lay-back phase of throwing. Many of the brightest minds in the sports medicine world have asserted that this adaptation may at least in part arise because of the significant pull on the posterior shoulder by the long head of the triceps tendon, which is active eccentrically to prevent excessive elbow flexion during lay-back, not to mention its obvious significance at ball release. What are the take-home messages? Take care of the triceps; they need to be long and strong. And, don't ever overlook the significance of the long head of the triceps in shoulder pain. #cspfamily #shoulderpain #armcare #sportsmedicine #Repost @dr.alvaromuratore @get_repost_easily #repost_easily ****** La zona posterior del manguito rotador contribuye a la elevación más rotación externa del hombro y además funciona como estabilizador de la articulación. En este video se observa desde atrás: El supraespinoso,infraespinoso, redondo menor y también el redondo mayor pasando por delante del tríceps. #shoulderanatomy #shouldertherapy #shouldersurgery #anatomy #anatomiadelhombro #anatomia #rehabilitation #rehab #phisicaltherapy #kinesiologist #kinesiologia #cirugiademano #cirugiadehombro #rotatorcuff #rotatorrehab #manguitorotador #mangorotador #manguitorotadores #sportsmedicine #orthopedics #orthopedicsurgery #orthopedicsurgeon

A post shared by Eric Cressey (@ericcressey) on

Sign-up Today for our FREE Newsletter and receive a four-part video series on how to deadlift!

Name
Email
Read more

Game-Planning for the Glute-Ham Raise

Today's guest post comes from Cressey Sports Performance - Massachusetts Director of Performance, John O'Neil.

Today, I'm gong to be covering a few ways to progress the glute-ham raise (GHR). We use GHR variations for hypertrophy and injury prevention, as they are a good supplementary exercise to a lifting and/or sprinting program. These variations are a nice replacement for people who struggle to do a GHR well, or, people looking for variety in a program. These variations are heavily impacted from our good friends at Resilient PT, so be sure to check them out on Instagram at @resilientPPT!

1. Glute Ham Raise ISO Hold

-Muscle Action: Isometric Hamstrings, Glutes
-Purpose: Create context for other exercises that require a the ability to create posterior pelvic tilt using your feet (i.e., deadlifts, RDLs, etc..)
-Degree of Difficulty: Beginner
-Common Rep Scheme: 3-5 reps x 5-10seconds, or, minimal reps for long duration breaths
-Common Error: Don’t set up too far away, and don’t expect to cover too much ground

2. GHR Hip Extension
-Muscle Action: Isometric Hamstrings, Eccentric to Concentric Glutes
-Purpose: Create context for hip hinging by driving your feet into the pad as you descend and ascend. Additionally, work on syncing upper and lower half tension needed on a deadlift variation.
-Degree of Difficulty: Beginner -> Intermediate
-Common Rep Scheme: 6-10 Reps
-Common Error: Don’t go for speed. The goal is to feel tension throughout the movement. Additionally, make sure to achieve full hip extension at the top of the movement.

3. GHR Razor Curl
-Muscle Action: Eccentric -> Concentric Hamstrings, Isometric (mid-range) glutes
-Purpose: Hamstring hypertrophy. By avoiding full hip extension, the stress of the activity is placed purely on the hamstrings.
-Degree of Difficulty: Advanced
-Common Rep Scheme: I’ll typically program this as an RPE. For example, if I write 9 RPE, it’s assumed that you go 1 rep shy of technical failure. Other ways to write this include (Max – 1) or 1 Rep in Reserve (RIR). Take this close to failure to make it a hypertrophy focused exercise. I’ve seen an athlete go from 3 reps in week 1 to 17 in week 3, so, don’t assume one rep scheme for a 4-week block.
-Common Error: Don’t go for speed on the eccentric, and really reach your body out into full knee extension to assure that you hit the distal fibers of the hamstrings. Also, don’t cheat it by coming up into hip extension at the top and keep the tension.

4. GHR Waterfall
-Muscle Action: Eccentric -> Concentric Hamstrings and Glutes
-Purpose: Hamstring and glute hypertrophy.
-Degree of Difficulty: Intermediate -> Advanced. Slightly easier than the razor curl for two reasons – one, the eccentric is with gravity, and two, achieving full hip extension at the top gives you a moment of releasing tension from the hamstrings.
-Common Rep Scheme: Same as the razor curl. Typically better formatted as an RPE or RIR.
-Common Error: Don’t rely on momentum to bounce out of the bottom. You want to feel your feet leading the movement from the bottom of the motion.

5. Decline, Incline, Band-Assist, Band-Reach, Load

If you want to make any GHR variation easier, decline the machine (elevate the front). To make it harder, incline the machine (elevate the back). Depending on the machine, you might be able to fit a band behind the back and either hold it or wrap it around your body to unload the bottom of the motion and provide more of an elastic component upon the return to the top.

To make the motion harder, adding a banded reach or adding load (holding a weight or using a weighted vest) will add to the eccentric stress and make the concentric motion more difficult. 

About the Author

John O'Neil (@ONeilStrength) serves as Director of Performance at Cressey Sports Performance-MA. You can contact him by email at joh.oneil@gmail.com and follow him on Instagram

Sign-up Today for our FREE Newsletter and receive a four-part video series on how to deadlift!

Name
Email
Read more

Exercise of the Week: Slideboard Bodysaw Push-up with Opposite Leg Reach

Imagine a slideboard bodysaw push-up married a yoga push-up with opposite leg reach - and then they had an absolute savage of a child. They’d name him. If you’re looking for a next level body weight exercise to use during these crazy times, look no further than the slideboard bodysaw push-up with opposite leg reach, which is our exercise of the week!

Important coaching cues:

1. Don't let the lower back arch or the head to shoot into forward head posture.

2. Keep the upper arm at roughly a 30-45 degree angle to the side. It shouldn't be tucked in tight to the side.

3. This movement is best executed smoothly. In other words, don't segment the yoga push-up from the reach (which would make it "hitchy"). Be athletic!

4. I'll usually program it for 5-8 reps per side on each set.

5. I love this for times of year when I'm trying to get athletes in and out of the gym with shorter training sessions, as you effectively get an anterior core and upper body pressing exercise in one.

6. This is a more advanced push-up progression. If you don't have the strength and core control to do at least ten clean body weight push-ups, it shouldn't be in your program.

7. If you're at home and don't have access to a slideboard or Valslide, you can try a furniture slider or sock over your hand on a tile/wood floor.

Sign-up Today for our FREE Newsletter and receive a four-part video series on how to deadlift!

Name
Email
Read more

What Do You Think of XYZ Method?

Often, I'll get inquiries that go something like this:

What do you think of yoga?

How do you feel about Pilates?

I have a friend who liked MAT. Do you think it's legit?

These are always challenging questions to answer because there are actually a number of variables you have to consider. To illustrate my point, let's try for some parallels in different industries. What do you think of real estate attorneys? Accountants? Veterinarians? Plumbers? General contractors?

As you can probably infer, there's going to be a high amount of variability in the delivery of each method, so you have to ask the following questions:

1. Is the method actually legit?

Sometimes, entire methodologies are based on bad science or bad people manipulating science for their own financial gain. A good example of this would be the thousands of different kinds of "cleanses" marketed in the nutrition/supplement industry.

2. Is the practitioner actually educated (and, where appropriate, licensed) in the method?

This is something that is near and dear to me. Each week, we get emails from young baseball players and their parents who say they train with a "Cressey guy" or someone "Eric has mentored." Then, they tell me that coach's name and I've never heard of him, and he's never even purchased one of my products or attended our actual baseball mentorship. Instead, he saw me give a one-hour talk in 2009. In describing himself, however, he positions himself on par with one of our interns who spent 3-5 months side-by-side with me six days per week. That's a markedly different level of education in our method.

As a good rule of thumb, think of the telephone game. The further away from the founder of a method, the more watered down the product becomes. As an example, Ron Hruska created the Postural Restoration Institute, and it's mostly disseminated through courses he's designed and by instructors he's trained himself. If an attendee then returns and teaches his/her staff the principles, then they teach their clients, and then the clients share their favorite positional breathing drill with a friend after a few adult beverages at a cocktail party, is it really representative of how impactful PRI can really be?

3. Does the practitioner actually have attention to detail?

Having just built a brand new Cressey Sports Performance facility, this is fresh on my mind. Not all contractors are created equal. Two can look at the exact same finished product and one person says it's beautiful, and the other says it's terrible work. No matter how great the method might be, if someone is lazy, it won't be positioned in a great light.

4. Does the practitioner understand how to "pivot" within a philosophy?

The back-to-wall shoulder flexion exercise is a central piece of our philosophy at Cressey Sports Performance. We think it's imperative to get the arms overhead without compensation at adjacent joints. Give this a video a watch to learn how we'd coach it under the three most common challenges one will typically encounter:

As you can see, these modifications rely on being able to do some basic, quick evaluations on the fly. If you don't have the ability to perform them, the client will likely just wind up banging on the front of the shoulder.

This is where a lot of group exercise methodologies can fall short. They don't understand how to pivot when someone can't perform a drill, so they wind up plowing through a bony block or exacerbating an existing movement fault.

5. Has the practitioner evolved with the methodology?

I tweeted this several years ago, but it still holds true:


If you look at CSP years ago versus now, it's easy to see how much we've evolved. What you would have learned in a single day of observation at the facility in 2010 is a lot different than what you'd learn on a 2020 visit. This might refer to the methodologies represented, coaching approaches, or equipment utilized.

6. Does the practitioner utilize one methodology exclusively?

As the hackneyed expression goes, "If you're a carpenter who only has a hammer, everything looks like a nail." For example, I'm very leery of chiropractors who only do adjustments when there are undoubtedly many other associated therapeutic interventions that could further help their patients. I'll always refer to multi-dimensional providers over one-trick ponies.

Pulling It All Together

As you can see, five of my six qualifications had nothing to do with the method, but rather the practitioner carrying out that method. That, my friends, is why I always refer to PEOPLE and not just methods. And, it's why you should always try to find good people - regardless of the methodologies they utilize - to help you get to your goals.

It's also why continuing education is so important: we need to understand the principles that govern how successful people can be within various methodologies. If you're looking to learn more about some of those principles and how I apply them to evaluation, programming, and coaching at the shoulder, be sure to check out my popular resource, Sturdy Shoulder Solutions.

Sign-up Today for our FREE Newsletter and receive a four-part video series on how to deadlift!

Name
Email
Read more
Page 1 6 7 8 9 10 183
LEARN HOW TO DEADLIFT
  • Avoid the most common deadlifting mistakes
  • 9 - minute instructional video
  • 3 part follow up series