When it comes to deadlift technique, one thing I find myself coaching individuals on all the time is their hand position - and this is especially true with the conventional deadlift. Learn more in this deadlift technique tutorial with a specific focus on the grip set-up:
Sign-up Today for our FREE Newsletter and receive a four-part video series on how to deadlift!
Today marks the fifth installment of a series that looks at the coaching cues we use at Cressey Sports Performance. Here are three more cues we find ourselves using with our athletes all the time.
1. Move the hands in or out to improve your deadlift technique.
When you're learning how to deadlift, understanding hand positioning is really important - but each deadlift variation is unique in terms of what you have to do with your grip. Check out this video to understand why:
2. Squat between your legs instead of over them.
In the past, I've spoken at length about how stance width impacts where the knees go. Move the feet out too wide, and the knees have no place to go but in. Bring them in closer, and it's much easier to get the knees out. Check out this video for more details:
So, for many folks, bringing the feet in can really help - particularly with the deadlift. However, squats can be a bit trickier, as the stance coming in can lead to a lot more forward lean and individuals not positioning the torso correctly. Individuals will squat as if they are trying to touch the belly to the quads. There are, in fact, some accomplished lifters who do this, but their bellies are very big, and the Average Joe isn't fat enough to pull this mechanical advantage off! Most folks wind up turning this approach into a really ugly good morning.
This is why I like the cue of telling folks to squat between the legs instead of over the top of them. Some people grasp it a lot better than "spread the floor" or "knees out." They can also understand positionally if you show them a bad set-up followed by a good set-up, like this classic photo (notice how the knees around outside the torso from the rear view):
Source: DaveDraper.com
3. Pretend your biceps is a rotisserie chicken.
This is, without a doubt, the strangest cue I've given. However, it works.
When we're doing our (shoulder) external rotation variations, we want to make sure the humeral head (ball) is centered in the glenoid fossa (socket), as that is the primary functional of the rotator cuff. This cue gets the job done:
Looking for more detailed coaching tutorials like this? Check out Elite Training Mentorship, an extensive online education program that features my staff in-services, exercise demonstrations, and articles - as well as the contributions of several other accomplished fitness professionals.
Sign-up Today for our FREE Newsletter and receive a four-part video series on how to deadlift!
Today marks the third installment of a series that looks at the coaching cues we use to optimize training technique at Cressey Performance. Today, we'll focus specifically on deadlift technique coaching cues. Additionally, if you really want to learn how to deadlift from scratch, I'd encourage you to subscribe to my free newsletter, as you'll receive a video deadlift technique tutorial when you do so.
1. Touch your butt to an imaginary wall a foot behind you.
"Hips back" is a cue that works great for many people when it comes to coaching deadlift variations, box squats, toe touch progressions, and a host of other exercises requiring a good hip hinge. For those with less-than-stellar "movement awareness," I prefer to give a slightly different reference point.
You see, "hips back" is an internal focus coaching cue; it focuses on the athlete moving part of his/her body. The imaginary wall, on the other hand, is an external focus cue; it's just an inanimate object that serves as a reference point for the athlete. With the "touch your butt to an imaginary wall a foot behind you" cue, you give an athlete both internal and external focus options, so it's more likely that one of them will register. Plus, "butt" may register a bit more with folks who can't don't understand how to dissociate the hips from the lower back.
2. Show me the logo on your shirt.
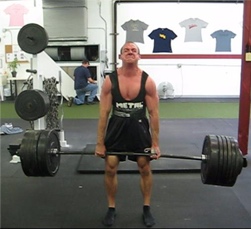
Also on the deadlifting front, many individuals simply don't grasp the concept of "chest up" when they're in the bottom position of a deadlift and want to go hunchback on you. However, I haven't met a lifter yet who doesn't understand what I mean when I stand in front of them and say, "Show me the logo on your shirt." Again, "me" is an external cue that helps to fix things up.
Take note of the New Balance logo on the front of my shirt during this deadlift; is there ever a point during the lift that you don't see it?
This isn't just for singles, either. You'll see the logo on Tony's shirt on every rep on this set of eight reps.
Now, let's compare two heavier lifts - one that was awful on this front, and two that were significantly better. This first one was taken in August of 2007. Notice how the logo disappears, and my spine looks like it's going to explode?
Now, compare that to the deadlifts (1:40 mark through the end) in my mock/impromptu powerlifting meet two weeks ago. You'll notice that you never lose sight of the logo on my shirt.
3. Don't just lift; put force into the ground.
I've found that folks often get so caught up in the moment when they approach heavy weights on the deadlift that they will simply do anything it takes to get the bar up (reference my ugly August 2007 deadlift from above). However, what they fail to realize is that they'll be stronger if they put themselves in the most biomechanically correct position possible.
In the context of the deadlift, this means not allowing the bar to get too far away from the body. If you do, it's like sitting on a seesaw opposite someone, but letting them move further away from the center point; you've made them feel heavier without actually changing the weight. In other words, crushing big weights on the deadlift is about keeping the bar close to the primary axis of movement: the hips. It's why most lifters will be slightly stronger on a trap bar deadlift than a conventional deadlift; the weight is positioned closer to the hips. And, it's also why folks with long femurs usually can lift more weight with sumo deadlifts (and do so more safely).
Regardless of the deadlift variation in question, I've found that more advanced lifters can really benefit from thinking more about just putting force into the ground. This doesn't mean you have to stomp your heels down (I actually used to do that, but don't any longer), but rather just engaging your posterior chain to take tension out of the bar and ensure that the bar starts out in the right path: close to you. Some cues that go hand-in-hand with this are #2 from above (show logo) and "pull back, not up."
Sign-up Today for our FREE Newsletter and receive a four-part video series on how to deadlift!
There might not be a more obnoxious and stubborn athletic injury than the hamstrings strain. When it is really bad, it can bother you when you're simply walking or sitting on it. Then, when a hamstrings strain finally feels like it's getting better, you build up to near your top speed with sprinting - and it starts barking at you again. In other words, a pulled hamstrings is like a crazy, unpredictable mother-in-law; just when you think you've finally won her over, she brings you back down to Earth and reminds you how much more she liked your wife's old boyfriend.
However, not all hamstrings pain cases are true strains; more commonly, they present as a feeling of "tight hamstrings." If one is going to effective prevent this discomfort, rehabilitate it, or train around it, it's important to realize what is causing the hamstrings tightness in the first place. Here are five reasons:
1. Protective Tension of the Hamstrings
This is readily apparent in someone who has a crazy anterior pelvic tilt, which puts a big stretch on the hamstrings, which posteriorly tilt the pelvis. When someone is extremely anteriorly tilted, the hamstrings are constantly "on" to prevent someone from ending up with extension-based back pain, such as spondylolysis (vertebral fractures), spondylolisthesis (vertebral "slippage"), and lumbar erector tightness/strains. This is a problem most commonly seen in females (greater anterior pelvic tilt than men) and athletes:
Doing a lot of longer duration static stretching for the hamstrings in this population usually isn't a great idea, as you run the risk of making someone more unstable - particularly in the case of females, who have less rigid ligamentous restraints (more congenital laxity) to protect them. To that end, our approach with these folks is to use the warm-ups to foam roll the area, then do some hamstrings mobilizations to transiently reduce stiffness in the hamstrings.
After this reduction in stiffness, we work to build stability in synergists to the hamstrings in posterior pelvic tilt. In other words, there's a heavy emphasis on glute activation and anterior core recruitment both with a strength training program and postural reeducation for the other 23 hours of the day.
At the end of the training session, with the male athletes, we may do some shorter duration hamstrings stretching just to "dissipate" a little eccentric stress. I like ten seconds in each of these three positions:
The thing to remember is that while you can do everything right with these athletes in training, what they do with their posture during the rest of their lives is of paramount importance. If they continue to stand around in anterior tilt and don't help the new stiffness they've developed "stick," they'll continue to over-rely on their already tight hamstrings.
2. Neural Tension
Just because you feel hamstrings tightness doesn't mean that the hamstrings are actually the source of the problem. In fact, it's not uncommon at all for those with lumbar disc issues to present with radicular pain, tightness, or numbness/tingling into the legs - especially the hamstrings. The symptoms may also come from nerve entrapment (most commonly the sciatic nerve) on soft tissue structures further down the chain. Just aggressively stretching the hamstrings can actually make these symptoms worse, so it's important to see a medical professional to rule out causes further up with the appropriate clinical exams, such as the slump test.
3. Truly Tight Hamstrings
In order for hamstrings to really be short, one would have to spend a lot of time with the knee flexed and hip extended - so just imagine the position you're in at the top of a standing leg curl. That's a hard pose to hold for an extended period of time, much less do so on a regular basis.
That said, some folks do get somewhat close to that on a daily basis in the sitting position, and are therefore the most likely to really have "tight hamstrings." They have to be in posterior pelvic tilt and knee flexion for a considerable chunk of the day - and even then, it's still pretty tough to be truly short, as they are still in hip flexion.
These folks usually can't distinguish hip flexion from lumbar flexion, so if you do a standing hip flexion assessment, rather than maintain the neutral spine we see in this photo, they'll go into lumbar flexion (butt will "tuck under").
The same trend will usually be noticeable with any kind of squat unless they have a tremendous amount of core stiffness to overcome the posterior hip stiffness that's present. If you test these folks on an straight leg raise, it isn't pretty, as the pelvis is already posteriorly tilted. In a pelvis that starts in "neutral" on a straight leg raise, roughly the first 1/3 of movement that you see comes from posterior tilt of the pelvis before the femur ever starts to flex on the acetabulum of the pelvis. These folks are usually already posteriorly tilt, so that 1/3 is already used up; you're really only measuring hip flexion and not hip flexion PLUS posterior pelvic tilt. And, as you can imagine, if someone is truly short in the hamstrings, that straight leg raise isn't going to be pretty. Obviously, these folks usually have a terrible toe touch pattern as well.
This should also educate you on why you can't treat all hamstrings strains the same. In the protective tension example earlier, we needed to work to regain stability to hold a position of a bit more posterior pelvic tilt. We'd cue glute activation, and use exercises that draw folks back into posterior tilt (e.g., reverse crunches). If you have someone has a pulled hamstrings because they are truly short from already being in posterior pelvic tilt, though, some of these cues and exercises would be contraindicated. You'd be feeding the dysfunction.
While manual therapy and stretching for the posterior hip is valuable, again, it must be followed by stabilization work at adjacent joints with the pelvis in a neutral position. These folks can benefit from training hip flexion above 90 degrees as well, as it educates them on how to flex the hip without rounding the lumbar spine. This is one reason why I think a lot of the chop and lift exercises we've learned from Gray Cook are so fantastic; they teach us anti-rotation and anti-extension stability in various positions of hip flexion while the pelvis is in neutral. They make changes "stick" better.
4. Previous Hamstrings Strain
Not to be overlooked in this discussion is the simple fact that the single-best predictor of hamstrings strains is a previous hamstrings injury. One you have an injury, that area may never be the same from a tissue density standpoint - whether it's the surrounding fascia or the muscle or tendon itself. A previous injury can leave athletes feeling "tight" in the region, so regular manual therapy can certainly help in this regard.
Anecdotally, the athletes with the long-term problems seem to be the ones with the pulls up on the gluteal fold, right where the hamstrings tendons attach to the ischial tuberosity. The area gets "gunked up"in a lot of athletes as it is because of all the tissues coming together and exerting force in a small area, but it's especially problematic in those who have a previous injury in the region. Perhaps more problematic, though, is the fact that we sit on our proximal hamstrings attachments - and that isn't exactly good for blood flow and tissue regeneration.
I haven't seen any research on it, but I have a feeling that if you looked at this region in a lot athletes with ultrasound (similar to this study with patellar tendons), you'd find a ton of people walking around with substantial degenerative changes that could be diagnosed as tendinosis even though they haven't actually hit a symptomatic threshold. My guess is that it's even worse in the posterior hip region because a) we sit on it, b) the ischial tuberosity is a more "congested" area than the anterior knee), and c) the study I noted above used 14-18 year-old athletes, and degenerative problems will get worse as one gets older (meaning this study likely undercut the true prevalence across the entire population).
Very simply, an athlete with a previous hamstrings strain needs to stay on top of quality manual therapy on the area, and be cognizant of maintaining mobility and stability in the right places. They have less wiggle room with which to work.
5. Acute Hamstrings Strain or Tendinosis
Of course, the fifth reason you hamstrings might be tight is because you might actually have a hamstrings injury! It could be an actual hamstrings strain, or just a tendinosis (overuse issue where tissue loading exceeds tissue tolerance for loading). There is no one perfect recommendation in this regard, as a tendinosis or grade 1 hamstrings strain is going to be much more tolerable than a grade 3 hamstrings strain where you have bruising all along the back of your thigh.
In terms of maintaining a training effect with the less serious ones, here are a few suggestions:
a. When you are ready to deadlift, use trap bar deadlifts instead of conventional or sumo deadlift variations. I explain a bit more about how the positioning of the center of gravity makes this more hamstrings friendly HERE.
b. Shorten up your stride on single-leg exercises. This makes the movement slightly more quad dominant, but allows you to still get the benefits of controlling the frontal and transverse planes with appropriate glute and adductor recruitment at the hip.
c. Go with step-up and reverse sled dragging variations. Eliminating the eccentric component can take a considerably amount of stress off the hamstrings, and both these exercises get the job done well.
d. If you're going to squat, start with front squats at the beginning, and reintegrate back squat and box squat variations later on, as they will be more hamstrings intensive.
e. Understand anatomy. If you are in hip flexion and knee extension, you're going to really be stretching the hamstrings and likely irritating them in the process. Select exercises that don't hit these painful end-ranges, and then gradually reintroduce more dramatic ranges of motion as the issues subside.
f. Do hill sprints before you do regular sprints. Your stride is going to be a bit shorter with hill sprints, and that'll take a considerable amount of stress off the hamstrings at heel strike (pretty good research on uphill vs. downhill sprinting HERE, for those who are interested). Just don't go out and run as hard as you can the first time out; propulsive forces are still quite high.
Of course, this just speaks to how to train around a pulled hamstrings; there is really a lot more to look at if you want to really understand why they occur and how to prevent or address them. In my eyes, this post was necessarily "geeky," as it is important that we don't dumb down complex injuries to "just stretch it out." This recommendation is analogous to a doctor just telling someone to take some NSAIDs for regular headaches; it doesn't get to the root of the problem, and it may actually make things worse.
Today, we have a guest blog from former Cressey Performance intern Eric Oetter, who is well on his way to a great career in physical therapy. Eric is an extremely bright up-and-comer from whom you'll be hearing a lot in the years to come. Here's a little sampling.
As part of the “pre-launch” phase for his new collaborative project, Elite Training Mentorship, Eric posted an outstanding video covering the lower-extremity assessment protocol he uses at Cressey Performance. For those who haven’t yet seen it, follow the link here; you won’t regret it.
In the video, Eric mentions three different factors that can contribute to mobility deficits at the hip: muscular restrictions, capsular restrictions, and bony restrictions. While the first two – muscular and capsular – can be relatively easy to decipher based on the test position of the hip, identifying bony restrictions can be tricky unless you’ve got access to a client’s radiological imaging. For this reason, it’s important to appreciate any structural variations in the skeletal system that can underlie joint malalignment at the hip.
The focus of this piece is a structural variation called hip anteversion. We’ll be covering the joint morphology associated with anteversion, along with a quick orthopedic test and some implications for programming.
What is hip anteversion?
Excerpted from the 2002 text Diagnosis and Treatment of Movement Impairment Syndromes, Shirley Sahrmann describes hip anteversion as the following:
“ … the angle of the head and neck of the femur is rotated anteriorly, beyond that of the normal torsion with respect to the shaft. The result is a range of medial hip rotation that appears to be excessive, whereas the lateral rotation range appears to be limited.”
Essentially, clients who present with this structural abnormality were born with, or have acquired, a more internally oriented neutral position for their femurs as they sit in the acetabulum (or hip socket). To be classified as anteverted, the femoral head and neck must be rotated more than 15° anteriorly with respect to the plane of the femoral condyles (Sahrmann 2002). (Conversely, a posterior rotation of the femoral head and neck would constitute a retroverted hip.)
When observed standing, clients with hip anteversion will often present with femoral adduction and genu valgum – the classic “knock-kneed” posture. As kids, these clients likely eschewed “indian-style” for W-sitting – a position much more congruent with their natural femoral alignment.
While some might also classify “pigeon-toes” as an indicator for anteverted hips, this is not always the case. In the presence of anteversion, some clients – especially athletes – will develop a tibial torsion as a result of the applied stresses to the lower extremities. This adaptation allows for a neutrally aligned sub-talar joint in the face of morphological changes up the kinetic chain.
The largest implication of hip anteversion or retroversion is a significant discrepancy between hip internal and external rotation. As described in the Sahrmann quotation above, hip anteversion creates an apparently large amount of internal rotation (IR) with a reciprocal loss of external rotation (ER).
I liken these morphological changes to those seen in the retroverted shoulder of an overhead throwing athlete. The total hip range of motion (IR + ER) can present at around 90°, or “normal”, but these measures are drastically skewed in one direction of rotation.
Whereas a retroverted shoulder presents a favorable adaptation in baseball, the same cannot always be said for the athlete with anteverted hips.
If undiagnosed or mismanaged, hip anteversion can create pathology. Expect issues like knee pain, back pain, and hip instability (Sahrmann 2002). For this reason, it’s imperative to recognize anteversion when it presents and apply the programming modifications necessary to accommodate this structural abnormality.
So how can I test for it?
Although checking IR and ER in both supine and prone can highlight limitations in the capsule or surrounding hip musculature, you’ll need an extra orthopedic test at your disposal to clear the skeletal system. For this purpose, we’ll use the Craigs’s test.
Assuming you’re following the assessment outlined in Eric’s video, the best time to perform a Craig’s test is immediately after you’ve assessed a client’s hip rotation in prone, especially if you detect a glaring asymmetry between IR and ER.
Note the client in the photos below – here, we see an excessive amount of IR (~50°) met with limited ER (only ~20°). With a rotational deficit of ≥30°, this client may have some torsional issue at play; thus, a Craig’s test indicated.
With the client remaining in prone the knee held in flexion, the Craig’s test is performed by first palpating the same side greater trochanter, a landmark on the femur that protrudes laterally about 5 inches below the iliac crest. Make sure to apply flat-hand contact with the pads of the fingers – this posture allows for greater sensory feedback and precision. Once this position is assumed, begin internally and externally rotating the femur through its full range of motion.
As you rotate the leg, you’ll notice the greater trochanter tracking against your fingertips, becoming more or less prominent depending on the direction of rotation. Start shortening your oscillations until you determine the position at which the trochanter is most prominent laterally and pause once you locate it. At this range of rotation, the femoral head is optimally situated within the acetabulum.
We get a positive Craig’s test when the hip rotation at the point of ideal femoral alignment is ≥15° into IR. Also, we can now classify the hip as anteverted, providing useful insight for the dexterous coach.
Check out the video below to see a Craig’s test performed on our client from above.
One thing worth noting – a 1992 study by Ruwe et al. showed the Craig’s test to be more reliable than radiological techniques in the assessment of femoral torsion. So, even if you have client X-rays available, a Craig’s test is still worth administering.
If the Craig’s test is positive, how should I alter programming?
Now that we’ve performed a Craig’s test and determined whether or not any torsional qualities exist, it’s time to write an effective program that respects our findings. Here are a few do’s and don’ts to consider when programming:
• DON’T stretch the hip into external rotation – this only creates impingement. We wouldn’t force the retroverted shoulder of a pitcher into an end-range sleeper stretch, so we need to take the same approach with an anteverted hip. Even though the hip is a much more durable joint, there’s no reason to drive motion that a client simply doesn’t have, as this only serves to jam the femoral head against the acetabulum.
• DO increase the amount of core work in clients with femoral torsion. When someone is stuck in internal rotation at the hip, the kinematics of the lower-extremities become predisposed towards a pronation pattern (sub-talar pronation, tibial/femoral IR, and anterior pelvic tilt).
The hip external rotators often become excessively stiff and overused, as they are constantly checking motion into adduction, internal rotation, and flexion. While increasing external rotator strength will improve the first two, we can employ the posterior fibers of external oblique and rectus abdominis to aid in flexion control, creating a more stable pelvis. By doing so, we’re also increasing stiffness at the lumbar spine, fighting any compensatory motion created by the hip external rotation deficit.
As far as exercise selection goes, focus on half-kneeling chops/lifts and anti-extension – both integrate the hips and core simultaneously to check hip flexion ROM. I especially like rollout variations for clients with hip anteversion, which are highlighted in Eric’s video below.
• DON’T introduce quad-dominant lifts until the client shows dramatic improvements in hip stability. The pronation pattern I described above is essentially a cookbook for ACL and MCL injuries. In a population that is likely anteriorly tilted at the pelvis and anterior weight bearing, the last thing we want to do is make them even more reliant on their quads. An adroit posterior chain should precede any anterior chain-focused movement.
• DO hammer the posterior chain as if your life depended on it. While this statement could serve as a mantra for most general population programming, it is even more important when dealing with anteversion of the hip. These clients sometimes present with femoral control so poor, our first goal is to simply get them to baseline.
Mastering stability in the sagittal plane takes precedence. Start bilateral with deadlift and box squat variations and increase stability demands as the client advances. Great second tier progressions include single-leg RDLs, single-leg hip thrusts, and bowler squats, all of which introduce frontal and transverse plane stability.
Lastly, exercises that force the femur into an abducted and externally rotated state are contraindicated – sumo deadlifts provide a great example. Even though pulling sumo is a fantastic variation for hip strength, it can create malalignment in the acetabulum if the hip is anteverted. In this case, it’s safer to stick with either trap bar deadlift or conventional deadlift variations.
Conclusion
Hip anteversion isn’t something you’ll likely see in every client. Johns Hopkins Medical School reports the prevalence to be ~8-10%, but that number varies based upon cultural norms and neurodevelopmental patterns, which can alter skeletal growth.
Regardless, it is an important structural variation to recognize and program for, especially in an athletic population. Taken as supplement to Eric’s lower-extremity video, I hope this article provides you another piece towards building a better assessment.
About the Author
Eric is currently a senior at the University of Georgia majoring in Exercise and Sport Science, with plans to pursue a Doctorate of Physical Therapy. After concluding a Division-1 football career at the Georgia Institute of Technology, Eric has ardently pursued his passion for coaching, garnering experience with clients of all ages and ability levels through internships at both Indianapolis Fitness & Sports Training and Cressey Performance. His articles can be found on EricCressey.com, 8weeksout.com, and in Fighting Fit magazine. You can follow him on Twitter or reach him via email at ecoetter@gmail.com.
Sign-up Today for our FREE Newsletter and receive a four-part video series on how to deadlift!
I know we have a lot of "rising stars" in the fitness and strength and conditioning communities reading this blog, so I thought I'd throw out some of my top coaching suggestions along these lines.
1. Always coach at 90-degree angles.
You'll never see everything you want to see from a 45-degree angle, so you're better off directly in front and/or to the side of the one performing the exercise. Imagine what happens when you are coaching deadlift technique, for instance.
From the side, you can observe neutral lumbar-through-cervical spine, whether the athlete is pushing through the heels or toes, and whether the movement is turning into too much of a squat.
From the front, you can watch for hip shifts, knock-knees, turning-out of the toes, and grip width (in the case of the conventional deadlift and sumo deadlift).
From a 45-degree angle, you can see some stuff - but never with as "unobscured" a view as you'd prefer.
2. Never cross your arms.
This is the single-best way to say "Don't talk to me; I'm in a bad mood." The problem is that you might not even be in a bad mood, but that's the way clients and athletes perceive it. "Open arms" equals "open to interaction."
3. Don't sit down.
How athletic is this posture?
The only way you could make yourself any more unappealing as a strength coach or personal trainer is to rock a turtleneck like the one the guy in the photo has. Standing up gives you a better view of the training room and makes you more approachable.
That said, a lot of coaches and trainers may get cranky knees and lower backs from standing on hard training surfaces for hours and hours on-end. If this is the case, you've got a few ways to break the wear and tear:
a) Demonstrate more exercises - simply getting moving will help things out, especially if you are doing a lot of ground-to-standing transitions
b) Put a foot up on a bench or weight rack here and there - going to single-leg stance can redistribute your weight and give you breaks in the action (while keeping you standing)
c) Play around with footwear and training surface - In a given day, I might coach in two different pairs of shoes and even go barefoot for a bit. I think our lower extremities like the variety (and I generally feel best in my minimalist footwear or barefoot). It's also helped me to bounce back and forth between the harder rubber training surface and the softer turf we have at Cressey Sports Performance.
4. Find out whether clients/athletes like "demonstrate" or "describe."
Some people are visual learners; you need to show them what you are asking them to do. This is especially true among beginners, and those who don't have strong athletic backgrounds (as well as those who are very forgetful).
Other people just need to hear the "what" and a few coaching cues, and they'll go right to it and be successful. They'll actually be annoyed with you if you slow things down too much and get in their way when they are ready to train. These are generally the more experienced exercisers who may have already mastered some derivative of the exercise in question (for instance, learning a 1-arm DB Bulgarian Split Squat from Deficit after they've already learned a regular Bulgarian Split Squat).
As an interesting anecdotal aside to this, last year, we had a professional baseball player come to us who had previously trained at a large facility in a group with more than a dozen other players who were all doing the same program off the same dry erase board. He spent much of his first day with us bad-mouthing the other facility, saying that all they did was "grab-ass" and "stand around," never getting anything done. After his first session, he made a point of saying how much better he liked our business and training model. The reason was very apparent: he was a "describe" learner in light of his previous training experience, but he'd been plugged into a "demonstrate" model with a lot of less experienced athletes. All they did was get in his way.
It's important to identify what kind of learner people are early on in their training with you - but also to appreciate that their learning style may change when they're presented with unfamiliar exercises.
5. Find different ways to demonstrate energy.
Many up-and-coming coaches worry that they aren't "Rah Rah" enough to be successful in this field. They seem to think that the only way to win people over is to be over-the-top excited all the time. The truth is, though, that the majority of the most successful people in the industry aren't in-your-face yellers, non-stop clappers, or bouncing-off-the-wall coaches. Guys like Todd Durkin and Dave Jack who have seemingly endless energy and great coaching ability are actually rare exceptions in our field (and I learn a lot about coaching each time I watch those two).
In reality, a lot of the other high-energy guys I've encountered use that enthusiasm to cover up for a lack of knowledge, and athletes eventually see through it. Plus, it's impossible to be high-energy all the time, so when these individuals are having rough days, they often lose their #1 coaching asset. You simply can't have bad days as a coach or trainer.
That said, there are a lot of ways to show enthusiasm without yelling all the time. Having a spring in your step is an extremely valuable asset in a trainer or coach's toolbox. If you were to watch me at Cressey Sports Performance, I never "amble" around; I always have spring in my step and am getting from Point A to Point B quickly, as it allows me to do more coaching (and interact with more people) in a given hour.
Being excited about what you're coaching is also paramount; tell athletes/clients what it's doing for them and why that's important.
Creating relationships should be a means of building excitement as well. Ask clients about their backgrounds, how they're doing, and what their goals are. People get excited and motivated when they find out that you are interested in them.
There are countless other ways to demonstrate energy on a daily basis: picking the right music, clapping your hands, creating competition among athletes, sending emails/Facebook posts/Tweets to athletes before they come in to train, or pairing up certain clients who you know will push each other. The only limitation is your creativity - and you'll find that it's easier to create energy once you know clients well, as you'll know exactly which buttons to push to get the reaction you seek.
These are just five coaching tips that immediately came to mind when I sat down to write this post this morning, but there are surely hundreds more that warrant attention. If you're an up-and-coming strength and conditioning coach or personal trainer, above all else, I'd encourage you to get out and observe coaches in the industry. Don't just watch their programming or exercise selection; rather, pay attention to their mannerisms, the flow of the facility, and how their staff carries themselves. You'll realize quickly that there is a lot more to successful coaching than just X and Os.
Sign-up Today for our FREE Newsletter and receive a four-part video series on how to deadlift!
I love writing multi-part features because it really affords me more time to dig deep into a topic of interest to both my readers and me. In many ways, it’s a challenge on par with writing a short book, whereas individual blogs tend to be quick bullet points. That said, here were five noteworthy features from 2011 at EricCressey.com:
How to Deadlift: Which Deadlift Variation is Right for You?- Part 1 (Conventional Deadlift) - This kicked off a three-part series on why certain deadlift variations may be more appropriate than others for certain lifters. Be sure to read installments 2 and 3: the Sumo Deadlift and the Trap Bar Deadlift.
Coffee Consumption and Health: The Final Word - Part 1 - As I noted the other day, one of the biggest surprises for me in 2011 was that my readers were psyched to get nutrition content at EricCressey.com, and Brian St. Pierre's guest blog on coffee consumption and health was one such example. Be sure to check out Part 2 as well.
How to Fit Core Stability Exercises into Strength and Conditioning Programs - Part 1 - This two-part feature was published late in the year, but that didn't stop it from receiving enough traffic to rank in the top five at year-end. It was a follow-up to the Functional Stability Training seminar that Mike Reinold and I presented at Cressey Performance in November. Click here for part 2.
Is Dairy Healthy? The Whole Story - Part 1 - This three-part feature was another great guest submission from Brian St. Pierre on a hotly debated topic in the nutrition world. Check out Part 2 and Part 3 as well.
Speaking of features, that wraps up this third installment of the "Best of 2011" series; I'll be back soon with the top videos of 2011.
Sign-up Today for our FREE Newsletter and receive a four-part video series on how to deadlift!
With 2011 winding down, I'll be dedicating this week to the best content of the year, based on traffic volume at EricCressey.com. I'll kick it off today with my most popular articles from the past year.
1. My New Favorite Training Shoe - This post received more than 3,000 views more than #2. Apparently, footwear is a topic about which folks were anxious to read, and I gave a detailed review of all the minimalist footwear options I've tried - and folks shared it a ton. Additionally, based on feedback on my Twitter account, a lot of people purchased the New Balance Minimus based on my recommendation and have absolutely loved it.
2. Your Arm Hurts? Thank Your Little League, Fall Ball, and AAU Coaches. - This post received well over 1,000 Facebook "shares" and loads of Tweets, and I'm hopeful that this is indicative of parents, coaches, and players learning about how to approach arm care and throwing programs intelligently. I think it was also popular because it was a good blend of scientific evidence and simple, everyday logic.
3.Tim Collins: Why Everyone Should Be a Kansas City Royals Fan (at least for a day) - This was my favorite post of the year, as it was a chance to celebrate a good friend and long-time Cressey Performance athlete who is everything that is right about Major League Baseball. As a cool little aside, traffic to this article played a large part in having "Tim Collins" trending on Twitter during his MLB debut on Opening Day in March.
4. Weight Training Programs: You Can't Just Keep Adding - It sounds like many of my readers were glad to hear that I was doing some writing on managing training stress. There is a lot of common sense in this one, but sometimes, that's what people need!
5. Strength Training Programs and Squat Technique: To Arch or Not to Arch? - Here's a very misunderstood topic in the area of strength and conditioning technique. You'll be happy to know that I'll be addressing it in great detail in the new Functional Stability Training resource that Mike Reinold and I are releasing soon.
6. Shoulder Hurts? Start Here. - In this piece, I outlined three sure-fire strategies that just about everyone can employ regardless of their shoulder issues.
7. Healthy Food Options: Why You Should Never Take Nutrition Advice from Your Government - One of the biggest surprises for me in 2011 was that my readers absolutely ate up (no pun intended) nutrition content, and summer Cressey Performance intern Tyler Simmons' guest blog perfect example. He shared some great (and controversial) thoughts in this guest blog.
8. Correcting Bad Posture: Are Deadlifts Enough? - People want results, and they want them fast. This post touched on whether or not the deadlift could be an optimal "shortcut" for getting to where you want to be.
9. Why the Gym's Out-of-Business and the Porn Store's Thriving - This was proof that I can write about just about anything. Don't ever expect to see a content drought here at EricCressey.com. The timing for this was really good, as I got the idea to write it right around the time that we released The Fitness Business Blueprint.
10. Lifting Heavy Weights vs. Corrective Exercise: Finding a Balance - I can definitely see how folks found this topic so interesting, as it's a very challenging balance to strike. In fact, it was even a very challenging piece around which to wrap my brain!
This wraps up our top 10 posts of 2011, but I'll be back soon with more "Best of" highlights from 2011. Next up, I'll list my top product reviews of the year.
Sign-up Today for our FREE Newsletter and receive a four-part video series on how to deadlift!
As I noted in my post earlier this week, I’m doing the Superhero Workout for a nice little change of pace in my training program – and simply because it’s nice to be able to outsource my training here and there to other qualified fitness professionals.
Yesterday’s strength training program included ten sets of three reps on a wide stance squat, and it was all going smoothly until the seventh set, when I started to get a little tight in my right adductor. It wasn’t too bad, but I’m a firm believer in “better safe than sorry,” so I cut back on the weight by 50 pounds, narrowed my stance, and finished my last three sets with no problem at all.
Sure, I deviated from the program, but I completed the session just fine, and have zero issues in the adductor today. I avoided taking an unnecessary risk that could have become a setback in my training, and as a result, I’ll be continuing with the program as-is today.
It got me to thinking about this question for my readers: what would you have done in this situation? It's a tough - and confusing - decision.
Would you have done what I did? Would you have simply dropped the weight and tried another set with a wide stance? Would you have canned the final sets and reps and moved on to the next strength exercise pairing? Would you have just pushed through it? Or, would you just have taken your ball and gone home altogether?
The answers to these questions – whether they are correct or not – parallel something called cybernetic periodization. I first came across the topic when Mel Siff wrote about it in Supertraining as he referred to programs not always taking “into account the athlete’s subjective perception of the intensity and overall effects of the loading.” Siff went on to say that with cybernetic periodization, “the original preplanned periodisation scheme is regularly modified by subjective and objective feedback obtained from the lifter’s current performance state.”
Traditionally, at least from what I have read, cybernetic periodization has referred almost strictly to load, volume, and training frequency. However, the question I pose today is: why can’t it also refer to exercise selection?
As an example, I’ve switched folks from conventional deadlifts to trap bar deadlifts or sumo deadlifts when they just couldn’t find their groove on the conventional version. And, some people can do feet-elevated push-ups when regular push-ups hurt. Exercise selection absolutely matters as much as any other strength training program variable.
I’m a firm believer that there is always something folks can do in a gym to get better, regardless of their injury or state of mind. Folks may be wildy excited to train, but have physical limitations that need to be taken into account on the fly in the context of exercise selection. To that end, I think it’s important to know what to watch for in this regard if you’re trying to determine whether you should change a day’s training program:
1. Is there a performance drop from previous weeks?2. Do warm-up sets feel heavier than normal?3. Do you find that you’re having a hard time getting warmed-up? 4. Did you get poor sleep quality the night before?5. Do you have unusual tightness, or something you’d term an injury?
These are all questions you can ask yourself on the fly in your strength training program to determine whether you need to change things up. The modification may be an exercise substitution or reduction in volume or intensity. Regardless of the change, it’s extremely rare that the answer is to push through it, as it’s your body’s way of telling you something is wrong – and the correct cybernetic periodization approach is the way to “get things right.”
On a related note, the early-bird special price on the Superhero Workout ends Saturday at midnight. Head HERE for more information.
Sign-up Today for our FREE Newsletter and receive a deadlift technique tutorial!
I haven't published much strength and conditioning randomness of late, so here goes.
1. Here's a research study that demonstrates relationships among a variety of scheduling and recovery factors and injury rates. The part I found most interesting was that researchers observed that sleeping fewer than six hours the night prior to a competition led to a significant increase in fatigue related injuries.
Additionally, while it wasn't specifically observed in the study, my anecdotal observations are that kids who play 14 games in a weekend are more likely to hate their sports, have too many insignificant trophies, and live in their parents' basement until age 35 because they have a weird sense of entitlement and absolutely no idea how to interact on a social level with anyone who isn't on their AAU teams.
2. Speaking of young athletes, interval training works better for them, too. There's absolutely no reason for a young soccer player to be running miles and miles at a steady-state. Kids need to get strong and learn to run fast before they try to run fast for a long time. Interval training is a nice "bridge" between the two when applied correctly during the off-season period.
3. Here's an excellent study with a biomechanical analysis of the hex/trap bar deadlift technique as compared to the conventional deadlift technique. It backs up a lot of the comments I made last month with my deadlift series from last month, which you can find at the following links:
How to Deadlift: Which Variation is Right for You? - Part 1 (Conventional Deadlift)
How to Deadlift: Which Variation is Right for You? - Part 2 (Sumo Deadlift)How to Deadlift: Which Variation is Right for You? - Part 3 (Trap Bar Deadlift)
4. Here's an interesting article in Radiology Today about the use of MRI in college athletes as a pre-screening tool - and potentially even an aid in optimizing strength and conditioning programs.
Because a lot of the observations on MRI may be "subclinical" (meaning they are findings that occur without the presence of symptoms), there may be merit (albeit at a big cost) to using screens like this as part of an initial (or on the fly) evaluation of an athlete to dictate a training or "prehab" program. For instance, observing a subclinical patellar tendinopathy may mean you do more soft tissue work around the knee and more heavily emphasize glute activation and minimize quad dominant squatting (among other things) to keep that tendon from reaching a symptomatic threshold.
There are, of course, some significant drawbacks. For starters, MRIs are expensive and time consuming, so not everyone could get them. How do you decide who deserves it - especially in the era of Title IX?
Second, you're assuming that strength and conditioning coaches are qualified and capable to organize programs around what's found on a radiology report. Generally speaking, there isn't a ton of individualization in collegiate strength and conditioning because coaches have so many athletes assigned to them and it isn't feasible. It makes me wonder if you could prevent more injuries if you simply hired 3-4 more strength and conditioning coaches for what it would cost you to get an extra radiologist and imaging technician.
Third, and perhaps most importantly, there are a lot of "false positives" on MRI. I've written about this quite in the past and covered it in our Optimal Shoulder Performance DVD set, but you are headed down a very slippery slope when you start treating the image rather than the athlete. In other words, how one moves and feels is far more important than how one's MRI looks. I can guarantee you that the overwhelming majority of my overhead throwing athletes have labral fraying, partial thickness supraspinatus tears, and a host of other "normal" findings for this population. If I immediately contraindicated a ton of exercises in my program because I knew this, I'd likely be setting them back with regressions in their programming when they actually needed progressions.
What are your thoughts on this final issue? If you had the resources, would you MRI every athlete in a college athletic program? How would you pick which region to MRI?
Sign-up Today for our FREE Newsletter and receive a deadlift technique tutorial!


