As you can probably imagine, given that I deal with a ton of baseball players - and the fact that I've written about shoulder pain a ton over the past decade - a lot of people initially come to Cressey Performance because their shoulder hurts. It might be rotator cuff pain, AC joint irritation, or any of a host of other issues, but you'd be surprised at how many similarities there are among the ways that you address most of these issues.
The problem is that pain can throw a wrench in your plans and limit you in your ability to get to exactly where someone needs to improve movement-wise. For instance, you might have someone who has a significant glenohumeral (ball-and-socket) internal rotation deficit, but it's hard to manually stretch them into internal rotation without further irritating a cranky AC joint. Or, someone with a partial thickness rotator cuff tear may be dramatically limited in shoulder flexion, but even shoulder flexion with assisted scapular posterior tilt and upward rotation exacerbates their symptoms. Very simply, you can't just pound round pegs into square holes when it comes to dealing with a delicate joint like the shoulder - and that applies to both asymptomatic and symptomatic shoulders.
To that end, there are three initiatives that I think are the absolute most important places to start in just about every case.
First, I'm a huge advocate of soft tissue work with a skilled manual therapist. In our office, we have a massage therapist and chiropractor who performs both Active Release and Graston. And, we make sure that any physical therapist to whom we refer clients uses manual therapy as an integral part of their treatment approach. Whether you're a regular exerciser or not, tissues can get dense, nasty, and fibrotic, and integrating some hands-on work on the pec minor, posterior rotator cuff, lats, scalenes, sternocleidomastoid, and several other areas can dramatically reduce an individual's symptoms and improve range-of-motion instantly - and that allows us to do more with a corrective exercise program.
Understandably, not everyone has access to a qualified manual therapist all the time, so you can always utilize self-myofascial release in the interim. Here, in a video from Show and Go: High Performance Training to Look, Feel, and Move Better, CP massage therapist Chris Howard goes over a quick and easy way to loosen up the pecs:
The second area where you really can't go wrong is incorporating thoracic spine mobilizations. The thoracic spine has direct interactions with the lumbar spine, rib cage, cervical spine, and scapulae; as a result, it has some very far-reaching effects. Unfortunately, most people are really stiff in this region - and that means they wind up with poor core and scapular stability, altered rib positioning (which impacts respiration), and cervical spine dysfunction. Fortunately, mobilizing this area can have some quick and profound benefits; I've seen shoulder internal rotation improve by as much as 20 degrees in a matter of 30 seconds simply by incorporating a basic thoracic spine mobility drill.
That said, not all thoracic spine mobility drills are created equal. Many of these drills require the glenohumeral joint to go into external rotation, abduction, and horizontal abduction in order to drive scapular posterior tilt/retraction and, in turn, thoracic spine extension and rotation. If you've got a cranky shoulder, this more extreme shoulder position usually isn't going to go over well. So, drills like the side-lying extension-rotation are likely out:
For most folks, a quadruped extension-rotation drill will be an appropriate regression:
And, if the hand position (behind the head) is still problematic for the shoulder, you can always simply put it on the opposite shoulder (in the above example, the right hand would be placed on the left shoulder) and keep the rest of the movement the same.
Last, but certainly not least, you can almost always work on forward head posture from the get-go with someone whose shoulder hurts. We start with standing chin tucks, and then progress to quadruped chin tucks.
Additionally, working on cervical rotation is extremely valuable, although teaching that is a bit beyond the scope of this post.
Keep in mind that these three broad initiatives are really just the tip of the iceberg when it comes to a comprehensive corrective exercise plan that would also include a focus on scapular stabilization and rotator cuff exercises, plus additional mobility drills. They are, however, safe entry-level strategies you can use with just about anyone to get the ball rolling without making a shoulder hurt worse in a strength and conditioning program.
For more information on what a comprehensive shoulder rehabilitation program and the concurrent strength and conditioning program should include, check out Optimal Shoulder Performance, a DVD set I co-created with Mike Reinold, the Head Athletic Trainer and Rehabilitation Coordinator of the Boston Red Sox.
The Optimal Shoulder Performance DVD is a phenomenal presentation of the variables surrounding shoulder health, function, and performance. It combines the most current research, real world application as well as the the instruction on how to implement its vast amount of material immediately. After just one viewing, I decided to employ some of the tactics and methods into our assessment and exercise protocols, and as a result, I feel that myself, my staff and my clients have benefited greatly.
Michael Ranfone BS, CSCS, LMT, ART
Owner, Ranfone Training Systems
Single-leg work has been a pretty controversial topic lately.
Some folks say that it's the only safe way to train the lower body for the long haul and that bilateral exercise is the devil. Others insist that you can't possibly build size relying on unilateral lower body strength exercises and that they're a cop-out for those who don't want to squat and deadlift heavy in a strength and conditioning program.
What's my take?
Continue Reading...
Late last week, my buddy Nick Tumminello made the follow comment that some folks, unfortunately, took out of context:
“Everyone is talking about assessments (and that's cool). But, no one seems to talking about simply not allowing poor form in training. If you can't keep good form in a certain exercise (movement pattern), simply don't do that exercise until you've improved the movement or decided that you're simply not built for it to begin with. Not sure why things need be any more complicated than that!”
For the record, I agree 100% with Nick and understood what he meant, but it would have been easy to assume that he was referring to “trainers train, and therapists assess.” In other words, many folks assume that as long as you aren’t symptomatic in some way, then you’re safe to start exercising because you can simply “feel” things out as you go and, if something hurts, you don’t do it.
While you obviously shouldn’t do something if it hurts, just because something doesn’t hurt doesn’t mean that it’s not harmful long-term – and to me, that’s the difference between “working someone out” and provided them with an optimal training experience. As physical therapist Mike Reinold has said, “Assess; don’t assume.”
To illustrate my point, here are a few examples.
Let’s say you have someone with a chronically cranky acromioclavicular joint or osteolysis of the distal clavicle that might only be apparent upon reviewing a health history, palpating the area, or taking someone into full horizontal adduction at the shoulder. While direct over-pressure on the area (as in a front squat) would surely elicit symptoms, my experience is that most folks won’t notice a significant amount of pain until the next day if the strength exercise selection is inappropriate (e.g., dips, full range-of-motion bench pressing). You might have avoided what “hurt” during the session (presumably because the individual was warmed up), but you find out after the fact that you just set an individual back weeks in their recovery and fitness program.
How about right scapular winging? It’s not easily observed if a client has a shirt on, and if you simply throw that individual into a bootcamp with hundreds of push-ups each week, you’re bound to run into trouble. Here’s the thing, though: even if you observed that winging and wanted to address it in your training, you really have to consider that it can come from one or more of several factors: weak scapular stabilizers, a stiff posterior cuff, insufficient right thoracic rotation, faulty breathing patterns, or poor tissue quality of pec minor, rhomboids, levator scapulae (or any of a number of other muscles/tendons). Just doing some rows and YTWL circuits will not work.
Also at the shoulder, a baseball pitcher with crazy congenital and acquired shoulder external rotation may have a ton of anterior instability in the “cocking” position of throwing (90 degrees of abduction and external rotation), but be completely asymptomatic. Back squatting this athlete would exacerbate the problem over the long haul even if he didn’t notice any symptoms acutely.
Finally, in my recent article, Corrective Exercise: Why Stiffness Can Be a Good Thing, I spoke about how someone can have crazy short hip flexors and still manage a perfect squat pattern because his stiffness at adjacent joints is outstanding. If I don’t assess him in the first place and just assume that he squats well, I’m just waiting for him to strain a rectus femoris during sprinting or any of a number of other activities. Gross movement in a strength and conditioning program wouldn’t tell me anything about this individual, but targeted assessments would.
The point is that while Nick’s statement is absolutely true – demanding perfect form is corrective in itself – you’ve still got to assess to have a clear picture of where you’re starting. Otherwise, many cases like this will slip through the cracks.
To that end, I’m happy to announce that my long-time friend and colleague, Mike Robertson, recently released his Bulletproof Knees and Back Seminar DVD Set. This comprehensive product covers anatomy, assessments, program design, and coaching. In fact, almost the entire second day is focused on coaching, and that’s an area in which most trainers really do need to improve. All in all, this isn’t a collection of bits and pieces; it’s Mike’s entire philosophy on training someone who is suffering from knee or low back pain (and how to prevent it in the first place). Effectively, Mike covers what both Nick and I are getting at in the paragraphs you just read.
This is tremendously valuable information that fitness professionals need to hear, so be sure to check it out.
Sign-up Today for our FREE Newsletter and receive a deadlift technique tutorial!
I just received this feedback from a very happy customer and thought I'd share it with you:
Hi Eric,
I just completed Show and Go last week and tested my lifts yesterday. I thought you'd like to see the results.
Broad jump: 80" to 84"
Front box squat: 240 to 265
Bench press: 190 to 210
Trap bar deadlift: 310 to 340
Chin-up 3RM: 220.2 to 234.7
My body composition stayed pretty constant.
Show and Go followed Maximum Strength. Putting the two together, here are the results from the last 8 months (i.e., pre-Maximum Strength vs. post-Show & Go):
Broad jump: 77" to 84"
Front box squat: 155 to 265
Bench press: 150 to 210
Trap bar deadlift: 240 to 340
Chin-up 3RM: 197.8 to 234.7.
Not a bad way to spend eight months, especially at almost 43 years old and only 170 lbs. Thanks to you, I can, for the first time in my life, bench press more than my weight, front squat more than 1.5 times my weight, and deadlift almost twice my weight.
Thanks for producing these workout plans. I look forward to following the next program you release.
Best,
Scott Garland
As you can see, Show and Go makes for a great follow-up strength and conditioning program to Maximum Strength. If you haven't checked out both, I (like Scott) would encourage you to do so!
Maximum Strength: Get Your Strongest Body in 16 Weeks with the Ultimate Weight-Training ProgramShow and Go: High Performance Training to Look, Feel, and Move BetterSign-up Today for our FREE Newsletter and receive a deadlift technique tutorial!
Today marks the third and final installment of this series on which deadlift variation is right for you. Part 1 focused on the Conventional Deadlift, while Part 2 covered the Sumo Deadlift. Today, we'll talk about another fantastic option: the Trap (or Hex) Bar Deadlift.
At Cressey Performance, we use the trap bar for all our initial deadlift technique instruction with new clients, as it tends to be a very safe option for just about everyone.
Because the handles are to the sides (instead of in front) of the lifter, it doesn't take as much hip and ankle mobility to get down to the bar. Most trap bars also come with two handle settings - one of which is a little bit higher so that those with limited mobility can still get down to deadlift with a neutral spine. So, it saves you the time and annoyance of having to put the plates on top of some sort of riser to elevate the bar.
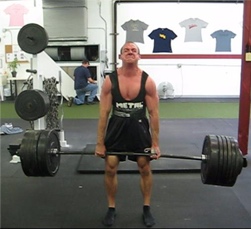
Additionally, because the lifter is positioned "inside" the bar, the load is horizontally closer to with his center of gravity (COG), whereas the resistance is usually more anterior to that COG on a conventional or sumo deadlift. Note the white line in this photo that depicts the position of the load relative to the hip - and imagine how it would be a few inches further to the left in a conventional or sumo deadlift.
As a result, there is less shear stress on the spine and presumably more compressive stress. Our spines generally handle compression much better than shear, so this simple repositioning of the resistance closer to the axis of rotation (hips) can dramatically improve "comfort" during deadlifts in those with a history of back pain (or those who are looking to avoid it). You'll often see lifters who try to go right back to conventional deadlifting after lower back pain and wind up with recurring symptoms. They'd be much better of transitioning with some trap bar deadlifts to "test the waters."
The only problems I see with trap bar deadlifts are pretty subtle ones - and both have to do with the fact that the bar really never comes in contact with the legs on the way up or down. As a result, there is a tendency is novice lifters to try to squat the weight up and down - and this is not what should be taking place; it's a deadlift - which means "hips forward, hips back." This first common problem can be quickly corrected by simply teaching the movement correctly with a good hip hinge.
The second concern would be those in significant posterior pelvic tilt who have lost the lordotic curve of the lumbar spine. When one gets to lockout on a conventional or sumo deadlift, we cue them to activate the glutes and "hump the bar" to complete the movement. In those with posterior pelvic tilt, that same movement to finish hip extension without the presence of a bar to stop them will often lead to them going into full posterior pelvic tilt and lumbar flexion under load in the upright position. In other words, the hips come through too far. This is another problem that can be easily fixed with cueing on when the hip extension should end, and what the upright position should look and feel like.
A lot of those reading this piece may not have access to a trap bar for performing this strength exercise, but to be honest, I can say without wavering that for most people, it's well worth purchasing. You can pick one up HERE through Perform Better for just $144.95 plus shipping. And, this bar is actually surprising versatile addition to a strength and conditioning program relative to what people think; you can do deadlifts with it, but also farmer's walks, overhead presses, and (if it's your thing) shrugs.
To see how all the deadlift variations fit into a comprehensive strength and conditioning program, check out The High Performance Handbook.
Sign-up Today for our FREE Newsletter and receive a deadlift technique tutorial!
In the first installment of this series, I talked about the conventional deadlift and how it's the most advanced progression in the "deadlift spectrum" for most folks. Today, our focus will be another great strength exercise: the sumo deadlift.
I like the sumo deadlift quite a bit for those who aren't quite mobile enough to get all the way down to the bar for conventional deadlifts from the floor. It's also grown in popularity among powerlifters over the years because it shortens the distance the bar has to travel and also (as a general rule of thumb) allows lifters to get more out of their deadlift (or squat) suits when pulling. I find that it's particularly common among the guys who are built to squat and bench press because of shorter arms and legs but longer torsos because they don't have to get down so low (via hip flexion and dorsiflexion) to grasp the bar.
By bringing the feet a bit wider (abducting the hips) and turning the toes out a bit (externally rotating the hips), a lot of folks can get to "depth" much easier and ensure that they can pull with a neutral spine. This is probably one reason why those with more retroverted hips inevitably resort to sumo deadlifts after failing miserably with trying to pull conventional-style; they're just more comfortable with the hips externally rotated a bit. So, if you're someone who always walks with the toes pointed out, there's a good chance that sumo deadlifts are going to be safer for you than conventional pulling.
That said, when discussing sumo deadlifts, I have just two concerns.
First, I think that they need to be cycled in and out of one's strength and conditioning program relatively frequently, especially if you use an ultra-wide stance. Deadlifting sumo-style for more than eight weeks straight is a recipe for hip irritation - especially if you're someone who is doing a fair amount of squatting in the same strength training programs. It's one reason why I prefer a more "moderate" stance width for sumo deadlifts.
Second, the biggest sumo deadlift technique mistake I see is lifters trying to squat the weight up and down. When the hips start too low - and then the hips and knees extend at the same rate - the knees aren't extended enough when the bar gets to them. The only way that the bar can continue its upward path is to either go around the shins (which is accomplished by rounding the back to move the bar away from the body) or get dragged along the shins. If your back hurts or you have blood all over the bar and scabs on your shins, you're probably doing something wrong.
If conventional-style is the most advanced variation of the deadlift out there, sumo deadlifts are likely the first "regression" down, as they allow you to perform the exercise with less hip and ankle mobility, and they also ensure that the bar is starting a bit closer to the primary axis of rotation (the hips), as the femur is flexed and abducted and not just flexed.
Our next installment - the trap bar deadlift - will wrap this series up. In the meantime, in case you missed it, enter your name and email below to receive a free 9-minute deadlift technique video.
It’s no secret that I’m a big fan of the deadlift.
It’s a great strength exercise for the posterior chain with excellent carryover to real life – whether we’re talking about athletics or picking up bags of groceries.
It’s among the best muscle mass builders of all time because it involves a ton of muscle in the posterior chain, upper back, and forearms.
It’s a tremendous corrective exercise; I’m not sure that I have an exercise I like more for correcting bad posture, as this one movement can provide the stiffness needed to minimize anterior pelvic tilt and thoracic kyphosis.
These benefits, of course, are contingent on the fact that one can perform the deadlift correctly to make it safe. And, sadly, the frequency of what I’d consider “safe” deadlifts has diminished greatly as our generation has spent more and more time a) at computers, b) in high-top sneakers with big heel lifts, and c) watering down beginner fitness programs so much that people aren’t taught to deadlift (or do any valuable, compound exercises) when starting a strength training program.
To me, there are two ways to make things “safe.” The first is to teach correct deadlift technique, which I already did with a 9-minute video that is free to anyone who subscribes to my newsletter (if you missed it, you can just opt-in to view it HERE). This video troubleshoots three common variations of the deadlift: conventional, sumo, and trap bar.
The second is to educate lifters on which deadlift versions are the safest versions for different individuals with different injury histories and movement inefficiencies. That’s the focus of today’s piece. We’ll start with the conventional deadlift.
While this version of the deadlift is undoubtedly the “one that started it all,” it’s also the most technically advanced and potentially dangerous of the bunch. Shear stress on the spine is going to be higher on the conventional deadlift than any other variation because the bar is further away from the center of gravity than in any other variation. Additionally, in order to get down to the bar and maintain one’s center of gravity in the right position while maintaining a neutral spine, you’ve got to have excellent ankle, hip, and thoracic spine mobility. Have a look at the video below, and take note of the position of the ankles, hips, and thoracic spine:
You’ll notice that the ankles are slightly dorsiflexed (knees out over toes). If you are crazy restricted in your ankles and can’t sufficiently dorsiflex, two problems arise:
1. You can’t create a “space” to which the bar can be pulled back toward (a lot of the best deadlifters pull the bar back to the shin before breaking the bar from the floor). You can observe this space by drawing a line straight down from the front of the knee to the floor at the 2-second mark of the above video:
2. Those who can’t dorsiflex almost always have hypertonic plantarflexors (calves). These individuals always struggle with proper hip-hinging technique, as they substitute lumbar flexion for hip flexion in order to “counterbalance” things so that they don’t tip over.
You’ll also notice that the hips are flexed to about 90 degrees in my example. I have long arms and legs and a short torso, so I have a bit less hip flexion than someone with shorter arms would need. They would utilize more hip flexion (and potentially dorsiflexion) to be able to get down and grab the bar.
Regardless of one’s body type, you need to be able to sufficiently flex the hips. You’d be amazed at how many people really can’t even flex the hips to 90 degrees without some significant compensation patterns. Instead, they just go to the path of least resistance: lumbar flexion (lower back rounding).
Moving on to the thoracic spine, think about what your body wants to do when the ankles and hips are both flexed: go into the fetal position. The only problem is that the fetal position isn’t exactly optimal for lifting heavy stuff, where we want to maintain a neutral spine. Optimal thoracic spine mobility – particularly into extension – brings our center of gravity back within our base of support and helps ensure that we don’t lose the neutral lumbar spine as soon as external loading (the lift) is introduced.
As you can see, having mobility in these three key areas is essential in order to ensure that the conventional deadlift is both a safe and effective strength exercise in your program. The problem is that in today’s society, not many people have it. So, what do we do with those who simply can’t deadlift effectively from the floor?
We’ve got two options:
1. We can simply elevate the bar slightly (or do rack pulls) to teach proper hip hinging technique in the conventional stance – and train the movement within the limitations of their ankle, hip, and thoracic spine (upper back) mobility.
2. We can simply opt to go with a different deadlift variation. This is something that, for some reason, most previously injured lifters can’t seem to grasp. They have near-debilitating low back injuries that finally become asymptomatic, and they decide to go right back to conventional deadlifts with “light weights.” They still have the same movement impairments and flawed technique, so they build their strength back up, ingraining more and more dysfunction along the way. They’d be better off doing other things – including trap bar and sumo deadlifts – for quite some time before returning to the conventional deadlift.
And, on that note, we’ll examine those two other deadlift variations in parts 2 and 3 of this series. Stay tuned!
To see how all the deadlift variations fit into a comprehensive strength and conditioning program, check out The High Performance Handbook.
Back in graduate school, an opportunity arose to invest in an up-and-coming company. At the time, I was swamped with student loans and really didn’t have the $5,000 “buy-in” to spare. However, I’d always had the “entrepreneurial spirit,” and the company was recommended by a more experienced colleague I trusted (who’d also bought in), so I decided to take the plunge and devote a hefty chunk of my bartending (grad school evening job) income to the cause.
Almost a decade later, it’s been a tax deduction for me every April, as the company has lost money year after year. The lowlight came when the vice president walked off with $80,000 to waste on strippers and cocaine, as us unenthused investors were told. Apparently, when it comes to venture capital, there are “angel investors” and “poor grad students who accidentally fund guys who like boobs.” It didn’t take me long to figure out which category I was in (although I did take time to consider that $80K is a lot of $1 bills).
I’ve learned lessons from books, DVDs, seminars, training people from all walks of life, and lifting myself – but throwing $5K down the toilet when I really didn’t have it to spare actually ended up teaching me a valuable lesson: no matter who you trust, the only person you can really count on is yourself.
This can really be applied to just about any walk of life – from business (obviously) to personal development. Every decision you make in life is really a balance between trust and complete self-reliance.
When you hire an employee, it’s because you trust that he or she will do a good job with clients and customers at the level you expect. Otherwise, you’d have to extend hours and do everyone yourself…24/7/365.
When you go to church and put a few dollar bills in the collection plate, you trust that everyone who touches that money along the way will, in fact, ensure that it goes to the right place. Otherwise, you’d have to hand deliver your donation each week.
When you go to the doctor, you trust that he or she has been educated properly and is thorough enough to give you a diagnosis that might save your life. Otherwise, you have to get second opinions – or try to diagnose yourself.
Heck, even as you read this newsletter, you trust that I know my arse from my elbow (and in light of my stellar investment story from above, a lot of you are probably second-guessing yourselves already).
Catch my drift? Your life is really a series of dependencies on others, as much as you might hate to admit it. This applies to your strength and conditioning program in a big way.
When you go to the gym, you trust that the ownership of that facility has properly maintained that equipment so that it’s not going to break while you’re using it. Otherwise, you’d be checking out each piece of equipment meticulously between each set.
When you connect with a training partner, you trust that he or she is going to be as motivated as you and push you to be better. Otherwise, you’re lifting by yourself.
When you purchase a fitness product, you trust that the author has the experience necessary to create a program that’ll deliver the results you want in a safe and timely manner.
How do you ensure that your strength and conditioning program (or any aspect of your life) doesn’t end up as a series of failed dependencies on others?
1. Review the résumé of anyone you’re considering. When it comes to selecting people to work at our facility, the résumé is something that gets you a foot in the door – much like an academic transcript or SAT score might impact college admissions. At the end of the day, how you act during an interview and perform on the job is more important to me. For you, though, if you’re looking to purchase a fitness product, check on the background of who created it. Are they training people – or have they at least done so in the past? Or, are these hypothetical programs?
2. Look for a track record of success. This might seem synonymous with checking on a résumé, but it’s actually different. I’ve known people with tremendous on-paper accomplishments who couldn’t cut it in the real world because these achievements didn’t translate to a different realm, or because their previous success had made them complacent and apathetic. Sadly, I’ve also met people who have forged résumés altogether. Do your homework by seeking out testimonials and asking around – and that’s where #3 will come into play.
3. Surround yourself with as many positive – and insightful – people as possible. Your first impression is usually the correct one, but it never hurts to have additional perspectives from those around you. While there’s no way you can ever guarantee that all the advice you get is good, consistently reevaluating the relationships you keep can be really valuable – not only in terms of making sure that you have the best advice on hand, but also in determining if you need to get someone’s negativity out of your life. Not every friendship is going to work out, not every business dealing will be a good fit, and not every book/DVD will appeal to you. The more you can “hone in” your social circle, the better the decisions you’ll make – whether it’s in avoiding the extra slice of chocolate cake, deciding to go for the PR bench press on a day when you could have slacked off, or buying book “X” instead of DVD “Y.”
4. Look for a way out; there should always be a fall-back option. You can test-drive the care before you buy it. You can find a new training partner if things aren’t working out. You can always fire an employee if they aren’t the right fit. Many products have money-back guarantees.
5. Only delegate within your comfort zone. Learning to delegate was the absolute hardest thing for me when we opened Cressey Performance and I had co-owners and employees for the first time in my life. It took some time, but now I have people doing everything – billing, scheduling, taxes, maintenance, answering the phone – that doesn’t allow me to effectively leverage my strengths: assessments, program design, and coaching. Comfort in this regard doesn’t magically happen; it’s something that develops over time.
To bring this lesson to a close, look back at my botched investment and apply these five principles to it. I didn’t even know the president or vice president of the company, and therefore never checked their résumés (#1). They’d never run a business before and had no track record of success (#2). Rather than running my idea by multiple people, I went on the basis of one colleague – who was more of an acquaintance, anyway (#3). There was no fall-back option, so with this being my first investment opportunity, I would have been smarter to go with something more low-risk, such as investing in stocks/bonds rather than a brand new company (#4). I instantly delegated everything, andto people I didn’t even know! There was no easing into it (#5).
I deserved to lose my money; I was an idiot.
To take the guesswork out of your programming, check out my new program, Show and Go: High Performance Training to Look, Feel , and Move Better. I promise, you can trust me – and there’s a money-back guarantee.
Sign-up Today for our FREE Newsletter and receive a deadlift technique tutorial!
If something is going to be controversial and potentially elicit a negative response from my readers, I "sit" on the topic for 24 hours. During that time, I weigh the decision of whether me publicly writing about something is for the better good - meaning that it'll help people in the long-term even if it makes them recognize that they've been goofing up in the short-term.
I did some thinking on that front last night (actually, for the past several nights), and decided to go through with this blog, as I feel like it's something that every single baseball player, parent, and especially coach ought to read. So, if you're in one of those categories - or are just a baseball fan who loves the game - please spread the word on what you're about to read, whether it's with a Facebook "recommend," "Tweet," or just a friendly email with the link to this article.
If you've perused my Baseball Content page much in the past, you'll know that I don't try to hide the fact that throwing a baseball is an incredibly unnatural and flat-out dangerous motion. It's the single-fastest motion in all of sports, and every day, physically unprepared athletes go out and essentially play with fire every single time they try to light up a radar gun - or even just play catch.
Not surprisingly, when you mix physically unprepared bodies with arguably the most dangerous sporting challenge on the planet (the folks in Pamplona, Spain might argue with me, but that's a blog for another day), athletes get hurt. Arm injuries (like all youth sports injuries) are rising exponentially thanks to not "less athletic athletes" taking part in high-risk sports, but also this participation taking place at all-time high rates thanks to the proliferation of little league all-star teams, AAU teams, fall ball, private pitching instruction, and the baseball showcase industry. A fantastic study by Olsen et al. in 2006 (must-read for anyone involved in baseball development) clearly demonstrated strong associations between injuries requiring surgery and pitching "more months per year, games per year, innings per game, pitches per game, pitches per year, and warm-up pitches before a game" as well as showcase appearances during adolescence. The message was very clear: throw too much - especially at a young age - and you're going to wind up hurt.
Unfortunately, though, many people glaze over numbers in studies (if they ever read them), and while they may walk away with the "overuse is bad" message, they don't appreciate what true overuse really is - especially since it's age-dependent. Fortunately, a February 2011 study from Fleisig et al. showed in no uncertain terms that, in ages 9-14, throwing more than 100 innings per year was associated with a 3.5 times higher risk of elbow or shoulder surgery - or retirement altogether.
To put this into context, I'll first ask you: do you realize how challenging it is to throw 100 innings in a little league season? Let’s say you start baseball the first week of April (little league) and even manage to play on a summer team that runs through the end of July. That’s a four month season: exactly what I was accustomed to growing up - at the absolute most.
If you look at the Major League Baseball leaders in innings pitched, those at the top of the list generally throw about 35 innings per month (4-5 starts each). In other words, high-performance, skeletally mature pitchers in the most elite baseball league in the world are on pace for roughly 140 innings pitched over the first four months of the year. However, there are parents and coaches out there that actually think it's okay to send an 11-year old out there for a comparable number of innings? It's especially troublesome when you realize that younger kids always throw more pitches per inning than their older counterparts, as they don't have good command and insist on trying to strike everyone out instead of pitching to contact here and there.
Just think about how hard that is to do. Major League pitchers throw on a five-day rotation, and Little league games are, at most, twice a week. If a kid pitches once a week for four months, even if he throws complete games every time out (not something I'd advise, for the record), he'd still struggle to hit 100 innings (16 starts x 7 inning games =112 innings). Rats! It's actually tough to overuse kids when the season is kept in check.
So, instead, they add seasons. Join an AAU team (or seven of them). Play fall ball so that you can rack up another seven innings every weekend. Be sure to hit up a few college camps on Saturdays and throw as hard as you can so that your Sunday outing in 25-degree weather is extra miserable. Make sure you see your pitching coach for bullpens as soon as fall ball ends. Get your registration in early for that showcase that's taking place the first week in January. Just do some band work and a couple of half-ass stretches and you'll be fine. Riiiight....good thinking.
At risk of sounding arrogant, I'm good at what I do. I've devoted my life to keeping baseball players healthy. They comprise 85% of our clientele at Cressey Performance, and I work with millions of dollars of arms every off-season and see players from ages 9 to 50+. I do my best to surround myself with the smartest people in strength and conditioning, rehabilitation, and skill-specific training in and outside of the game. I managed the first subpectoral biceps tenodesis in major league history. I can talk mechanics with the best pitching coaches around, write strength and conditioning and throwing programs, manually stretch guys, you name it. I've got two fantastic therapists in my office to do massage, ART, Graston, chiropractic adjustments, and a host of other manual therapy approaches - not to mention great physical therapists nearby who can handle all our complex cases. You know the only things I, we, or anybody on this planet can't control?
Poor judgment by athletes and their parents and coaches.
And that - no doubt about it - is the primary reason that kids get hurt. We can do all the strength training, mobility work, and soft tissue treatments in the world and it won't matter if they're overused - because I'm just not smart enough to have figured out how to go back in time and change history. Worried about whether they're throwing curveballs, or if their mechanics are perfect? It won't matter if they've already accumulated too many innings.
While athletes might be playing with fire each time they throw, the pain presentation pattern is different. You burn your hand, and you know instantly. Pitching injuries take time to come about. Maybe you do microscopic damage to your ulnar collateral ligament each time you throw - and then come back and pitch again before it's had time to fully regenerate. Or, maybe you ignore the shoulder internal rotation deficit and scapular dyskinesis you've got and it gets worse and worse for years - until you're finally on the surgeon's table for a labral and/or rotator cuff repair. These issues might be managed conservatively if painful during the teenage years (or go undetected if no pain is present) - but once a kid hits age 18 or 19, it seems to automatically become "socially acceptable" to do an elbow or shoulder surgery.
Of course, this isn't just applicable to coaches in the 9-14 age group. You see "criminal" pitch counts in the high school and collegiate ranks as well, and while they may be more physically mature than the 9-14 year-olds, that doesn't mean that they're exempt from the short- and long-term consequences.
This is why we need the best coaches at the youngest levels. It's also why we need pitching coaches that understand "managing pitchers" as much as - if not more than - teaching pitching mechanics. And, it's why coaches need to understand the big picture in terms of what different kids can do at different ages, at different times in the year.
It's also while parents need to be proactive with their young pitchers. If a coach isn't going to track his innings - and a 9-year-old kid certainly can't be expected to do so - the parent needs to step up and do so. I've met a lot of parents of kids who have been injured at ages 17-21, and most of them look back with a lot of anger toward coaches at younger levels for overusing their sons. Hindsight is always 20/20, but foresight is what saves an arm. Don't be afraid to step up and say something, as you aren't telling a coach how to do his job; you're protecting your kid, just as you would be locking the door at night or making sure he brushes his teeth.
In terms of planning the competitive year, I have no problem with a 9-14 year-old kid playing baseball 4-5 months of the year, as the other 7-8 months per year should be devoted to at least two other sports. It's basically the "rule of thirds" for long-term athletic development: three sports, four months apiece. Kids can strength-train year round.
At ages 15-16, I'm fine with kids changing things up and going to only two sports. Baseball might occupy 7-8 months, but a big chunk of that should be focused on preparation. So, a kid might start playing catch in November, start his high school season in March, and then play summer ball through the end of July. August through November would be devoted to a fall sport and fall ball would be altogether omitted, as it was the only idea worse than making Rocky V. Kids would, of course, strength-train year-round.
At ages 17 and up, it's fine with me if you want to specialize in baseball, but that doesn't mean you should play year-round. I actually advocate kids only throw for 8-9 months of the year (at most) - which is right on par with what most professional players do. The only thing that'd be different is that the season would be shifted up a bit in the year, as the high school season usually starts a few weeks before the professional season. Pro guys get half of October, then all November and December off from throwing. "Specialized" high school players get August, September, and October off (again, because fall ball is as useful as a trap door in a lifeboat). Strength training is year-round.
You'll notice that there isn't a single penny spent on off-season baseball showcases. That wasn't an accidental omission (read here why I don't like them). If you insist on going to one, pick one between June and early August.
I'm convinced that the next big thing in Major League Baseball's "scouting revolution" is meticulously analyzing what players did when they were younger. If they are going to draft kids, they want to know that they haven't been overworked for years prior to entering professional baseball. You're already seeing this taking place in collegiate baseball based more on an assumption: pitchers from the North are getting more and more opportunities to play down South because coaches recruit them (beyond just talent) under the assumption that they've accumulated less wear and tear on their arms.
This piece might have ruffled some feathers. Kids want to play year-round. Parents want to make kids happy - and they enjoy watching them play. You know what else? Kids love chocolate, and parents want to see kids happy - but that doesn't mean that kids should get a limitless amount of chocolate to consume, right? You put away the Easter candy this week to stress moderation and look out for their long-term well-being.
Coaches enjoy coaching and want to win - and they may take a commentary like this personally because they're the ones who sent a 9-year-old out for 120 innings one year - and now he's the one having the elbow surgery. Or, maybe it's the college coach who let a kid throw 160 pitches in a game and killed his draft status because teams know he'll have a shoulder surgery in three years. Admitting you're wrong is hard enough, but admitting you're wrong and learning from that mistake to help future kids is even harder - but all the more rewarding.
This post wasn't intended to make anyone feel bad, but bring to light an issue (throwing volume) that I think is the absolute most important consideration when taking care of arms. We can do everything right in terms of physical preparation, but if you throw too much - especially at vulnerable ages - none of it matters.
Again, if you could help spread the word on this, I'd really appreciate it. And, feel free to comment below; I'm here to help.
Sign-up Today for our FREE Baseball Newsletter and Receive a Copy of the Exact Stretches used by Cressey Performance Pitchers after they Throw!
To kick off the week, here's a quick rundown of things you might like to read (or watch):
The 5 Most Common Deadlift Mistakes - I published this blog at Men's Health last week, and thought I'd give you a heads-up on it. It's a good tag-along to the FREE video I provide HERE on how to deadlift (you can also subscribe in the opt-in box at the bottom of this blog to get access).
Does Hip Range of Motion Correlate to Low Back Pain? Maybe Not in Everyone - This is a good post from Mike Reinold that talks about how research on the topic can be tough, and that rotational sport athletes and sedentary folks need to be considered differently.
Anti-Rotation Sled Dragging - Here's an innovative core exercise from Jim "Smitty" Smith utilizing the sled for your strength and conditioning program.
Sign-up Today for our FREE Newsletter and receive a deadlift technique tutorial!